User login
The extended focused assessment with sonography for trauma (EFAST) examination provides rapid point-of-care (POC) evaluation of patients with thoracoabdominal trauma. This article offers essential clinical pearls to ensure an accurate and thorough examination, including tips on proper gain adjustment, correct probe fanning, shadow removal, visualization of the paracolic gutters, seeking the “spine sign” to determine effusion, and assessing effusion or consolidation of the lung.
Turning Down the Gain
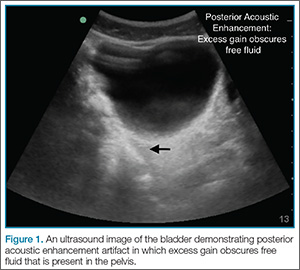
Too much gain (signal amplification) will wash out the ultrasound image, making it challenging to detect small quantities of free fluid. This is especially true in the pelvic windows. Sound waves travel easily through the fluid-filled bladder and a posterior acoustic enhancement artifact will make the far field of the image appear too bright, obscuring small quantities of fluid (Figure 1). To correct this issue without changing the gain of the entire image, the far-field gain can be adjusted on most ultrasound devices by using the time-gain compensation bar or a far field gain knob.
Fanning Is Key
With the probe placed at a single location on the skin, one can dramatically change the structures visualized by fanning (tilting the probe). The image visualized on the ultrasound screen represents only a single slice of the anatomy—one that is about the thickness of a credit card. A single image therefore can only show structures that are within that thin beam of the probe. Just as one would not make a clinical decision based on a single-slice computed tomography (CT) scan image, the same is true of ultrasound. By fanning the probe toward the anterior and posterior abdomen, the clinician will catch smaller quantities of free fluid within each quadrant. A good rule of thumb is to scan through the entire organ of interest from edge-to-edge (eg, the entire bladder when imaging the pelvic window; the entire kidney in the right upper quadrant (RUQ) window; the entire spleen in the left upper quadrant [LUQ]).
Get Rid of the Rib Shadows
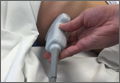
The RUQ and LUQ windows can be difficult to visualize when the view is obscured by rib shadows. To minimize/remove rib shadows, some clinicians prefer to use the phased array probe, which has a small footprint that fits easily in the intercostal space. Clinicians who prefer using the curvilinear probe should place the probe at an oblique angle (Figure 2); this probe will fit between the ribs and remove shadowing artifacts.
Remember the Paracolic
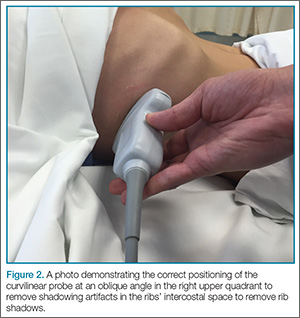
In some patients, the paracolic gutters are the most dependent portion of the abdomen and the first place where free fluid collects. When evaluating the RUQ, the clinician should first identify Morrison’s pouch, which is the interface between the liver and the kidney. After this pouch has been identified, the clinician should slide the probe toward the patient’s feet, paying close attention to the area around the inferior tip of the liver, and continue sliding the probe down to the inferior tip of the kidney, looking for fluid layering above the kidney or the psoas muscle (Figure 3). The same holds true for the LUQ technique. Once one has looked between the spleen and the diaphragm for free fluid, the probe should be moved down to the flank to evaluate the inferior tip of the spleen and the region anterior to the kidney.
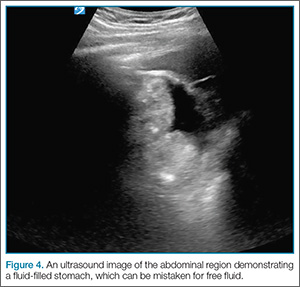
The Left Upper Quadrant—Do Not Let the Stomach Fake You Out
A fluid-filled stomach can be a fake-out for free fluid appearing black on ultrasound (Figure 4). Remember, free fluid in the LUQ window will typically appear between the spleen and the diaphragm or at either pole of the spleen, so the clinician should pay particular attention to these areas. When evaluating the LUQ, a good rule of thumb is to place one’s hand on the patient’s bed while holding the probe; this will ensure that the scan is sufficiently posterior. The probe may also need to be fanned toward the bed to identify the kidneys in the retroperitoneum.
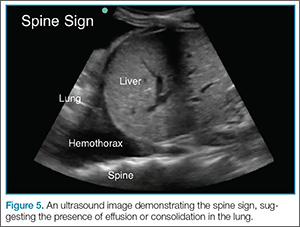
Look in the Chest and Remember the Spine Sign
Rapidly identifying a hemothorax can be a critical finding on the EFAST examination. Therefore, it is important to remember that air in the lungs scatters sound waves, so one does not normally visualize distinct structures that are deep to the pleural line. This is why the spine is not typically visible in the chest above the level of the diaphragm. When pathology is present, however, the sound waves are not blocked by air-filled lungs and one can see the “spine sign,” which suggests the presence of either effusion or consolidation of the lung (Figure 5).
Tough Cardiac Window? Try These Tips
A subxiphoid window is typically used to assess for pericardial effusion. To obtain this view, the clinician usually needs to increase the depth setting by a few centimeters (typically to around 18 cm). When the patient is able to do so, he or she may assist in the examination by bending his or her knees or taking a deep breath to help bring the heart into view. Despite these efforts, however, in some patients, it is technically impossible to obtain a subxiphoid view. In such cases, switching to an alternate view, such as the parasternal window, may be successful in visualizing the subxiphoid region.
Summary
Proper gain adjustment, thorough scanning of the thoracoabdominal region, and knowledge of common artifacts and signs are essential to ensuring an accurate and thorough POC EFAST examination.
The extended focused assessment with sonography for trauma (EFAST) examination provides rapid point-of-care (POC) evaluation of patients with thoracoabdominal trauma. This article offers essential clinical pearls to ensure an accurate and thorough examination, including tips on proper gain adjustment, correct probe fanning, shadow removal, visualization of the paracolic gutters, seeking the “spine sign” to determine effusion, and assessing effusion or consolidation of the lung.
Turning Down the Gain
Too much gain (signal amplification) will wash out the ultrasound image, making it challenging to detect small quantities of free fluid. This is especially true in the pelvic windows. Sound waves travel easily through the fluid-filled bladder and a posterior acoustic enhancement artifact will make the far field of the image appear too bright, obscuring small quantities of fluid (Figure 1). To correct this issue without changing the gain of the entire image, the far-field gain can be adjusted on most ultrasound devices by using the time-gain compensation bar or a far field gain knob.
Fanning Is Key
With the probe placed at a single location on the skin, one can dramatically change the structures visualized by fanning (tilting the probe). The image visualized on the ultrasound screen represents only a single slice of the anatomy—one that is about the thickness of a credit card. A single image therefore can only show structures that are within that thin beam of the probe. Just as one would not make a clinical decision based on a single-slice computed tomography (CT) scan image, the same is true of ultrasound. By fanning the probe toward the anterior and posterior abdomen, the clinician will catch smaller quantities of free fluid within each quadrant. A good rule of thumb is to scan through the entire organ of interest from edge-to-edge (eg, the entire bladder when imaging the pelvic window; the entire kidney in the right upper quadrant (RUQ) window; the entire spleen in the left upper quadrant [LUQ]).
Get Rid of the Rib Shadows
The RUQ and LUQ windows can be difficult to visualize when the view is obscured by rib shadows. To minimize/remove rib shadows, some clinicians prefer to use the phased array probe, which has a small footprint that fits easily in the intercostal space. Clinicians who prefer using the curvilinear probe should place the probe at an oblique angle (Figure 2); this probe will fit between the ribs and remove shadowing artifacts.
Remember the Paracolic
In some patients, the paracolic gutters are the most dependent portion of the abdomen and the first place where free fluid collects. When evaluating the RUQ, the clinician should first identify Morrison’s pouch, which is the interface between the liver and the kidney. After this pouch has been identified, the clinician should slide the probe toward the patient’s feet, paying close attention to the area around the inferior tip of the liver, and continue sliding the probe down to the inferior tip of the kidney, looking for fluid layering above the kidney or the psoas muscle (Figure 3). The same holds true for the LUQ technique. Once one has looked between the spleen and the diaphragm for free fluid, the probe should be moved down to the flank to evaluate the inferior tip of the spleen and the region anterior to the kidney.
The Left Upper Quadrant—Do Not Let the Stomach Fake You Out
A fluid-filled stomach can be a fake-out for free fluid appearing black on ultrasound (Figure 4). Remember, free fluid in the LUQ window will typically appear between the spleen and the diaphragm or at either pole of the spleen, so the clinician should pay particular attention to these areas. When evaluating the LUQ, a good rule of thumb is to place one’s hand on the patient’s bed while holding the probe; this will ensure that the scan is sufficiently posterior. The probe may also need to be fanned toward the bed to identify the kidneys in the retroperitoneum.
Look in the Chest and Remember the Spine Sign
Rapidly identifying a hemothorax can be a critical finding on the EFAST examination. Therefore, it is important to remember that air in the lungs scatters sound waves, so one does not normally visualize distinct structures that are deep to the pleural line. This is why the spine is not typically visible in the chest above the level of the diaphragm. When pathology is present, however, the sound waves are not blocked by air-filled lungs and one can see the “spine sign,” which suggests the presence of either effusion or consolidation of the lung (Figure 5).
Tough Cardiac Window? Try These Tips
A subxiphoid window is typically used to assess for pericardial effusion. To obtain this view, the clinician usually needs to increase the depth setting by a few centimeters (typically to around 18 cm). When the patient is able to do so, he or she may assist in the examination by bending his or her knees or taking a deep breath to help bring the heart into view. Despite these efforts, however, in some patients, it is technically impossible to obtain a subxiphoid view. In such cases, switching to an alternate view, such as the parasternal window, may be successful in visualizing the subxiphoid region.
Summary
Proper gain adjustment, thorough scanning of the thoracoabdominal region, and knowledge of common artifacts and signs are essential to ensuring an accurate and thorough POC EFAST examination.