User login
- Promontory dissection and creation of the retroperitoneal tunnel
- Dissection of the rectovaginal and vesicovaginal spaces
- Attachment of y-mesh to vagina: Start anteriorly
- Posterior y-mesh attachment
- Attachment of mesh to sacral promontory
These videos were provided by Catherine A. Matthews, MD.
Recent years have seen growing recognition that adequate support of the vaginal apex is an essential component of durable surgical repair of pelvic organ prolapse.1,2 Sacrocolpopexy is now considered the gold standard for repair of Level-1 defects of pelvic support, providing excellent long-term results.3-5
A recent randomized, controlled trial demonstrated the superior efficacy of laparoscopic sacrocolpopexy to a total vaginal mesh procedure in women who have vaginal vault prolapse—further evidence that sacrocolpopexy is the procedure of choice for these patients.6
The advantages of sacrocolpopexy include:
- reduced risk of mesh exposure, compared to insertion of vaginal mesh
- preservation of vaginal length
- reduced risk of re-operation for symptomatic recurrent prolapse
- reduced risk of de novo dyspareunia secondary to contraction of mesh.
Obstacles. Although a small number of surgeons are able to accomplish sacrocolpopexy using standard laparoscopic techniques, most of these procedures are still performed by laparotomy because the extensive suturing and knot-tying present a surgical challenge. Open sacrocolpopexy has disadvantages, too, including more pain, longer recovery, and longer length of stay.7-9
With the introduction of the da Vinci robot (Intuitive Surgical), the feasibility of having more surgeons perform this operation using a reproducible, minimally-invasive technique is much greater. The steep learning curve associated with standard laparoscopy in regard to mastering intracorporeal knot-tying and suturing is greatly diminished by articulating instruments. This makes robotic sacrocolpopexy an accessible option for all gynecologic surgeons who treat women with pelvic organ prolapse.
In this article, I detail the steps—with tips and tricks from my experience—to completing an efficient robotic-assisted sacrocolpopexy—modeled exactly after the open technique—that utilizes a y-shaped polypropylene mesh graft. Included is capsule advice from OBG Management’s coding consultant on obtaining reimbursement for robotic procedures (see “ Coding tips for robotic sacrocolpopexy”).
- Two proficient tableside assistants are needed
- Use steep Trendelenburg to remove the bowel from the operative field
- A fan retractor is necessary in some cases to gain access to the promontory
- Correct identification of the sacral promontory is key
- In the absence of haptic feedback, novice surgeons must be aware of the potential danger in dissecting too far laterally and entering the common iliac vessels
- Y-shaped grafts should be fashioned individually
- Know the exit point of the needle at the promontory
- Adequate spacing between the robotic arms is essential to avoiding interference among instruments during the procedure.
Details of the procedure
1. Surgical preparation, set-up
The patient completes a bowel prep using two bottles of magnesium citrate and taking only clear liquids 1 day before surgery. Although mechanical bowel cleansing has not been shown to decrease operative morbidity, manipulation and retraction of the sigmoid colon may be easier with the bowel empty.
Perioperative antibiotics are administered 30 minutes prior to the procedure. Heparin, 5,000 U, is injected subcutaneously for thromboprophylaxis as the patient is en route to the operating suite.
The patient is placed in the dorsal lithotomy position, buttocks extending one inch over the end of the operating table. The table should be covered with egg-crate foam to avoid having her slip down while in steep Trendelenburg position.
After the patient is prepped and draped, a Foley catheter is placed into the bladder. EEA sizers (Covidien) are inserted into the vagina and rectum.
Two experienced surgical assistants are necessary:
- One on the patient’s right side to assist with tissue retraction and introduction of suture material
- Another seated between the patient’s legs to provide adequate vaginal and rectal manipulation during surgery.
2. Port placement, docking, and instrumentation
Pneumoperitoneum is obtained with a Veress needle. Five trocars are then placed (FIGURE 1).
Careful port placement is integral to the success of this procedure because:
- Inadequate distance between robotic arms and the camera results in arm collisions and interference
- Visualization and access to the sacral promontory may be compromised if the camera is inserted too low on the anterior abdominal wall
- Bowel retraction may be compromised if the fourth arm of the robot isn’t at least 3 cm above the anterior superior iliac crest.
My experience evaluating the abdomen before trocar insertion is that at least 15 cm is required between the pubic bone and the umbilicus to rely on this landmark for locating the 12-mm camera port.10 If this distance is shorter (as it is in many obese women), insertion above the umbilicus is necessary.
An accessory 12-mm port, used to introduce sutures and the mesh graft, is placed approximately 10 cm lateral and 4 cm cephalad to the camera in the right-upper quadrant.
An 8-mm robotic port is placed in the right lower quadrant, 10 cm lateral to the accessory port and approximately 3 cm above the anterior superior iliac crest.
The third and fourth robotic arms are placed 10 cm apart in the left lower quadrant, with the fourth arm typically as far lateral as possible.
Docking. After the patient has been placed in steep Trendelenburg position and the table is locked, the robot is docked from the patient’s left side at a 45° angle to the table. Side-docking permits easy access to the vagina to 1) evaluate graft tension and 2) complete cystoscopy to ensure ureteral and bladder integrity.
TIP Take care to ensure that the spine of the robot is positioned right next to the bed at the level of the patient’s hip; driving it up too high in relation to the abdomen can compromise the mobility of the fourth arm. In addition, if the robot is not close enough to the bed, the reach of the first (right) arm may be limited.
Next, introduce monopolar scissors through the right arm; a bipolar PK Dissector (Intuitive Surgical) through the left arm; and an atraumatic bowel grasper, such as Cadiere Forceps (Intuitive Surgical), through the fourth arm.
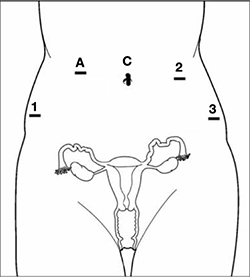
FIGURE 1 Placement of 5 ports for robotic sacrocolpopexy
Key: C, camera; A, accessory port; 1, right arm (monopolar shears); 2, left arm (PK Dissector); 3, fourth arm (Cadiere Forceps).
3. Dissect the sacral promontory and create a retroperitoneal tunnel
With the use of a 0° scope or 30° down-scope, retract the sigmoid colon laterally using Cadiere forceps and identify the right ureter.
TIP When you attempt robotic sacrocolpopexy for the first time, it may help to identify the sacral promontory, using a standard laparoscopic instrument with haptic feedback, before you dock the robot.
Elevate the peritoneum overlying the sacral promontory and open it using monopolar cautery. Expose the fat pad that overlays the anterior longitudinal ligament and gently dissect it away (FIGURE 2; VIDEO 1). Often, the middle sacral artery is visualized; it can be coagulated using the PK Dissector if necessary.
TIP In a case in which the promontory is difficult to find, dissecting the retrorectal space is a simple way to mobilize the bowel away from the sacrum, thus exposing the promontory.
TRICK Instead of opening the peritoneum from the sacrum to the cul-de-sac, I create a retroperitoneal tunnel along that right paracolic gutter, from the promontory to just medial to the right uterosacral ligament (VIDEO 1). Doing so has three benefits:
- It is quicker and less bloody
- It allows the mesh to lay flat in the hollow of the sacrum when you bring the sacral arm up to the promontory
- There is much less peritoneum to close over the mesh at the end of the procedure.
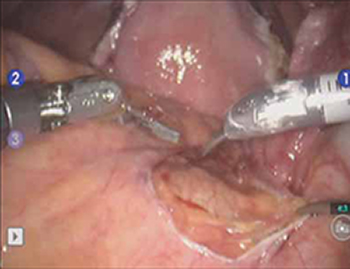
FIGURE 2 Entering the peritoneum
Open the peritoneum at the sacral promontory and dissect the fat pad. This reveals the anterior longitudinal ligament.
4. Dissect the vesicovaginal and rectovaginal spaces
Effective vaginal and rectal manipulation is critical to complete this part of the procedure safely. To gain access to the rectovaginal space, the vaginal assistant needs to push the vagina all the way in and up toward the anterior abdominal wall (the handle of the EEA sizer will be pushing hard up against the perineum) while simultaneously pushing the rectal probe downward (effectively scissoring the two apart).
From the exit point of the retroperitoneal tunnel that was created at the beginning of the case, then extend the peritoneal incision transversely in the shape of a “T” to expose the posterior vaginal wall (FIGURE 3, VIDEO 2). If indicated, dissect the rectovaginal space all the way down to the perineal body.
Deviate the vagina posteriorly to facilitate dissection of the bladder from the anterior vaginal wall. Use sharp dissection with scissors and short bursts of energy with monopolar cautery.
TIP If you encounter significant scarring between the bladder and vagina, retrograde-fill the bladder with 300 mL of saline mixed with methylene blue dye to identify the surgical plane.
Expose approximately 4 to 6 cm of anterior vaginal wall, depending on the degree of anterior vaginal wall prolapse. Try to leave the peritoneum intact at the apex of the vagina to reduce the chance that mesh will erode.
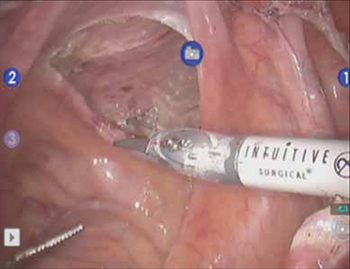
FIGURE 3 The peritoneal incision
Extend the peritoneal incision along the cul-de-sac to the posterior vaginal wall in a T-shaped configuration to gain access the rectovaginal space. When perorming cervicosacropexy, it is easiest to develop this surgical plane before amputating the cervix.
5. Attach the y-mesh to the vagina
Several mesh options exist: IntePro (American Medical Systems), Alyte (Bard Medical), and Restorelle Y (Mpathy Medical) are preformed Type-1 polypropylene mesh products. A correctly sized mesh can easily be fashioned by suturing together two strips of Gynemesh (Ethicon) that are approximately 3 cm wide.
Because there can be significant variability in the relative dimensions of the anterior and posterior segments of mesh, I recommend fashioning the graft after dissection is complete: When posterior wall prolapse is extensive, for example, preformed y-mesh strips may not be long enough to reach all the way down to the perineal body. After having assessed the differences in graft placement and manipulation when the two arms are sutured together 1) before the grafts are placed intracorporeally and 2) after they are placed, I’ve concluded that the first method—suturing before placement—is far easier.
Introduce the mesh graft through the accessory port after exchanging the scissors and PK dissector for a suture cutter and a large needle driver. Retract the bladder using the fourth arm, and place the anterior mesh arm over the anterior vaginal wall; suture it in place using 2-0 Gore-Tex sutures on CT-2 needles that are each cut to 6 inches long.
For greatest efficiency, anchor the two distal corners first (FIGURE 4; VIDEO 3), then place a series of interrupted stitches towards the vaginal apex. Tie the knots using 2 surgeon’s knots, followed by 2 half-hitches. Attempt to achieve healthy bites through the vaginal muscularis without perforating the epithelium.
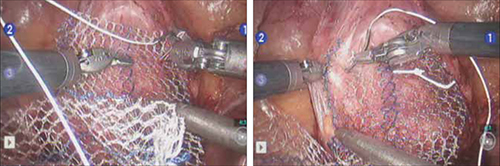
FIGURE 4 Suturing the mesh graft to the vaginal wall
Left and right: Suture the y-shaped polypropylene mesh graft to the anterior vaginal wall first, starting at the distal corners. The bladder is retracted cephalad using the fourth arm.After you’ve adequately secured the anterior mesh arm, deviate the vagina anteriorly and drape the posterior mesh arm over the posterior vaginal wall with the assistance of the fourth robotic arm that can hold upward traction on the sacral end of the mesh graft. Starting at the vaginal apex, place 6 to 8 interrupted sutures to secure the mesh to the posterior vaginal wall (FIGURE 5; VIDEO 4). If necessary, exchange the 0° scope for a 30° up-scope so that you can fully visualize the rectovaginal space.
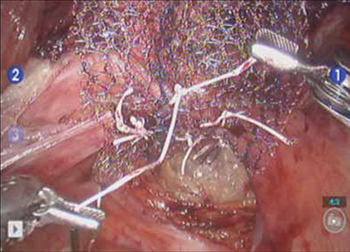
FIGURE 5 Attachment of the posterior arm of the mesh
The fourth arm of the robot provides upward traction on the sacral portion of the mesh graft.
6. Attach the graft to the sacrum
Again retract the sigmoid laterally to expose the promontory dissection. Retrieve the sacral arm of the mesh through the retroperitoneal tunnel and pull it up toward the promontory. Deviate the vagina toward the sacrum and, ensuring that there is no excessive tension, suture the sacral portion of the mesh graft to the anterior longitudinal ligament at the promontory, using 2 or 3 interrupted sutures (FIGURE 6, VIDEO 5).
When placing the needle during this critical juncture, it is important to rotate through the ligament along the curvature of the needle—as opposed to driving the needle forward and risking exiting farther laterally than expected.
TIP Because of the slight traction that exists on the mesh, a slip-knot is preferred instead of a surgeon’s knot when suturing the sacral portion of the mesh graft to the anterior longitudinal ligament. Take care to visualize the middle sacral artery and either suture around it or cauterize it.
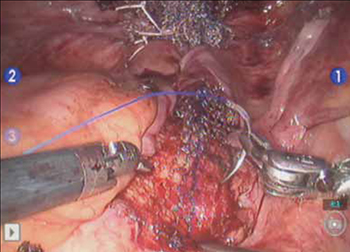
FIGURE 6 Suture the mesh directly to the anterior longitudinal ligament
Use two or three stitches, secured with slip-knots. Take care not to create excessive tension on the mesh graft.
7. Extraperitonealize the mesh
I no longer routinely close the peritoneum over the mesh at the vaginal apex because I have not had a single case of small-bowel obstruction since I began performing this procedure laparoscopically. You should close the peritoneal window at the promontory, however, if the mesh is tented up at all, because tenting creates the potential for bowel to get caught beneath the mesh. Perform this closure using 2-0 monofilament suture or 2-0 Vicryl suture (Ethicon) cut to 8 inches (FIGURE 7). It is always easiest to start distally and suture towards the camera and operative instruments.
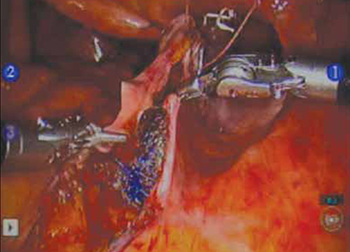
FIGURE 7 Extraperitonealize the mesh
Close the peritoneum from the apex of the vagina with a purse-string—like stitch, continuing it to the promontory in running fashion.
8. Ensure that mesh is not in the bladder or rectum
Perform cystoscopy and a rectal examination at the end of each case to confirm that no sutures or mesh material are within either viscus. It is much easier to remove these before leaving the operating room.
Modifying the procedure for uterovaginal prolapse
If the patient has an intact uterus and benign cervical cytology, perform supracervical hysterectomy before proceeding with Steps 1–8 above.
TIP Leaving the cervix in situ may reduce the chance of mesh erosion and provides an excellent platform for mesh attachment.
TRICK I find it most helpful to fully dissect the anterior and posterior vaginal walls before cervical amputation because upward traction on the corpus improves visualization of the surgical planes.
Once the cervix is amputated, however, effective vaginal manipulation can present a surgical challenge. Some surgeons use a tenaculum attached to the fourth arm of the robot to apply traction on the cervix, but this eliminates this arm from performing other necessary tasks. Malleable or Breisky-Navratil retractors can be used to delineate the anterior and posterior vaginal fornices, but are not always satisfactory—especially if an assistant isn’t seated between the legs.
TIP A useful and inexpensive instrument is the Colpo-Probe vaginal fornix delineator (Cooper Surgical) (FIGURE 8), which not only assists in dissecting the vagina from the bladder and rectum but also provides a stable surface during attachment of mesh.
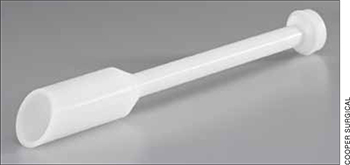
FIGURE 8 Colpo-Probe
This device delineates the anterior and posterior vaginal fornices. It provides a stable platform against which to suture the mesh graft.
Tips and tricks for managing hemorrhage during sacrocolpopexy
Four potential areas of bleeding danger exist:
- In trying to find the sacral promontory, you risk entering the right common iliac vein if dissection is too far cephalad and lateral.
TIP I strongly advise novice robotic surgeons to try to identify the site of the promontory with a standard laparoscopic instrument with haptic feedback before moving to the surgical console.
TRICK Another trick that can help with safe identification of the promontory is mobilization of the sigmoid colon away from the sacrum by developing the retrorectal space. - During dissection of the fat pad from the promontory, you can encounter the middle sacral artery.
TRICK Spreading carefully in a caudal–cephalad direction until the level of the ligament is reached, instead of spreading in a lateral dimension, can decrease the chances of lacerating of this vessel. - A dangerous plexus of veins traverses the hollow of the sacrum. If you are trying to affix mesh at the level of S2-3, therefore, you may encounter significant bleeding.
TIP Work above the level of S1 to avoid these veins completely. - In securing the mesh to the sacral promontory, you can puncture the left common iliac vein if you are not aware of the exit point of the needle and it traverses too far medially.
TIP If you encounter bleeding, introduce a RAY-TEC sponge (Johnson & Johnson) through the accessory port. Apply manual compression for at least 5 minutes. If bleeding persists, I recommend Floseal Hemostatic Matrix (Baxter) to control hemorrhage that arises from arterial and venous sources.
TRICK As last resort, perform emergency undocking in rapid fashion while the bedside assistant maintains pressure through the accessory port.
Conclusion
The da Vinci robotic surgical system facilitates completion of sacrocolpopexy and cervicosacropexy, in a manner identical to the open technique, by surgeons who may not possess advanced laparoscopic skills. Full knowledge of the relevant anatomy is critical; there is the potential for significant morbidity during the procedure if surgical planes are created incorrectly.
Robotic surgery in on the rise, but coding for robotic procedures is still limited to the basic, conventional procedure. Why? Because insurers reimburse the hospital for use of the equipment but still refuse to reimburse the surgeon any additional amount for incorporating the robot into the surgical technique.
Coding for your work when performing robotic sacrocolpopexy is straightforward: Report laparoscopic code 57425 (laparoscopy, surgical, colpopexy [suspension of vaginal apex]) for the procedure. Mesh that might be used as part of the repair is not reported separately.
Blue Cross/Blue Shield (BC/BS) added the Healthcare Common Procedure Coding System Level-II code S2900 (surgical techniques requiring use of robotic surgical system) to the national code set a few years ago. Although BC/BS and some other payers accept this code on the claim, there is no reimbursement attached: It was developed for informational purposes only.
Remember, however, that coding is complete only when you have an appropriate linking diagnosis to establish the medical necessity of laparoscopic sacrocolpopexy. Diagnostic coding options for this surgical procedure include documentation of uterovaginal prolapse (incomplete prolapse is 618.2; complete prolapse is 618.3); vaginal vault prolapse after hysterectomy (618.5); and uterine prolapse without vaginal wall prolapse (618.1).
—MELANIE WITT, RN, CPC, COBGC, MA
We want to hear from you! Tell us what you think.
1. Summers A, Winkel LA, Hussain HK, DeLancey JO. The relationship between anterior and apical compartment support. Am J Obstet Gynecol. 2006;194(5):1438-1443.
2. Maher C, Baessler K, Glazener CM, Adams EJ, Hagen S. Surgical management of pelvic organ prolapse in women. Cochrane Database Syst Rev. 2007;(3):CD004014.-
3. Sullivan ES, Longaker CJ, Lee PY. Total pelvic mesh repair: a ten-year experience. Dis Colon Rectum. 2001;44(6):857-863.
4. Culligan PJ, Murphy M, Blackwell L, Hammons G, Graham C, Heit MH. Long-term success of abdominal sacral colpopexy using synthetic mesh. Am J Obstet Gynecol. 2002;187(6):1473-1482.
5. Nygaard IE, McCreery R, Brubaker L, et al. Pelvic Floor Disorders Network. Abdominal sacrocolpopexy: a comprehensive review. Obstet Gynecol. 2004;104(4):805-823.
6. Maher CF, Feiner B, DeCuyper EM, Nichlos CJ, Hickey KV, O’Rourke P. Laparoscopic sacral colpopexy versus total vaginal mesh for vaginal vault prolapse: a randomized trial. Am J Obstet Gynecol. 2011;204(4):360.e1-7.
7. Nezhat CH, Nezhat F, Nezhat C. Laparoscopic sacral colpopexy for vaginal vault prolapse. Obstet Gynecol. 1994;84(5):885-888.
8. Ross JW. Techniques of laparoscopic repair of total vault eversion after hysterectomy. J Am Assoc Gynecol Laparosc. 1997;4(2):173-183.
9. Cosson M, Rajabally R, Bogaert E, Querleu D, Crepin G. Laparoscopic sacrocolpopexy hysterectomy, and burch colposuspension: feasibility and short-term complications of 77 procedures. JSLS. 2002;6(2):115-119.
10. Matthews CA, Schubert CM, Woodward AP, Gill EJ. Variance in abdominal wall anatomy and port placement in women undergoing robotic gynecologic surgery. J Minim Invasive Gynecol. 2010;17(5):583-586.

Catherine A. Matthews, MD
Dr. Matthews is Associate Professor and Director, Division of Urogynecology and Reconstructive Pelvic Surgery, Department of Obstetrics and Gynecology, University of North Carolina School of Medicine, Chapel Hill, NC. She is a member of the editorial board of the International Academy of Pelvic Surgery (IAPS).
Dr. Matthews reports that she is a proctor for Intuitive Surgical.
- Promontory dissection and creation of the retroperitoneal tunnel
- Dissection of the rectovaginal and vesicovaginal spaces
- Attachment of y-mesh to vagina: Start anteriorly
- Posterior y-mesh attachment
- Attachment of mesh to sacral promontory
These videos were provided by Catherine A. Matthews, MD.
Recent years have seen growing recognition that adequate support of the vaginal apex is an essential component of durable surgical repair of pelvic organ prolapse.1,2 Sacrocolpopexy is now considered the gold standard for repair of Level-1 defects of pelvic support, providing excellent long-term results.3-5
A recent randomized, controlled trial demonstrated the superior efficacy of laparoscopic sacrocolpopexy to a total vaginal mesh procedure in women who have vaginal vault prolapse—further evidence that sacrocolpopexy is the procedure of choice for these patients.6
The advantages of sacrocolpopexy include:
- reduced risk of mesh exposure, compared to insertion of vaginal mesh
- preservation of vaginal length
- reduced risk of re-operation for symptomatic recurrent prolapse
- reduced risk of de novo dyspareunia secondary to contraction of mesh.
Obstacles. Although a small number of surgeons are able to accomplish sacrocolpopexy using standard laparoscopic techniques, most of these procedures are still performed by laparotomy because the extensive suturing and knot-tying present a surgical challenge. Open sacrocolpopexy has disadvantages, too, including more pain, longer recovery, and longer length of stay.7-9
With the introduction of the da Vinci robot (Intuitive Surgical), the feasibility of having more surgeons perform this operation using a reproducible, minimally-invasive technique is much greater. The steep learning curve associated with standard laparoscopy in regard to mastering intracorporeal knot-tying and suturing is greatly diminished by articulating instruments. This makes robotic sacrocolpopexy an accessible option for all gynecologic surgeons who treat women with pelvic organ prolapse.
In this article, I detail the steps—with tips and tricks from my experience—to completing an efficient robotic-assisted sacrocolpopexy—modeled exactly after the open technique—that utilizes a y-shaped polypropylene mesh graft. Included is capsule advice from OBG Management’s coding consultant on obtaining reimbursement for robotic procedures (see “ Coding tips for robotic sacrocolpopexy”).
- Two proficient tableside assistants are needed
- Use steep Trendelenburg to remove the bowel from the operative field
- A fan retractor is necessary in some cases to gain access to the promontory
- Correct identification of the sacral promontory is key
- In the absence of haptic feedback, novice surgeons must be aware of the potential danger in dissecting too far laterally and entering the common iliac vessels
- Y-shaped grafts should be fashioned individually
- Know the exit point of the needle at the promontory
- Adequate spacing between the robotic arms is essential to avoiding interference among instruments during the procedure.
Details of the procedure
1. Surgical preparation, set-up
The patient completes a bowel prep using two bottles of magnesium citrate and taking only clear liquids 1 day before surgery. Although mechanical bowel cleansing has not been shown to decrease operative morbidity, manipulation and retraction of the sigmoid colon may be easier with the bowel empty.
Perioperative antibiotics are administered 30 minutes prior to the procedure. Heparin, 5,000 U, is injected subcutaneously for thromboprophylaxis as the patient is en route to the operating suite.
The patient is placed in the dorsal lithotomy position, buttocks extending one inch over the end of the operating table. The table should be covered with egg-crate foam to avoid having her slip down while in steep Trendelenburg position.
After the patient is prepped and draped, a Foley catheter is placed into the bladder. EEA sizers (Covidien) are inserted into the vagina and rectum.
Two experienced surgical assistants are necessary:
- One on the patient’s right side to assist with tissue retraction and introduction of suture material
- Another seated between the patient’s legs to provide adequate vaginal and rectal manipulation during surgery.
2. Port placement, docking, and instrumentation
Pneumoperitoneum is obtained with a Veress needle. Five trocars are then placed (FIGURE 1).
Careful port placement is integral to the success of this procedure because:
- Inadequate distance between robotic arms and the camera results in arm collisions and interference
- Visualization and access to the sacral promontory may be compromised if the camera is inserted too low on the anterior abdominal wall
- Bowel retraction may be compromised if the fourth arm of the robot isn’t at least 3 cm above the anterior superior iliac crest.
My experience evaluating the abdomen before trocar insertion is that at least 15 cm is required between the pubic bone and the umbilicus to rely on this landmark for locating the 12-mm camera port.10 If this distance is shorter (as it is in many obese women), insertion above the umbilicus is necessary.
An accessory 12-mm port, used to introduce sutures and the mesh graft, is placed approximately 10 cm lateral and 4 cm cephalad to the camera in the right-upper quadrant.
An 8-mm robotic port is placed in the right lower quadrant, 10 cm lateral to the accessory port and approximately 3 cm above the anterior superior iliac crest.
The third and fourth robotic arms are placed 10 cm apart in the left lower quadrant, with the fourth arm typically as far lateral as possible.
Docking. After the patient has been placed in steep Trendelenburg position and the table is locked, the robot is docked from the patient’s left side at a 45° angle to the table. Side-docking permits easy access to the vagina to 1) evaluate graft tension and 2) complete cystoscopy to ensure ureteral and bladder integrity.
TIP Take care to ensure that the spine of the robot is positioned right next to the bed at the level of the patient’s hip; driving it up too high in relation to the abdomen can compromise the mobility of the fourth arm. In addition, if the robot is not close enough to the bed, the reach of the first (right) arm may be limited.
Next, introduce monopolar scissors through the right arm; a bipolar PK Dissector (Intuitive Surgical) through the left arm; and an atraumatic bowel grasper, such as Cadiere Forceps (Intuitive Surgical), through the fourth arm.
FIGURE 1 Placement of 5 ports for robotic sacrocolpopexy
Key: C, camera; A, accessory port; 1, right arm (monopolar shears); 2, left arm (PK Dissector); 3, fourth arm (Cadiere Forceps).
3. Dissect the sacral promontory and create a retroperitoneal tunnel
With the use of a 0° scope or 30° down-scope, retract the sigmoid colon laterally using Cadiere forceps and identify the right ureter.
TIP When you attempt robotic sacrocolpopexy for the first time, it may help to identify the sacral promontory, using a standard laparoscopic instrument with haptic feedback, before you dock the robot.
Elevate the peritoneum overlying the sacral promontory and open it using monopolar cautery. Expose the fat pad that overlays the anterior longitudinal ligament and gently dissect it away (FIGURE 2; VIDEO 1). Often, the middle sacral artery is visualized; it can be coagulated using the PK Dissector if necessary.
TIP In a case in which the promontory is difficult to find, dissecting the retrorectal space is a simple way to mobilize the bowel away from the sacrum, thus exposing the promontory.
TRICK Instead of opening the peritoneum from the sacrum to the cul-de-sac, I create a retroperitoneal tunnel along that right paracolic gutter, from the promontory to just medial to the right uterosacral ligament (VIDEO 1). Doing so has three benefits:
- It is quicker and less bloody
- It allows the mesh to lay flat in the hollow of the sacrum when you bring the sacral arm up to the promontory
- There is much less peritoneum to close over the mesh at the end of the procedure.
FIGURE 2 Entering the peritoneum
Open the peritoneum at the sacral promontory and dissect the fat pad. This reveals the anterior longitudinal ligament.
4. Dissect the vesicovaginal and rectovaginal spaces
Effective vaginal and rectal manipulation is critical to complete this part of the procedure safely. To gain access to the rectovaginal space, the vaginal assistant needs to push the vagina all the way in and up toward the anterior abdominal wall (the handle of the EEA sizer will be pushing hard up against the perineum) while simultaneously pushing the rectal probe downward (effectively scissoring the two apart).
From the exit point of the retroperitoneal tunnel that was created at the beginning of the case, then extend the peritoneal incision transversely in the shape of a “T” to expose the posterior vaginal wall (FIGURE 3, VIDEO 2). If indicated, dissect the rectovaginal space all the way down to the perineal body.
Deviate the vagina posteriorly to facilitate dissection of the bladder from the anterior vaginal wall. Use sharp dissection with scissors and short bursts of energy with monopolar cautery.
TIP If you encounter significant scarring between the bladder and vagina, retrograde-fill the bladder with 300 mL of saline mixed with methylene blue dye to identify the surgical plane.
Expose approximately 4 to 6 cm of anterior vaginal wall, depending on the degree of anterior vaginal wall prolapse. Try to leave the peritoneum intact at the apex of the vagina to reduce the chance that mesh will erode.
FIGURE 3 The peritoneal incision
Extend the peritoneal incision along the cul-de-sac to the posterior vaginal wall in a T-shaped configuration to gain access the rectovaginal space. When perorming cervicosacropexy, it is easiest to develop this surgical plane before amputating the cervix.
5. Attach the y-mesh to the vagina
Several mesh options exist: IntePro (American Medical Systems), Alyte (Bard Medical), and Restorelle Y (Mpathy Medical) are preformed Type-1 polypropylene mesh products. A correctly sized mesh can easily be fashioned by suturing together two strips of Gynemesh (Ethicon) that are approximately 3 cm wide.
Because there can be significant variability in the relative dimensions of the anterior and posterior segments of mesh, I recommend fashioning the graft after dissection is complete: When posterior wall prolapse is extensive, for example, preformed y-mesh strips may not be long enough to reach all the way down to the perineal body. After having assessed the differences in graft placement and manipulation when the two arms are sutured together 1) before the grafts are placed intracorporeally and 2) after they are placed, I’ve concluded that the first method—suturing before placement—is far easier.
Introduce the mesh graft through the accessory port after exchanging the scissors and PK dissector for a suture cutter and a large needle driver. Retract the bladder using the fourth arm, and place the anterior mesh arm over the anterior vaginal wall; suture it in place using 2-0 Gore-Tex sutures on CT-2 needles that are each cut to 6 inches long.
For greatest efficiency, anchor the two distal corners first (FIGURE 4; VIDEO 3), then place a series of interrupted stitches towards the vaginal apex. Tie the knots using 2 surgeon’s knots, followed by 2 half-hitches. Attempt to achieve healthy bites through the vaginal muscularis without perforating the epithelium.
FIGURE 4 Suturing the mesh graft to the vaginal wall
Left and right: Suture the y-shaped polypropylene mesh graft to the anterior vaginal wall first, starting at the distal corners. The bladder is retracted cephalad using the fourth arm.After you’ve adequately secured the anterior mesh arm, deviate the vagina anteriorly and drape the posterior mesh arm over the posterior vaginal wall with the assistance of the fourth robotic arm that can hold upward traction on the sacral end of the mesh graft. Starting at the vaginal apex, place 6 to 8 interrupted sutures to secure the mesh to the posterior vaginal wall (FIGURE 5; VIDEO 4). If necessary, exchange the 0° scope for a 30° up-scope so that you can fully visualize the rectovaginal space.
FIGURE 5 Attachment of the posterior arm of the mesh
The fourth arm of the robot provides upward traction on the sacral portion of the mesh graft.
6. Attach the graft to the sacrum
Again retract the sigmoid laterally to expose the promontory dissection. Retrieve the sacral arm of the mesh through the retroperitoneal tunnel and pull it up toward the promontory. Deviate the vagina toward the sacrum and, ensuring that there is no excessive tension, suture the sacral portion of the mesh graft to the anterior longitudinal ligament at the promontory, using 2 or 3 interrupted sutures (FIGURE 6, VIDEO 5).
When placing the needle during this critical juncture, it is important to rotate through the ligament along the curvature of the needle—as opposed to driving the needle forward and risking exiting farther laterally than expected.
TIP Because of the slight traction that exists on the mesh, a slip-knot is preferred instead of a surgeon’s knot when suturing the sacral portion of the mesh graft to the anterior longitudinal ligament. Take care to visualize the middle sacral artery and either suture around it or cauterize it.
FIGURE 6 Suture the mesh directly to the anterior longitudinal ligament
Use two or three stitches, secured with slip-knots. Take care not to create excessive tension on the mesh graft.
7. Extraperitonealize the mesh
I no longer routinely close the peritoneum over the mesh at the vaginal apex because I have not had a single case of small-bowel obstruction since I began performing this procedure laparoscopically. You should close the peritoneal window at the promontory, however, if the mesh is tented up at all, because tenting creates the potential for bowel to get caught beneath the mesh. Perform this closure using 2-0 monofilament suture or 2-0 Vicryl suture (Ethicon) cut to 8 inches (FIGURE 7). It is always easiest to start distally and suture towards the camera and operative instruments.
FIGURE 7 Extraperitonealize the mesh
Close the peritoneum from the apex of the vagina with a purse-string—like stitch, continuing it to the promontory in running fashion.
8. Ensure that mesh is not in the bladder or rectum
Perform cystoscopy and a rectal examination at the end of each case to confirm that no sutures or mesh material are within either viscus. It is much easier to remove these before leaving the operating room.
Modifying the procedure for uterovaginal prolapse
If the patient has an intact uterus and benign cervical cytology, perform supracervical hysterectomy before proceeding with Steps 1–8 above.
TIP Leaving the cervix in situ may reduce the chance of mesh erosion and provides an excellent platform for mesh attachment.
TRICK I find it most helpful to fully dissect the anterior and posterior vaginal walls before cervical amputation because upward traction on the corpus improves visualization of the surgical planes.
Once the cervix is amputated, however, effective vaginal manipulation can present a surgical challenge. Some surgeons use a tenaculum attached to the fourth arm of the robot to apply traction on the cervix, but this eliminates this arm from performing other necessary tasks. Malleable or Breisky-Navratil retractors can be used to delineate the anterior and posterior vaginal fornices, but are not always satisfactory—especially if an assistant isn’t seated between the legs.
TIP A useful and inexpensive instrument is the Colpo-Probe vaginal fornix delineator (Cooper Surgical) (FIGURE 8), which not only assists in dissecting the vagina from the bladder and rectum but also provides a stable surface during attachment of mesh.
FIGURE 8 Colpo-Probe
This device delineates the anterior and posterior vaginal fornices. It provides a stable platform against which to suture the mesh graft.
Tips and tricks for managing hemorrhage during sacrocolpopexy
Four potential areas of bleeding danger exist:
- In trying to find the sacral promontory, you risk entering the right common iliac vein if dissection is too far cephalad and lateral.
TIP I strongly advise novice robotic surgeons to try to identify the site of the promontory with a standard laparoscopic instrument with haptic feedback before moving to the surgical console.
TRICK Another trick that can help with safe identification of the promontory is mobilization of the sigmoid colon away from the sacrum by developing the retrorectal space. - During dissection of the fat pad from the promontory, you can encounter the middle sacral artery.
TRICK Spreading carefully in a caudal–cephalad direction until the level of the ligament is reached, instead of spreading in a lateral dimension, can decrease the chances of lacerating of this vessel. - A dangerous plexus of veins traverses the hollow of the sacrum. If you are trying to affix mesh at the level of S2-3, therefore, you may encounter significant bleeding.
TIP Work above the level of S1 to avoid these veins completely. - In securing the mesh to the sacral promontory, you can puncture the left common iliac vein if you are not aware of the exit point of the needle and it traverses too far medially.
TIP If you encounter bleeding, introduce a RAY-TEC sponge (Johnson & Johnson) through the accessory port. Apply manual compression for at least 5 minutes. If bleeding persists, I recommend Floseal Hemostatic Matrix (Baxter) to control hemorrhage that arises from arterial and venous sources.
TRICK As last resort, perform emergency undocking in rapid fashion while the bedside assistant maintains pressure through the accessory port.
Conclusion
The da Vinci robotic surgical system facilitates completion of sacrocolpopexy and cervicosacropexy, in a manner identical to the open technique, by surgeons who may not possess advanced laparoscopic skills. Full knowledge of the relevant anatomy is critical; there is the potential for significant morbidity during the procedure if surgical planes are created incorrectly.
Robotic surgery in on the rise, but coding for robotic procedures is still limited to the basic, conventional procedure. Why? Because insurers reimburse the hospital for use of the equipment but still refuse to reimburse the surgeon any additional amount for incorporating the robot into the surgical technique.
Coding for your work when performing robotic sacrocolpopexy is straightforward: Report laparoscopic code 57425 (laparoscopy, surgical, colpopexy [suspension of vaginal apex]) for the procedure. Mesh that might be used as part of the repair is not reported separately.
Blue Cross/Blue Shield (BC/BS) added the Healthcare Common Procedure Coding System Level-II code S2900 (surgical techniques requiring use of robotic surgical system) to the national code set a few years ago. Although BC/BS and some other payers accept this code on the claim, there is no reimbursement attached: It was developed for informational purposes only.
Remember, however, that coding is complete only when you have an appropriate linking diagnosis to establish the medical necessity of laparoscopic sacrocolpopexy. Diagnostic coding options for this surgical procedure include documentation of uterovaginal prolapse (incomplete prolapse is 618.2; complete prolapse is 618.3); vaginal vault prolapse after hysterectomy (618.5); and uterine prolapse without vaginal wall prolapse (618.1).
—MELANIE WITT, RN, CPC, COBGC, MA
We want to hear from you! Tell us what you think.
1. Summers A, Winkel LA, Hussain HK, DeLancey JO. The relationship between anterior and apical compartment support. Am J Obstet Gynecol. 2006;194(5):1438-1443.
2. Maher C, Baessler K, Glazener CM, Adams EJ, Hagen S. Surgical management of pelvic organ prolapse in women. Cochrane Database Syst Rev. 2007;(3):CD004014.-
3. Sullivan ES, Longaker CJ, Lee PY. Total pelvic mesh repair: a ten-year experience. Dis Colon Rectum. 2001;44(6):857-863.
4. Culligan PJ, Murphy M, Blackwell L, Hammons G, Graham C, Heit MH. Long-term success of abdominal sacral colpopexy using synthetic mesh. Am J Obstet Gynecol. 2002;187(6):1473-1482.
5. Nygaard IE, McCreery R, Brubaker L, et al. Pelvic Floor Disorders Network. Abdominal sacrocolpopexy: a comprehensive review. Obstet Gynecol. 2004;104(4):805-823.
6. Maher CF, Feiner B, DeCuyper EM, Nichlos CJ, Hickey KV, O’Rourke P. Laparoscopic sacral colpopexy versus total vaginal mesh for vaginal vault prolapse: a randomized trial. Am J Obstet Gynecol. 2011;204(4):360.e1-7.
7. Nezhat CH, Nezhat F, Nezhat C. Laparoscopic sacral colpopexy for vaginal vault prolapse. Obstet Gynecol. 1994;84(5):885-888.
8. Ross JW. Techniques of laparoscopic repair of total vault eversion after hysterectomy. J Am Assoc Gynecol Laparosc. 1997;4(2):173-183.
9. Cosson M, Rajabally R, Bogaert E, Querleu D, Crepin G. Laparoscopic sacrocolpopexy hysterectomy, and burch colposuspension: feasibility and short-term complications of 77 procedures. JSLS. 2002;6(2):115-119.
10. Matthews CA, Schubert CM, Woodward AP, Gill EJ. Variance in abdominal wall anatomy and port placement in women undergoing robotic gynecologic surgery. J Minim Invasive Gynecol. 2010;17(5):583-586.