User login
Does vaginal progesterone reduce preterm delivery among asymptomatic women who have a short cervix in the midtrimester?
John T. Repke, MD (Examining the Evidence, April 2012)
Update on obstetrics
John T. Repke, MD, and Jaimey M. Pauli, MD (January 2012)
Placement of a suture around an incompetent cervix to prevent premature pregnancy loss was first described more than 50 years ago1,2—but the few randomized studies that have been published (all of them in the past decade) devote very little attention to technique.3-7
Are we to assume, then, that over more than 50 years, no modifications to technique have been devised?
Are we to assume as well that in the two largest randomized studies to date, which involved 266 cerclages inserted in 27 different medical centers over more than 4 years,5,7 all cerclages were inserted in an identical manner using the same technique originated more than half a century ago?
In this article, we lay out five principles to achieve effective cerclage and describe a stepwise approach to technique. This technique is based on our experience with approximately 2,000 cerclages performed in a single medical center. We emphasize anatomic landmarks and surgical principles that are based on the published literature as well as our personal experience.
Five principles of effective cerclage
Place the cerclage as high as possible
In the original paper on cerclage, McDonald emphasized the need to place the suture as high as possible to be as close as possible to the level of the internal cervical os.2
Zilianti and colleagues elegantly described how—in the absence of cerclage—cervical tissue begins to change at the level of the internal os, forming a funnel that advances downward in the shape of the letters “Y,” “V,” and “U.”8 If we accept this notion, then the only way to prevent further shortening from the top down is by placing a high cerclage.
Studies have demonstrated improved pregnancy outcomes after placement of a high cervico-isthmic cerclage following failure of a “conventional” low cerclage.9,10
Place the cerclage adjacent to the cervical stroma
Macroscopic and microscopic visualization of the cervix reveals the following main layers:
- epithelium/mucosa, which covers the deeper connective tissue known as cervical stroma
- cervical stroma, which may be divided into two zones: 1) a superficial, subepithelial zone that appears histologically as loose stromal bands and 2) a deeper, dense collagen layer.
It is the dense collagen layer of the cervical stroma that affords most of the resistance to forces of deformation, whereas the loose stromal layer and the epithelium above it slide easily over the deeper stroma. Including too great a proportion of these “slippery” components within the cerclage could increase the risk of displacement and failure.11,12
Shirodkar was the first to suggest that the mucosa and submucosa be excluded from cerclage,1 and a detailed submucosal cerclage insertion was described by Fahmy more than 30 years ago.13 We support his recommendation that cerclage placement be as close to the inner cervical stroma as possible and that it include as little as possible of the surrounding tissue.
Take three encircling cervical “bites”
In his original publication, McDonald described “five or six bites with the needle” to encircle the cervix.2 Later authors usually described four encircling steps, but no reliable study has challenged the original dogma.
Although we lack science to favor one approach over another, common sense suggests that three bites (versus four or five) offer the following advantages. They:
- produce less penetrating injury
- require less manipulation of the cervix
- are simpler and quicker to perform
- offer less opportunity for the cerclage tape to get twisted (a flat tape provides for better distribution of the load)
- permit a small gap between the two final exit points of the tape (at 5 o’clock and 7 o’clock), which allows for easier cinching and tightening of the cerclage (FIGURE 1).
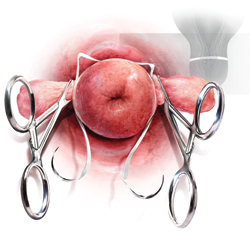
FIGURE 1 A small gap between the ends of the cerclage tape, which exit at 5 o’clock and 7 o’clock, allows for easier cinching and tightening.
Both Shirodkar1 and McDonald2 described placement of the knot (or approximation of the “ends”) at 12 o’clock, anteriorly. However, this approach can complicate removal if strong pressure is applied to the cerclage or if it is covered by tissue. Attempts to remove the cerclage can result in bladder injury.
For these reasons, we prefer the approach described by Caspi and colleagues, who placed the knot in the back of the cervix at 6 o’clock.14 In that location, the surgeon can reach as high as desired, and there is no risk of organ injury during removal.
That said, it should be noted that removal of a cerclage with a knot at 6 o’clock is more difficult than removal of one with a knot at 12 o’clock—but the convenience of the operator should be secondary to safety and efficacy of the cerclage.
Place a figure of 8 around the cerclage knot
Because of the proximity of the bladder anteriorly, there is a limit to how high one can place the cerclage anteriorly. However, in the back of the cervix, one can place the cerclage much higher without risk of injury. This approach sometimes will result in downward forces on the posterior part (where the knot is) and occasionally may cover the knot with tissue from the posterior vaginal fornix.
For these reasons, we propose securing the knot of the cerclage tape to the posterior surface of the cervical “core” by placing a figure of 8 using bright blue Prolene #1 (Ethicon) to prevent slippage and help call attention to the knot when the time for removal comes.
1. Use a weighted speculum to retract the posterior-inferior vaginal wall. Have an assistant hold one or two right-angle retractors to retract the other aspects of the vaginal wall, including the bladder anteriorly, as needed.
2. Clamp the anterior and posterior lips of the cervix and tug them lightly—at all times—in an outward direction (FIGURE 2).
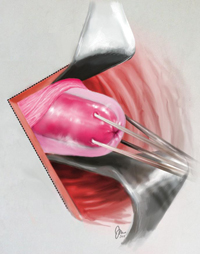
FIGURE 2 Clamping of the cervix
Clamp the anterior and posterior lips of the cervix and tug them lightly and steadily in an outward direction.
3. Retract and release the bladder several times using a right-angle retractor for more accurate identification of the cervico-vesical fold (FIGURE 3 and FIGURE 4). Note the distance from the external os to the cervico-vesical fold; it should be 2 cm or farther. (If it is less than 2 cm, another type of cerclage may be preferable.)
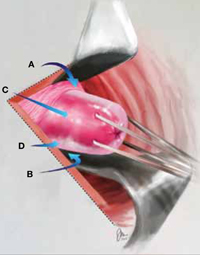
FIGURE 3 Anatomic landmarks
Cerclage is facilitated by orientation to the following landmarks; A. cervico-vesical fold; B. posterior fornix; C. cervical stroma; D. cervical mucosa.
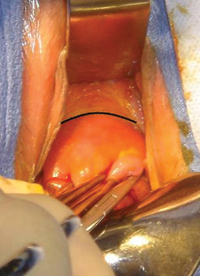
FIGURE 4 Cervico-vesical fold
The black line indicates the location of the fold.
4. Identify the roof of the posterior fornix (FIGURE 3 and FIGURE 5).
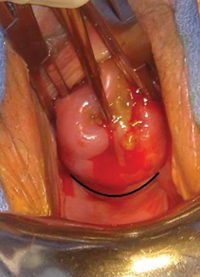
FIGURE 5 Roof of the posterior fornix
This landmark is delineated in black.
5. Using Allis clamps bilaterally, clamp the soft tissue covering the cervical core (stroma), between the cervico-vesical junction anteriorly and the superior point of the posterior fornix posteriorly. This is a cardinal step because it separates the core from the mucosal/ submucosal elements (FIGURE 6). (Helpful hint: To achieve optimal placement of the lateral Allis clamps, place the open clamp ever so slightly to one side of the middle of the cervix. As you close the instrument, let the clamp slide off the cervical core until it is locked adjacent to it. This takes the soft tissue and supporting blood vessels out of the operative field.)
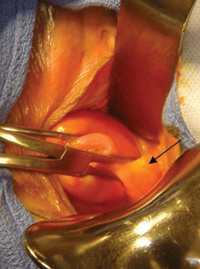
FIGURE 6 Anterolateral view
The pericervical mucosa (black arrow) after application of an Allis clamp.
6. Take three bites, 1 mm in depth, through the cervical core using a 5-mm Mersilene tape and a blunt-tipped needle (RS21; Ethicon). One bite should encompass 12:30 to 11:30 anteriorly. Another bite should go in at 3 o’clock and out at 5 o’clock, and another bite should go in at 9 o’clock and out at 7 o’clock (FIGURE 1). (Helpful hint: Ensure that the direction of the pull always is a direct extension of the passage through tissue in small steps and not an outward direction toward the operator. An instrument such as a curved Mayo clamp should be placed at the point of the needle’s exit to reduce the risk of injury. At the conclusion of the three bites, the Mersilene tape should be the same length on each side, exiting at 5 o’clock and 7 o’clock, as stated earlier [FIGURE 7].)
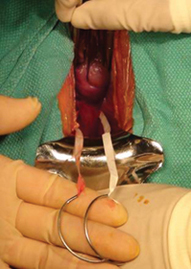
FIGURE 7 Ensure equal distribution of the tape
After taking three bites of tissue, ensure that the ends of the Mersilene tape are of equal length on each side.
7. Once the tape is of equal length on both sides, closely encircling three sides of the cervical core, empty the bladder with a catheter to ensure the presence of clear urine. Bloody urine could be an indication for cystoscopy to rule out bladder injury.
8. Cut the needles off of the tape and tie the cerclage in three ties, the first one being a surgical tie. After tying the first tie, ensure proper tension by pressing gently with the index finger up and down on the knot; if it is properly tensioned, it will not be displaced by this movement. (Helpful hint: There is no clear indication of how tight a cerclage should be tied. We suggest making the first tie as close as possible to the cervical core to create a visible, and palpable, depression in the soft tissue at the area of the knot [FIGURE 8]).

FIGURE 8 Tying the cerclage
Make the first tie as close as possible to the cervical core so that it creates a visible, and palpable, depression in the soft tissue at the area of the knot. Inset: Cerclage tie secured by a figure of 8.
9. Trim the ends of the tape to 3 cm to facilitate easy identification and manipulation at the time of removal. Place a figure of 8, using bright blue Prolene #1 (Ethicon), around the knot, securing it to the posterior surface of the cervical core (FIGURE 9). The tape should encircle the firm part of the cervix near the internal os, as shown by transvaginal ultrasonography in FIGURE 10. (Helpful hint: Place surgical gauze under pressure around the cervix to support hemostasis after removal of the clamps. Remove the gauze approximately 30 minutes after the procedure.)
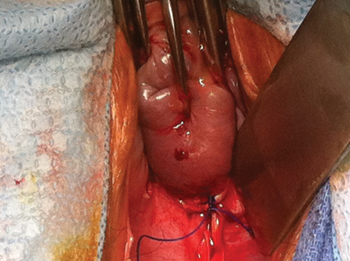
FIGURE 9 Mark the cerclage
Place a figure of 8, using bright blue Prolene #1, around the knot of the cerclage, securing it to the posterior surface of the cervical core.
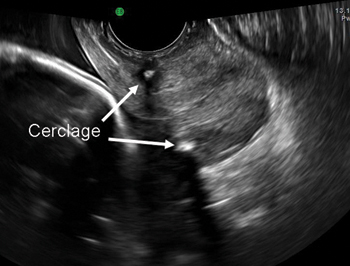
FIGURE 10 Final placement
The cerclage tape should encircle the firm part of the cervix near the internal os, as shown by transvaginal ultrasonography.
Technique is applicable to most cerclage procedures
One potential limitation of this technique is the fact that it is based on surgical experience in a single center, although it includes more than 2,000 operations performed at that center. Therefore, we lack data on the ease of teaching and reproducing this technique. Nevertheless, our approach incorporates various elements that previously were proposed to enhance the effectiveness of cerclage. It likely will be applicable to most cerclage procedures, with the exception of a few unique cases. These unique cases—most of them involving the failure of conventional cerclage—may require more elaborate technique.
As for data on the location of biomechanical stresses on cervical tissue during pregnancy, the literature indicates that the forces of maximum deformation begin internally at the level of the cervico-uterine junction.12 If not successfully resisted, these forces will proceed down along the cervical canal and could lead to premature pregnancy loss.
Although the superiority of a high cerclage has not yet been proven clinically, it appears to be more effective than low placement because it is more likely to provide support at the right location.
As pregnancy progresses, the challenge to the cervix increases—not only because of increasing uterine volume but also because of greater uterine activity. Both raise the risk of cerclage slippage and displacement.15 To address these issues, several investigators proposed an approach that excludes the slippery mucosal layer.1,13,14
The original Shirodkar cerclage and its modifications—but not the McDonald cerclage and its subsequent modifications—included an “anchor” suture attaching the cerclage band to the firm cervical stromal layer as a means to prevent downward slippage and displacement.1 It remains to be seen whether this addition of a figure of 8 using nonabsorbable suture, as proposed here, is indeed effective.
We believe that, if a standardized way to perform effective cerclage can be agreed upon, we also might devise a better way to compare results based on proper patient selection.
We want to hear from you! Tell us what you think.
1. Shirodkar VN. A new method of operative treatment for habitual abortions in the second trimester of pregnancy. Antiseptic. 1955;52:299.-
2. McDonald IA. Suture of the cervix for inevitable miscarriage. J Obstet Gynaecol Br Emp. 1957;64(3):346-350.
3. Rust OA, Atlas RO, Jones KJ, Benham BN, Balducci J. A randomized trial of cerclage versus no cerclage among patients with ultrasonographically detected second-trimester preterm dilatation of the internal os. Am J Obstet Gynecol. 2000;183(4):830-835.
4. Althuisius SM, Dekker GA, Hummel P, Bekedam DJ, van Geijn HP. Final Results of the Cervical Incompetence Prevention Randomized Cerclage Trial (CIPRACT): therapeutic cerclage with bed rest versus bed rest alone. Am J Obstet Gynecol. 2001;185(5):1106-1112.
5. To MS, Alfirevic Z, Heath VC, et al. Fetal Medicine Foundation Second Trimester Screening Group. Cervical cerclage for prevention of preterm delivery in women with short cervix: randomised controlled trial. Lancet. 2004;363(9424):1849-1853.
6. Berghella V, Odibo AO, Tolosa JE. Cerclage for prevention of preterm birth in women with a short cervix found on transvaginal ultrasound examination: a randomized trial. Am J Obstet Gynecol. 2004;191(4):1311-1317.
7. Owen J, Hankins G, Iams JD, et al. Multicenter randomized trial of cerclage for preterm birth in high-risk women with shortened midtrimester cervical length. Am J Obstet Gynecol. 2009;201(4):375.e1-8.
8. Zilianti M, Azuaga A, Calderon F, Pagés G, Mendoza G. Monitoring the effacement of the uterine cervix by transperineal sonography: a new perspective. J Ultrasound Med. 1995;14(10):719-724.
9. Herron MA, Parer JT. Transabdominal cerclage for fetal wastage due to cervical incompetence. Obstet Gynecol. 1988;71(6 Pt 1):865-868.
10. Katz M, Abrahams C. Transvaginal placement of cervicoisthmic cerclage: Report on pregnancy outcome. Am J Obstet Gynecol. 2005;192(6):1989-1992.
11. Ferenczy A. Ultrastructure of the uterine cervix. In: Huszar G ed. The Physiology and Biochemistry of the Uterus in Pregnancy and Labor. Boca Raton, FL: CRC Press; 2000: 239–260.
12. Heaps RH, House M, Socrate S, Leppert P, Strauss JF, III. Matrix biology and preterm birth. In: Petraglia F Strauss JF III, Gabbe SG, Weiss G, eds. Preterm Birth: Mechanisms, Mediators, Prediction, Prevention, and Interventions. United Kingdom: Informa; 2007:71–93.
13. Fahmy K. A closed submucous cervical suture for the incompetent cervix. Int Surg. 1978;63(2):77-80.
14. Caspi E, Schneider DF, Mor Z, Langer R, Weinraub Z, Bukovsky I. Cervical internal os cerclage: description of a new technique and comparison with Shirodkar operation. Am J Perinatol. 1990;7(4):347-349.
15. Harger JH. Cerclage and cervical insufficiency: an evidence-based analysis. Obstet Gynecol. 2002;100:1313-1327.
| Dr. Katz explains why high placement of the cerclage is a key to success |
Katrin Karl, MD
Dr. Karl practices in the Department of Obstetrics and Gynecology at Ludwig Maximilians University in Munich, Germany.
Michael Katz, MD
Dr. Katz is Chief of Obstetrics in the Division of Maternal-Fetal Medicine, Department of Obstetrics and Gynecology, at California Pacific Medical Center in San Francisco, California.
The authors report no financial relationships relevant to this article.
Does vaginal progesterone reduce preterm delivery among asymptomatic women who have a short cervix in the midtrimester?
John T. Repke, MD (Examining the Evidence, April 2012)
Update on obstetrics
John T. Repke, MD, and Jaimey M. Pauli, MD (January 2012)
Placement of a suture around an incompetent cervix to prevent premature pregnancy loss was first described more than 50 years ago1,2—but the few randomized studies that have been published (all of them in the past decade) devote very little attention to technique.3-7
Are we to assume, then, that over more than 50 years, no modifications to technique have been devised?
Are we to assume as well that in the two largest randomized studies to date, which involved 266 cerclages inserted in 27 different medical centers over more than 4 years,5,7 all cerclages were inserted in an identical manner using the same technique originated more than half a century ago?
In this article, we lay out five principles to achieve effective cerclage and describe a stepwise approach to technique. This technique is based on our experience with approximately 2,000 cerclages performed in a single medical center. We emphasize anatomic landmarks and surgical principles that are based on the published literature as well as our personal experience.
Five principles of effective cerclage
Place the cerclage as high as possible
In the original paper on cerclage, McDonald emphasized the need to place the suture as high as possible to be as close as possible to the level of the internal cervical os.2
Zilianti and colleagues elegantly described how—in the absence of cerclage—cervical tissue begins to change at the level of the internal os, forming a funnel that advances downward in the shape of the letters “Y,” “V,” and “U.”8 If we accept this notion, then the only way to prevent further shortening from the top down is by placing a high cerclage.
Studies have demonstrated improved pregnancy outcomes after placement of a high cervico-isthmic cerclage following failure of a “conventional” low cerclage.9,10
Place the cerclage adjacent to the cervical stroma
Macroscopic and microscopic visualization of the cervix reveals the following main layers:
- epithelium/mucosa, which covers the deeper connective tissue known as cervical stroma
- cervical stroma, which may be divided into two zones: 1) a superficial, subepithelial zone that appears histologically as loose stromal bands and 2) a deeper, dense collagen layer.
It is the dense collagen layer of the cervical stroma that affords most of the resistance to forces of deformation, whereas the loose stromal layer and the epithelium above it slide easily over the deeper stroma. Including too great a proportion of these “slippery” components within the cerclage could increase the risk of displacement and failure.11,12
Shirodkar was the first to suggest that the mucosa and submucosa be excluded from cerclage,1 and a detailed submucosal cerclage insertion was described by Fahmy more than 30 years ago.13 We support his recommendation that cerclage placement be as close to the inner cervical stroma as possible and that it include as little as possible of the surrounding tissue.
Take three encircling cervical “bites”
In his original publication, McDonald described “five or six bites with the needle” to encircle the cervix.2 Later authors usually described four encircling steps, but no reliable study has challenged the original dogma.
Although we lack science to favor one approach over another, common sense suggests that three bites (versus four or five) offer the following advantages. They:
- produce less penetrating injury
- require less manipulation of the cervix
- are simpler and quicker to perform
- offer less opportunity for the cerclage tape to get twisted (a flat tape provides for better distribution of the load)
- permit a small gap between the two final exit points of the tape (at 5 o’clock and 7 o’clock), which allows for easier cinching and tightening of the cerclage (FIGURE 1).
FIGURE 1 A small gap between the ends of the cerclage tape, which exit at 5 o’clock and 7 o’clock, allows for easier cinching and tightening.
Both Shirodkar1 and McDonald2 described placement of the knot (or approximation of the “ends”) at 12 o’clock, anteriorly. However, this approach can complicate removal if strong pressure is applied to the cerclage or if it is covered by tissue. Attempts to remove the cerclage can result in bladder injury.
For these reasons, we prefer the approach described by Caspi and colleagues, who placed the knot in the back of the cervix at 6 o’clock.14 In that location, the surgeon can reach as high as desired, and there is no risk of organ injury during removal.
That said, it should be noted that removal of a cerclage with a knot at 6 o’clock is more difficult than removal of one with a knot at 12 o’clock—but the convenience of the operator should be secondary to safety and efficacy of the cerclage.
Place a figure of 8 around the cerclage knot
Because of the proximity of the bladder anteriorly, there is a limit to how high one can place the cerclage anteriorly. However, in the back of the cervix, one can place the cerclage much higher without risk of injury. This approach sometimes will result in downward forces on the posterior part (where the knot is) and occasionally may cover the knot with tissue from the posterior vaginal fornix.
For these reasons, we propose securing the knot of the cerclage tape to the posterior surface of the cervical “core” by placing a figure of 8 using bright blue Prolene #1 (Ethicon) to prevent slippage and help call attention to the knot when the time for removal comes.
1. Use a weighted speculum to retract the posterior-inferior vaginal wall. Have an assistant hold one or two right-angle retractors to retract the other aspects of the vaginal wall, including the bladder anteriorly, as needed.
2. Clamp the anterior and posterior lips of the cervix and tug them lightly—at all times—in an outward direction (FIGURE 2).
FIGURE 2 Clamping of the cervix
Clamp the anterior and posterior lips of the cervix and tug them lightly and steadily in an outward direction.
3. Retract and release the bladder several times using a right-angle retractor for more accurate identification of the cervico-vesical fold (FIGURE 3 and FIGURE 4). Note the distance from the external os to the cervico-vesical fold; it should be 2 cm or farther. (If it is less than 2 cm, another type of cerclage may be preferable.)
FIGURE 3 Anatomic landmarks
Cerclage is facilitated by orientation to the following landmarks; A. cervico-vesical fold; B. posterior fornix; C. cervical stroma; D. cervical mucosa.
FIGURE 4 Cervico-vesical fold
The black line indicates the location of the fold.
4. Identify the roof of the posterior fornix (FIGURE 3 and FIGURE 5).
FIGURE 5 Roof of the posterior fornix
This landmark is delineated in black.
5. Using Allis clamps bilaterally, clamp the soft tissue covering the cervical core (stroma), between the cervico-vesical junction anteriorly and the superior point of the posterior fornix posteriorly. This is a cardinal step because it separates the core from the mucosal/ submucosal elements (FIGURE 6). (Helpful hint: To achieve optimal placement of the lateral Allis clamps, place the open clamp ever so slightly to one side of the middle of the cervix. As you close the instrument, let the clamp slide off the cervical core until it is locked adjacent to it. This takes the soft tissue and supporting blood vessels out of the operative field.)
FIGURE 6 Anterolateral view
The pericervical mucosa (black arrow) after application of an Allis clamp.
6. Take three bites, 1 mm in depth, through the cervical core using a 5-mm Mersilene tape and a blunt-tipped needle (RS21; Ethicon). One bite should encompass 12:30 to 11:30 anteriorly. Another bite should go in at 3 o’clock and out at 5 o’clock, and another bite should go in at 9 o’clock and out at 7 o’clock (FIGURE 1). (Helpful hint: Ensure that the direction of the pull always is a direct extension of the passage through tissue in small steps and not an outward direction toward the operator. An instrument such as a curved Mayo clamp should be placed at the point of the needle’s exit to reduce the risk of injury. At the conclusion of the three bites, the Mersilene tape should be the same length on each side, exiting at 5 o’clock and 7 o’clock, as stated earlier [FIGURE 7].)
FIGURE 7 Ensure equal distribution of the tape
After taking three bites of tissue, ensure that the ends of the Mersilene tape are of equal length on each side.
7. Once the tape is of equal length on both sides, closely encircling three sides of the cervical core, empty the bladder with a catheter to ensure the presence of clear urine. Bloody urine could be an indication for cystoscopy to rule out bladder injury.
8. Cut the needles off of the tape and tie the cerclage in three ties, the first one being a surgical tie. After tying the first tie, ensure proper tension by pressing gently with the index finger up and down on the knot; if it is properly tensioned, it will not be displaced by this movement. (Helpful hint: There is no clear indication of how tight a cerclage should be tied. We suggest making the first tie as close as possible to the cervical core to create a visible, and palpable, depression in the soft tissue at the area of the knot [FIGURE 8]).
FIGURE 8 Tying the cerclage
Make the first tie as close as possible to the cervical core so that it creates a visible, and palpable, depression in the soft tissue at the area of the knot. Inset: Cerclage tie secured by a figure of 8.
9. Trim the ends of the tape to 3 cm to facilitate easy identification and manipulation at the time of removal. Place a figure of 8, using bright blue Prolene #1 (Ethicon), around the knot, securing it to the posterior surface of the cervical core (FIGURE 9). The tape should encircle the firm part of the cervix near the internal os, as shown by transvaginal ultrasonography in FIGURE 10. (Helpful hint: Place surgical gauze under pressure around the cervix to support hemostasis after removal of the clamps. Remove the gauze approximately 30 minutes after the procedure.)
FIGURE 9 Mark the cerclage
Place a figure of 8, using bright blue Prolene #1, around the knot of the cerclage, securing it to the posterior surface of the cervical core.
FIGURE 10 Final placement
The cerclage tape should encircle the firm part of the cervix near the internal os, as shown by transvaginal ultrasonography.
Technique is applicable to most cerclage procedures
One potential limitation of this technique is the fact that it is based on surgical experience in a single center, although it includes more than 2,000 operations performed at that center. Therefore, we lack data on the ease of teaching and reproducing this technique. Nevertheless, our approach incorporates various elements that previously were proposed to enhance the effectiveness of cerclage. It likely will be applicable to most cerclage procedures, with the exception of a few unique cases. These unique cases—most of them involving the failure of conventional cerclage—may require more elaborate technique.
As for data on the location of biomechanical stresses on cervical tissue during pregnancy, the literature indicates that the forces of maximum deformation begin internally at the level of the cervico-uterine junction.12 If not successfully resisted, these forces will proceed down along the cervical canal and could lead to premature pregnancy loss.
Although the superiority of a high cerclage has not yet been proven clinically, it appears to be more effective than low placement because it is more likely to provide support at the right location.
As pregnancy progresses, the challenge to the cervix increases—not only because of increasing uterine volume but also because of greater uterine activity. Both raise the risk of cerclage slippage and displacement.15 To address these issues, several investigators proposed an approach that excludes the slippery mucosal layer.1,13,14
The original Shirodkar cerclage and its modifications—but not the McDonald cerclage and its subsequent modifications—included an “anchor” suture attaching the cerclage band to the firm cervical stromal layer as a means to prevent downward slippage and displacement.1 It remains to be seen whether this addition of a figure of 8 using nonabsorbable suture, as proposed here, is indeed effective.
We believe that, if a standardized way to perform effective cerclage can be agreed upon, we also might devise a better way to compare results based on proper patient selection.
We want to hear from you! Tell us what you think.
1. Shirodkar VN. A new method of operative treatment for habitual abortions in the second trimester of pregnancy. Antiseptic. 1955;52:299.-
2. McDonald IA. Suture of the cervix for inevitable miscarriage. J Obstet Gynaecol Br Emp. 1957;64(3):346-350.
3. Rust OA, Atlas RO, Jones KJ, Benham BN, Balducci J. A randomized trial of cerclage versus no cerclage among patients with ultrasonographically detected second-trimester preterm dilatation of the internal os. Am J Obstet Gynecol. 2000;183(4):830-835.
4. Althuisius SM, Dekker GA, Hummel P, Bekedam DJ, van Geijn HP. Final Results of the Cervical Incompetence Prevention Randomized Cerclage Trial (CIPRACT): therapeutic cerclage with bed rest versus bed rest alone. Am J Obstet Gynecol. 2001;185(5):1106-1112.
5. To MS, Alfirevic Z, Heath VC, et al. Fetal Medicine Foundation Second Trimester Screening Group. Cervical cerclage for prevention of preterm delivery in women with short cervix: randomised controlled trial. Lancet. 2004;363(9424):1849-1853.
6. Berghella V, Odibo AO, Tolosa JE. Cerclage for prevention of preterm birth in women with a short cervix found on transvaginal ultrasound examination: a randomized trial. Am J Obstet Gynecol. 2004;191(4):1311-1317.
7. Owen J, Hankins G, Iams JD, et al. Multicenter randomized trial of cerclage for preterm birth in high-risk women with shortened midtrimester cervical length. Am J Obstet Gynecol. 2009;201(4):375.e1-8.
8. Zilianti M, Azuaga A, Calderon F, Pagés G, Mendoza G. Monitoring the effacement of the uterine cervix by transperineal sonography: a new perspective. J Ultrasound Med. 1995;14(10):719-724.
9. Herron MA, Parer JT. Transabdominal cerclage for fetal wastage due to cervical incompetence. Obstet Gynecol. 1988;71(6 Pt 1):865-868.
10. Katz M, Abrahams C. Transvaginal placement of cervicoisthmic cerclage: Report on pregnancy outcome. Am J Obstet Gynecol. 2005;192(6):1989-1992.
11. Ferenczy A. Ultrastructure of the uterine cervix. In: Huszar G ed. The Physiology and Biochemistry of the Uterus in Pregnancy and Labor. Boca Raton, FL: CRC Press; 2000: 239–260.
12. Heaps RH, House M, Socrate S, Leppert P, Strauss JF, III. Matrix biology and preterm birth. In: Petraglia F Strauss JF III, Gabbe SG, Weiss G, eds. Preterm Birth: Mechanisms, Mediators, Prediction, Prevention, and Interventions. United Kingdom: Informa; 2007:71–93.
13. Fahmy K. A closed submucous cervical suture for the incompetent cervix. Int Surg. 1978;63(2):77-80.
14. Caspi E, Schneider DF, Mor Z, Langer R, Weinraub Z, Bukovsky I. Cervical internal os cerclage: description of a new technique and comparison with Shirodkar operation. Am J Perinatol. 1990;7(4):347-349.
15. Harger JH. Cerclage and cervical insufficiency: an evidence-based analysis. Obstet Gynecol. 2002;100:1313-1327.