User login
da Vinci Single-Site, the virtually scarless intra-abdominal hysterectomy
When the Food and Drug Administration cleared the da Vinci Single-Site Technology for use in benign hysterectomy and salpingo-oophorectomy in February 2013, I wondered how these procedures could possibly be performed with instruments that lack articulating wrists. I came to realize that with a stepwise approach to initiating this virtually scarless surgery, an appreciation of its nuances, and repetition of best practices found in my learning curve, Single-Site hysterectomy is indeed achievable and reproducible.
Single-Site tools are flexible and semirigid, allowing them to fit through the port’s curved cannulas. The port accommodates insufflation tubing, an 8.5-mm endoscope, two 5-mm operating instruments, and an assistant instrument. A 30-degree endoscope, facing downward to view the operating instruments underneath, is essential for achieving necessary triangulation.
I perform dissection with the fenestrated bipolar grasper in arm 1 and the monopolar cautery hook in arm 2. For vaginal cuff closure, I keep the fenestrated bipolar in arm 1 and place a needle holder in arm 2.
The fenestrated bipolar grasper for Single-Site became available only recently. Until then I utilized the Maryland bipolar forceps for dissection and tried various instruments, including the crocodile grasper, for vaginal cuff closure. Use of the fenestrated bipolar has been a game-changer for vessel sealing and has worked beautifully for cuff closure as well.
Single-port robotic hysterectomy requires deliberate transition. One must be comfortable first with minimal or no bedside assistance during multiport robotic surgery. The surgeon should take a stepwise approach to minimizing assistance – moving, for instance, from the use of five ports, to four ports, to four ports with no bedside assistance, to three ports, and lastly a "single-plus one" approach in which an extra port is placed as a precaution. I used a "single-plus one" approach for my first 10 cases before moving to a pure Single-Site approach.
I also began with two cases of bilateral salpingo-oophorectomy before performing Single-Site hysterectomy, and advise others to start with such easier cases as well. Patients selected for initial Single-Site surgery also should be younger than 70, with few comorbidities and a good performance status (American Society of Anesthesiologists classification I-II). They should have BMI less than 30, a history of little or no previous intra-abdominal or pelvic surgery, and a reasonably sized uterus (less than 12 weeks), and be candidates for vaginal or laparoscopic hysterectomy.
The Single-Site approach requires meticulous dissection, one side at a time. The surgeon must skeletonize vessels before coagulation, and must coagulate each vessel individually. Selective coagulation/sealing of vessels is key, as the surgeon does not have the luxury of using a harmonic scalpel, vessel sealer, or other such tools. Too much bleeding can make a case difficult, if not impossible, to complete without conversion. Similarly, because assistance is limited, coagulation must be done in a cephalad direction in order to minimize back-bleeding.
Uterine manipulation is always an important task, but it is especially important for the Single-Site hysterectomy. It is the assistant’s main role. He or she must know not only how to turn the uterus for vessel coagulation and visualization of anatomy, but also the nuances of traction and countertraction for dissection and the colpotomy. Various uterine manipulators will work; I prefer the VCare uterine manipulator.
Setup and entry
While steep Trendelenburg positioning is used for multiport hysterectomy, it must be lessened for the single-port approach. Trendelenburg changes the distance of the cannulae to the uterus, so individual adjustments are necessary. I start the patient in steep Trendelenburg, then lessen it just enough to displace the small bowel while maintaining an appropriate distance for the instruments to reach the uterus.
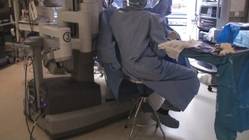
Center docking provides greater range of motion and is therefore often preferred, especially during early cases. However, side docking on the dominant-hand side, with the camera arm toward the uterus, is my preferred method. It provides the assistant maximal access to the vaginal area and best affords the surgeon the ability to add another port if it is necessary later.
Entry and port placement are critical aspects of the Single-Site approach. The Single-Site Port requires a skin incision of 2.5 cm. I make this incision transversely, following the natural creases of the umbilicus. To get to the fascia, the umbilical stalk is transected, and a small hole – a hernia defect, in essence – is identified and lifted. A 3-cm vertical fascial incision is made to accommodate the Single-Site Port. It is important that this incision size is exact: If it is too short, the port will not expand to its natural state and there will be crowding of instruments, and if it is too large, leaking air will be a problem. I have found that placing stay sutures on the fascia at this point helps facilitate later closure.
Cannulas for the Single-Site Port come in two lengths: There is a set of short, 250-mm cannulas and a set of long, 300-mm cannulas. When to use these cannulas depends on the working area and the patient’s size. Generally, the shorter cannulas are used for everything but the cuff closure. Then arm 2 is replaced with the longer cannula for the extra rigidity needed to suture. My use of the different cannula lengths has varied depending on the patient’s body size, and with growing experience I have sometimes gone without exchanging them.
Dissection through cuff closure

I start all my cases on the right side, holding the infundibulopelvic (IP) or utero-ovarian ligament on tension and skeletonizing it. I then coagulate the IP ligament with the fenestrated bipolar grasper (setting: 35 watts).
At this point and throughout the surgery, consistent use of the "cut" mode on the da Vinci console makes both dissection and sealing cleaner and more precise, with significantly less charring.
I use AirSeal for insufflation and automatic smoke evacuation.
As I do with all minimally invasive hysterectomies, regardless of modality, I work to find and develop the pararectal space. This space is bordered by the ureter medially, the hypogastric or internal iliac artery laterally, and the base of the cardinal ligament anteriorly, with the levator ani muscle as the floor. Defining and developing the space enable me to visualize the ureter so that I can dissect it off the peritoneum and drop it out of harm’s way. It puts me in a much better position, moreover, to handle dissection in more complex cases involving large fibroids or endometriosis.
Once the pararectal space is developed and the ureter dissected, I proceed with transection of the round ligament. Dissecting the round ligament any earlier would be particularly troublesome in a Single-Site robotic hysterectomy because it would be challenging to achieve the necessary degree of uterine manipulation.
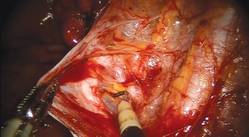
In developing the bladder flap, one must be conscious of the highly magnified view, as the bladder appears closer with the 30-degree 8.5-mm endoscope than it would with a 0-degree scope. A combination of traction and countertraction, small bites, and selective coagulation – one vessel at a time – is critical as dissection proceeds and the bladder flap is created.
Because the pararectal space has been developed early on, the ureter can be seen throughout the dissection and there is no need to coagulate the vessels from the level of the internal os and downward, as many surgeons are traditionally taught. Vessels are coagulated right near the location of the VCare cup. It is important that all bleeding vessels are coagulated prior to colpotomy. Again, using the "cut" mode on the console during the colpotomy minimizes charring.
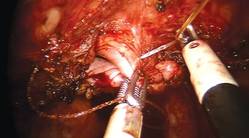
Vaginal cuff closure is the most technically challenging aspect of Single-Site hysterectomy. I tried numerous instruments and approaches and found a technique that works for me. The fenestrated bipolar grasper has been just as effective as the crocodile grasper, which is cost-effective because I use this instrument for dissection as well. Use of the fenestrated bipolar at this point also allows me to cauterize any small vessels that were not coagulated earlier.
I advise use of 2-0, barbed, 9-12\" absorbable suture on a 24- to 35-mm reverse-cutting needle. I recommend the 2-0 V-LOC reverse-cutting P-14 needle; this is the one that has worked for me with minimal difficulty. Because the suture is barbed, there is no need to tie.
I closed the cuff vertically in my initial cases – as I do in multiport cases – but at my 13th case I began horizontal cuff closures. Effectively grasping the needle, finding the correct combination of traction and countertraction, and achieving the correct angles take time and practice. I move in a transverse direction, right to left, in every case. The anterior cuff requires angled insertion of the needle, whereas the posterior cuff requires vertical insertion of the needle. The assistant may hold the bladder peritoneum as necessary throughout the closure to expose the cuff, but should not grasp and suspend the cuff itself.
I deliver the needle transvaginally, but alternatively it may be delivered through the camera port or the 10-mm assistant port. The tip of the needle should not be grasped in any circumstance, or it will be dulled.
Learning curve, outcomes
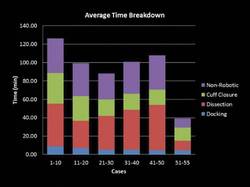
My learning curve for Single-Site hysterectomy was marked by two turning points: At case 20, I felt noticeably more proficient, with improved operative times and significantly less difficulty. At the 50th case, my comfort and skill levels jumped again, and I began to feel at times like I was performing multiport surgery.
From the first 20 cases to cases 51-55, my average total operating room time fell from approximately 113 minutes to 60 minutes, my average console time dropped from 71 minutes to 36 minutes, and my average cuff closure time fell from 29 minutes to 14 minutes. The most challenging part of the journey involved vaginal cuff closure; my initial closures took 60-70 minutes as I tried different needles and methods to close. By incorporating what I learned early on, cuff closure times dropped to 20-30 minutes by case 10 and continued to decrease further as I performed more cases.
There were no complications in my first 20 Single-Site surgeries. After that, I had one case of incisional hernia, two cases of pelvic hematoma, and one case of ureterovaginal fistula. I have yet to see cuff dehiscence. My average estimated blood loss has been 60 mL. The ureterovaginal fistula occurred in a patient with a 430-gram uterus and stage IV endometriosis, in whom I encountered a lot of bleeding and struggled with coagulation. My lesson from this case: If extensive coagulation is needed, consider being proactive and place a ureteral stent.

Single-Site hysterectomy makes minimally invasive surgery even more minimally invasive – without sacrificing the quality of care. My patients uniformly have been extremely happy with the cosmesis, and anecdotally they have reported less pain than those undergoing multiport robotic hysterectomy. I have no doubt this is just the beginning of what robotic surgery will enable in the coming years. The journey has been worth it.
Dr. Im is director of the Gynecologic Oncology Center at Mercy Medical Center, and clinical assistant professor of obstetrics, gynecology, and reproductive services at the University of Maryland, both in Baltimore. Dr. Im reports that he is an educational consultant for Intuitive Surgical, manufacturer of the da Vinci Single-Site Technology, and SurgiQuest, manufacturer of AirSeal.
When the Food and Drug Administration cleared the da Vinci Single-Site Technology for use in benign hysterectomy and salpingo-oophorectomy in February 2013, I wondered how these procedures could possibly be performed with instruments that lack articulating wrists. I came to realize that with a stepwise approach to initiating this virtually scarless surgery, an appreciation of its nuances, and repetition of best practices found in my learning curve, Single-Site hysterectomy is indeed achievable and reproducible.
Single-Site tools are flexible and semirigid, allowing them to fit through the port’s curved cannulas. The port accommodates insufflation tubing, an 8.5-mm endoscope, two 5-mm operating instruments, and an assistant instrument. A 30-degree endoscope, facing downward to view the operating instruments underneath, is essential for achieving necessary triangulation.
I perform dissection with the fenestrated bipolar grasper in arm 1 and the monopolar cautery hook in arm 2. For vaginal cuff closure, I keep the fenestrated bipolar in arm 1 and place a needle holder in arm 2.
The fenestrated bipolar grasper for Single-Site became available only recently. Until then I utilized the Maryland bipolar forceps for dissection and tried various instruments, including the crocodile grasper, for vaginal cuff closure. Use of the fenestrated bipolar has been a game-changer for vessel sealing and has worked beautifully for cuff closure as well.
Single-port robotic hysterectomy requires deliberate transition. One must be comfortable first with minimal or no bedside assistance during multiport robotic surgery. The surgeon should take a stepwise approach to minimizing assistance – moving, for instance, from the use of five ports, to four ports, to four ports with no bedside assistance, to three ports, and lastly a "single-plus one" approach in which an extra port is placed as a precaution. I used a "single-plus one" approach for my first 10 cases before moving to a pure Single-Site approach.
I also began with two cases of bilateral salpingo-oophorectomy before performing Single-Site hysterectomy, and advise others to start with such easier cases as well. Patients selected for initial Single-Site surgery also should be younger than 70, with few comorbidities and a good performance status (American Society of Anesthesiologists classification I-II). They should have BMI less than 30, a history of little or no previous intra-abdominal or pelvic surgery, and a reasonably sized uterus (less than 12 weeks), and be candidates for vaginal or laparoscopic hysterectomy.
The Single-Site approach requires meticulous dissection, one side at a time. The surgeon must skeletonize vessels before coagulation, and must coagulate each vessel individually. Selective coagulation/sealing of vessels is key, as the surgeon does not have the luxury of using a harmonic scalpel, vessel sealer, or other such tools. Too much bleeding can make a case difficult, if not impossible, to complete without conversion. Similarly, because assistance is limited, coagulation must be done in a cephalad direction in order to minimize back-bleeding.
Uterine manipulation is always an important task, but it is especially important for the Single-Site hysterectomy. It is the assistant’s main role. He or she must know not only how to turn the uterus for vessel coagulation and visualization of anatomy, but also the nuances of traction and countertraction for dissection and the colpotomy. Various uterine manipulators will work; I prefer the VCare uterine manipulator.
Setup and entry
While steep Trendelenburg positioning is used for multiport hysterectomy, it must be lessened for the single-port approach. Trendelenburg changes the distance of the cannulae to the uterus, so individual adjustments are necessary. I start the patient in steep Trendelenburg, then lessen it just enough to displace the small bowel while maintaining an appropriate distance for the instruments to reach the uterus.
Center docking provides greater range of motion and is therefore often preferred, especially during early cases. However, side docking on the dominant-hand side, with the camera arm toward the uterus, is my preferred method. It provides the assistant maximal access to the vaginal area and best affords the surgeon the ability to add another port if it is necessary later.
Entry and port placement are critical aspects of the Single-Site approach. The Single-Site Port requires a skin incision of 2.5 cm. I make this incision transversely, following the natural creases of the umbilicus. To get to the fascia, the umbilical stalk is transected, and a small hole – a hernia defect, in essence – is identified and lifted. A 3-cm vertical fascial incision is made to accommodate the Single-Site Port. It is important that this incision size is exact: If it is too short, the port will not expand to its natural state and there will be crowding of instruments, and if it is too large, leaking air will be a problem. I have found that placing stay sutures on the fascia at this point helps facilitate later closure.
Cannulas for the Single-Site Port come in two lengths: There is a set of short, 250-mm cannulas and a set of long, 300-mm cannulas. When to use these cannulas depends on the working area and the patient’s size. Generally, the shorter cannulas are used for everything but the cuff closure. Then arm 2 is replaced with the longer cannula for the extra rigidity needed to suture. My use of the different cannula lengths has varied depending on the patient’s body size, and with growing experience I have sometimes gone without exchanging them.
Dissection through cuff closure
I start all my cases on the right side, holding the infundibulopelvic (IP) or utero-ovarian ligament on tension and skeletonizing it. I then coagulate the IP ligament with the fenestrated bipolar grasper (setting: 35 watts).
At this point and throughout the surgery, consistent use of the "cut" mode on the da Vinci console makes both dissection and sealing cleaner and more precise, with significantly less charring.
I use AirSeal for insufflation and automatic smoke evacuation.
As I do with all minimally invasive hysterectomies, regardless of modality, I work to find and develop the pararectal space. This space is bordered by the ureter medially, the hypogastric or internal iliac artery laterally, and the base of the cardinal ligament anteriorly, with the levator ani muscle as the floor. Defining and developing the space enable me to visualize the ureter so that I can dissect it off the peritoneum and drop it out of harm’s way. It puts me in a much better position, moreover, to handle dissection in more complex cases involving large fibroids or endometriosis.
Once the pararectal space is developed and the ureter dissected, I proceed with transection of the round ligament. Dissecting the round ligament any earlier would be particularly troublesome in a Single-Site robotic hysterectomy because it would be challenging to achieve the necessary degree of uterine manipulation.
In developing the bladder flap, one must be conscious of the highly magnified view, as the bladder appears closer with the 30-degree 8.5-mm endoscope than it would with a 0-degree scope. A combination of traction and countertraction, small bites, and selective coagulation – one vessel at a time – is critical as dissection proceeds and the bladder flap is created.
Because the pararectal space has been developed early on, the ureter can be seen throughout the dissection and there is no need to coagulate the vessels from the level of the internal os and downward, as many surgeons are traditionally taught. Vessels are coagulated right near the location of the VCare cup. It is important that all bleeding vessels are coagulated prior to colpotomy. Again, using the "cut" mode on the console during the colpotomy minimizes charring.
Vaginal cuff closure is the most technically challenging aspect of Single-Site hysterectomy. I tried numerous instruments and approaches and found a technique that works for me. The fenestrated bipolar grasper has been just as effective as the crocodile grasper, which is cost-effective because I use this instrument for dissection as well. Use of the fenestrated bipolar at this point also allows me to cauterize any small vessels that were not coagulated earlier.
I advise use of 2-0, barbed, 9-12\" absorbable suture on a 24- to 35-mm reverse-cutting needle. I recommend the 2-0 V-LOC reverse-cutting P-14 needle; this is the one that has worked for me with minimal difficulty. Because the suture is barbed, there is no need to tie.
I closed the cuff vertically in my initial cases – as I do in multiport cases – but at my 13th case I began horizontal cuff closures. Effectively grasping the needle, finding the correct combination of traction and countertraction, and achieving the correct angles take time and practice. I move in a transverse direction, right to left, in every case. The anterior cuff requires angled insertion of the needle, whereas the posterior cuff requires vertical insertion of the needle. The assistant may hold the bladder peritoneum as necessary throughout the closure to expose the cuff, but should not grasp and suspend the cuff itself.
I deliver the needle transvaginally, but alternatively it may be delivered through the camera port or the 10-mm assistant port. The tip of the needle should not be grasped in any circumstance, or it will be dulled.
Learning curve, outcomes
My learning curve for Single-Site hysterectomy was marked by two turning points: At case 20, I felt noticeably more proficient, with improved operative times and significantly less difficulty. At the 50th case, my comfort and skill levels jumped again, and I began to feel at times like I was performing multiport surgery.
From the first 20 cases to cases 51-55, my average total operating room time fell from approximately 113 minutes to 60 minutes, my average console time dropped from 71 minutes to 36 minutes, and my average cuff closure time fell from 29 minutes to 14 minutes. The most challenging part of the journey involved vaginal cuff closure; my initial closures took 60-70 minutes as I tried different needles and methods to close. By incorporating what I learned early on, cuff closure times dropped to 20-30 minutes by case 10 and continued to decrease further as I performed more cases.
There were no complications in my first 20 Single-Site surgeries. After that, I had one case of incisional hernia, two cases of pelvic hematoma, and one case of ureterovaginal fistula. I have yet to see cuff dehiscence. My average estimated blood loss has been 60 mL. The ureterovaginal fistula occurred in a patient with a 430-gram uterus and stage IV endometriosis, in whom I encountered a lot of bleeding and struggled with coagulation. My lesson from this case: If extensive coagulation is needed, consider being proactive and place a ureteral stent.
Single-Site hysterectomy makes minimally invasive surgery even more minimally invasive – without sacrificing the quality of care. My patients uniformly have been extremely happy with the cosmesis, and anecdotally they have reported less pain than those undergoing multiport robotic hysterectomy. I have no doubt this is just the beginning of what robotic surgery will enable in the coming years. The journey has been worth it.
Dr. Im is director of the Gynecologic Oncology Center at Mercy Medical Center, and clinical assistant professor of obstetrics, gynecology, and reproductive services at the University of Maryland, both in Baltimore. Dr. Im reports that he is an educational consultant for Intuitive Surgical, manufacturer of the da Vinci Single-Site Technology, and SurgiQuest, manufacturer of AirSeal.
