User login
Emergency Ultrasound: Evaluating Right Upper Quadrant Abdominal Pain
When evaluating patients presenting with right upper quadrant abdominal pain, there are several imaging modalities to consider—ultrasound, computed tomography, endoscopic retrograde cholangiopancreatography, and hepatobiliary iminodiacetic acid scan. In addition to the many benefits to choosing bedside ultrasound as an initial modality, it also carries the least amount of imaging-associated risks (eg, lowest amount of radiation, no exposure to ionizing radiation or radionucleotides). Moreover, not only can bedside ultrasound decrease the time to diagnosis, but it also reduces the length of patient stay by an average of 1 hour.1

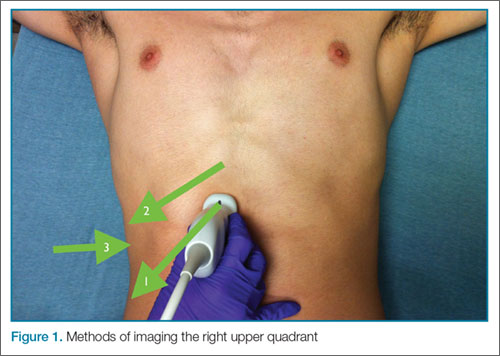
The patient is typically placed in the recumbent position, but in certain cases, placing the patient in the left lateral decubitus position may improve visualization. The scan should begin by placing the low-frequency probe in a sagittal orientation with the indicator marker pointed toward the head. Starting in the midline subxiphoid position, the clinician should angle the probe underneath the costal margin and then slide it to the patient’s right side. This will typically bring the gallbladder into view. If the gallbladder is not identified in this first pass, a second sweep across the ribs can be performed. If the gallbladder is still not in view, the clinician should then try placing the probe on the patient’s right side near the midaxillary line and fanning though the liver in a coronal plane (Figure 1).
Once the gallbladder is located, it is important to ensure that both the long and short axis planes are completely visualized. This can be accomplished by rotating the probe. There are several techniques to confirm that the structure in view is the gallbladder. One approach is to use the color-flow option, which can help differentiate vascular structures from the gallbladder. The gallbladder, which is connected to the portal vein by the main lobar fissure, will appear as an exclamation point on the ultrasound image (Figure 2).
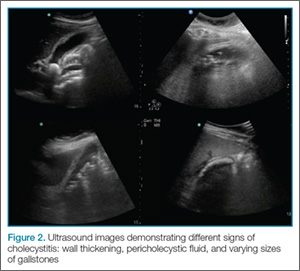
In ultrasound, pericholecystic fluid will appear around the gallbladder as small black triangular shapes. Gallstones have a hyperechoic anterior rim with posterior dark shadowing. Typically, gallstones are freely mobile unless they are stuck in the neck of the gallbladder, in which case, there is heightened concern for cholecystitis (Figure 2).
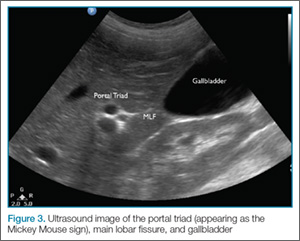
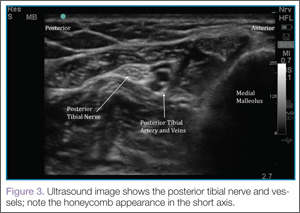
Visualization of the common bile duct can be challenging. Fortunately, most cases of acute cholecystitis can be diagnosed even without visualization of the common bile duct. When attempting visualization, however, the common bile duct can be found by tracing the main lobar fissure to the portal vein. The portal triad (commonly referred to as the “Mickey Mouse” sign) comprises the portal vein (“head”), the hepatic artery (left “ear”), and the common bile duct (right “ear”) (Figure 3). Once this sign is identified, the probe should be rotated to bring a long axis view of the portal vein. The common bile duct will run anterior and parallel to the portal vein. The duct should measure less than 4 to 6 mm in diameter; however, in patients older than age 60 years, this range should be adjusted to allow an additional 1 mm per decade).
Summary
Abdominal pain is a common presenting complaint in the ED. Ultrasound is particularly useful in evaluating right upper quadrant pain. This ultrasound is easy to learn and, with practice, it can decrease time to diagnosis and improve the length of a patient’s stay in the ED.
Dr Taylor is an assistant professor and director of postgraduate medical education, department of emergency medicine, Emory University School of Medicine, Atlanta, Georgia. Dr Beck is an assistant professor, department of emergency medicine, Emory University School of Medicine, Atlanta, Georgia. Dr Meer is an assistant professor and director of emergency ultrasound, department of emergency medicine, Emory University School of Medicine, Atlanta, Georgia.
Reference
- Blaivas M, Harwood RA, Lambert MJ. Decreasing length of stay with emergency ultrasound examination of the gallbladder. Acad Emerg Med. 1999;6(10):1020-1023.
Additional examples of ultrasound imaging and videos of the upper right abdominal quadrant may be accessed at https://vimeo.com/136832371
When evaluating patients presenting with right upper quadrant abdominal pain, there are several imaging modalities to consider—ultrasound, computed tomography, endoscopic retrograde cholangiopancreatography, and hepatobiliary iminodiacetic acid scan. In addition to the many benefits to choosing bedside ultrasound as an initial modality, it also carries the least amount of imaging-associated risks (eg, lowest amount of radiation, no exposure to ionizing radiation or radionucleotides). Moreover, not only can bedside ultrasound decrease the time to diagnosis, but it also reduces the length of patient stay by an average of 1 hour.1
The patient is typically placed in the recumbent position, but in certain cases, placing the patient in the left lateral decubitus position may improve visualization. The scan should begin by placing the low-frequency probe in a sagittal orientation with the indicator marker pointed toward the head. Starting in the midline subxiphoid position, the clinician should angle the probe underneath the costal margin and then slide it to the patient’s right side. This will typically bring the gallbladder into view. If the gallbladder is not identified in this first pass, a second sweep across the ribs can be performed. If the gallbladder is still not in view, the clinician should then try placing the probe on the patient’s right side near the midaxillary line and fanning though the liver in a coronal plane (Figure 1).
Once the gallbladder is located, it is important to ensure that both the long and short axis planes are completely visualized. This can be accomplished by rotating the probe. There are several techniques to confirm that the structure in view is the gallbladder. One approach is to use the color-flow option, which can help differentiate vascular structures from the gallbladder. The gallbladder, which is connected to the portal vein by the main lobar fissure, will appear as an exclamation point on the ultrasound image (Figure 2).
In ultrasound, pericholecystic fluid will appear around the gallbladder as small black triangular shapes. Gallstones have a hyperechoic anterior rim with posterior dark shadowing. Typically, gallstones are freely mobile unless they are stuck in the neck of the gallbladder, in which case, there is heightened concern for cholecystitis (Figure 2).
Visualization of the common bile duct can be challenging. Fortunately, most cases of acute cholecystitis can be diagnosed even without visualization of the common bile duct. When attempting visualization, however, the common bile duct can be found by tracing the main lobar fissure to the portal vein. The portal triad (commonly referred to as the “Mickey Mouse” sign) comprises the portal vein (“head”), the hepatic artery (left “ear”), and the common bile duct (right “ear”) (Figure 3). Once this sign is identified, the probe should be rotated to bring a long axis view of the portal vein. The common bile duct will run anterior and parallel to the portal vein. The duct should measure less than 4 to 6 mm in diameter; however, in patients older than age 60 years, this range should be adjusted to allow an additional 1 mm per decade).
Summary
Abdominal pain is a common presenting complaint in the ED. Ultrasound is particularly useful in evaluating right upper quadrant pain. This ultrasound is easy to learn and, with practice, it can decrease time to diagnosis and improve the length of a patient’s stay in the ED.
Dr Taylor is an assistant professor and director of postgraduate medical education, department of emergency medicine, Emory University School of Medicine, Atlanta, Georgia. Dr Beck is an assistant professor, department of emergency medicine, Emory University School of Medicine, Atlanta, Georgia. Dr Meer is an assistant professor and director of emergency ultrasound, department of emergency medicine, Emory University School of Medicine, Atlanta, Georgia.
Reference
- Blaivas M, Harwood RA, Lambert MJ. Decreasing length of stay with emergency ultrasound examination of the gallbladder. Acad Emerg Med. 1999;6(10):1020-1023.
Additional examples of ultrasound imaging and videos of the upper right abdominal quadrant may be accessed at https://vimeo.com/136832371
Emergency Ultrasound: Abdominal Aortic Aneurysm
Background
Abdominal aortic aneurysm (AAA) is a life-threatening condition, with a high mortality rate in undiagnosed cases. Several studies have shown that emergency physicians (EPs) can accurately diagnose an AAA through bedside ultrasound. This examination, which takes approximately 1 to 2 minutes, is easy to learn, perform, and interpret. In cases of a ruptured aneurysm, where minutes matter, this modality can significantly decrease time to diagnosis and expedite surgical consultation and repair.

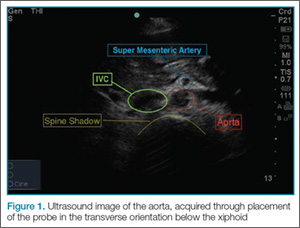
To perform the scan, the clinician should use a curvilinear (abdominal) probe with the marker pointed toward the patient’s right side. The probe should be placed just caudal to the xiphoid process in a transverse orientation. To locate the aorta, the “spine shadow” should first be identified for orientation. Vertebral bodies will have a bright rounded white cortex anterior to a dark shadow (Figure 1). The aorta is circular in shape, pulsatile, and lies just anterior to the spine. Care should be taken not to confuse the aorta with the inferior vena cava (IVC), which can also be seen in this view. The IVC is located to the right of the spine (in this orientation, it will be seen on the left side of the clinician’s image). The IVC has a thinner wall and is typically more oval in shape than the aorta.
Once the aorta is visualized, the clinician should slide the probe caudally while keeping the aorta in the center of the screen. The celiac trunk will be initially visualized as the probe is moved, and the superior mesenteric artery will be superior caudal to the celiac trunk. The clinician should then continue to move the probe down caudally until the bifurcation, which is typically found just above the level of the umbilicus, is visualized. It is especially important to visualize the distal (infrarenal) aorta just above the bifurcation since this is where most AAAs occur.
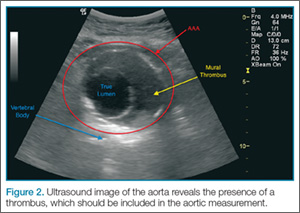
A normal aorta caliber will measure less than 3 cm in diameter, and the common iliac vessels should measure half of that diameter (1.5 cm in adult women, 1.85 cm in adult men). Since the entire diameter of aorta that predicts the risk of rupture, it is critical that measurements include any thrombus present (Figure 2).
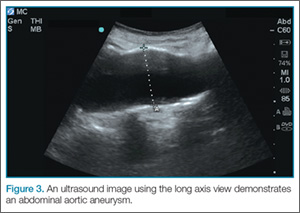
Once the entire aorta and bifurcation is seen in cross-section, the probe should be rotated clockwise 90 degrees so that the indicator marker is pointed toward the patient’s head; this will allow a longitudinal view of the aorta (Figure 3). When scanning longitudinally, it is important to place the probe over the center of the aorta as any lateral movement will cause the aorta to appear smaller than its actual size.
Points and Tips to Remember
To ensure the scan is performed correctly, it is essential to begin at the xiphoid process and then proceed caudally—without lifting the transducer off the patient. This will ensure the entire aorta is visualized, which is necessary to rule out an AAA.
During evaluation, bowel gas can obscure the image. If this occurs, the clinician should first try increasing the transducer pressure gradually or moving the probe back and forth while applying pressure in an attempt to displace the bowel gas. If this technique is unsuccessful, scanning off the midline or angling the probe may capture the aorta. Alternatively, a coronal image can be obtained by placing the probe on the patient’s right side in the midaxillary line with the indicator marker pointing toward the head.
Limitations
Despite the high sensitivity of ultrasound in detecting AAAs, there are some limitations to its use. Since the majority of AAAs rupture into the retroperitoneum, a rupture or leak is difficult to visualize on ultrasound. The EP should therefore recognize that the presence of an aneurysm alone in the setting of a convincing clinical history is sufficient to make the diagnosis.
Conclusion
Prompt evaluation and management of patients presenting with a suspected AAA are essential to avoid rupture, a catastrophic event with an extremely high-mortality rate. When the proper techniques for visualization are employed, including proper measurement of the aorta, bedside ultrasound is highly sensitive and specific for detecting an AAA.
Dr Taylor is an assistant professor and director of postgraduate medical education, department of emergency medicine, Emory University School of Medicine, Atlanta, Georgia. Dr Beck is an assistant professor, department of emergency medicine, Emory University School of Medicine, Atlanta, Georgia. Dr Meer is an assistant professor and director of emergency ultrasound, department of emergency medicine, Emory University School of Medicine, Atlanta, Georgia.
Background
Abdominal aortic aneurysm (AAA) is a life-threatening condition, with a high mortality rate in undiagnosed cases. Several studies have shown that emergency physicians (EPs) can accurately diagnose an AAA through bedside ultrasound. This examination, which takes approximately 1 to 2 minutes, is easy to learn, perform, and interpret. In cases of a ruptured aneurysm, where minutes matter, this modality can significantly decrease time to diagnosis and expedite surgical consultation and repair.
To perform the scan, the clinician should use a curvilinear (abdominal) probe with the marker pointed toward the patient’s right side. The probe should be placed just caudal to the xiphoid process in a transverse orientation. To locate the aorta, the “spine shadow” should first be identified for orientation. Vertebral bodies will have a bright rounded white cortex anterior to a dark shadow (Figure 1). The aorta is circular in shape, pulsatile, and lies just anterior to the spine. Care should be taken not to confuse the aorta with the inferior vena cava (IVC), which can also be seen in this view. The IVC is located to the right of the spine (in this orientation, it will be seen on the left side of the clinician’s image). The IVC has a thinner wall and is typically more oval in shape than the aorta.
Once the aorta is visualized, the clinician should slide the probe caudally while keeping the aorta in the center of the screen. The celiac trunk will be initially visualized as the probe is moved, and the superior mesenteric artery will be superior caudal to the celiac trunk. The clinician should then continue to move the probe down caudally until the bifurcation, which is typically found just above the level of the umbilicus, is visualized. It is especially important to visualize the distal (infrarenal) aorta just above the bifurcation since this is where most AAAs occur.
A normal aorta caliber will measure less than 3 cm in diameter, and the common iliac vessels should measure half of that diameter (1.5 cm in adult women, 1.85 cm in adult men). Since the entire diameter of aorta that predicts the risk of rupture, it is critical that measurements include any thrombus present (Figure 2).
Once the entire aorta and bifurcation is seen in cross-section, the probe should be rotated clockwise 90 degrees so that the indicator marker is pointed toward the patient’s head; this will allow a longitudinal view of the aorta (Figure 3). When scanning longitudinally, it is important to place the probe over the center of the aorta as any lateral movement will cause the aorta to appear smaller than its actual size.
Points and Tips to Remember
To ensure the scan is performed correctly, it is essential to begin at the xiphoid process and then proceed caudally—without lifting the transducer off the patient. This will ensure the entire aorta is visualized, which is necessary to rule out an AAA.
During evaluation, bowel gas can obscure the image. If this occurs, the clinician should first try increasing the transducer pressure gradually or moving the probe back and forth while applying pressure in an attempt to displace the bowel gas. If this technique is unsuccessful, scanning off the midline or angling the probe may capture the aorta. Alternatively, a coronal image can be obtained by placing the probe on the patient’s right side in the midaxillary line with the indicator marker pointing toward the head.
Limitations
Despite the high sensitivity of ultrasound in detecting AAAs, there are some limitations to its use. Since the majority of AAAs rupture into the retroperitoneum, a rupture or leak is difficult to visualize on ultrasound. The EP should therefore recognize that the presence of an aneurysm alone in the setting of a convincing clinical history is sufficient to make the diagnosis.
Conclusion
Prompt evaluation and management of patients presenting with a suspected AAA are essential to avoid rupture, a catastrophic event with an extremely high-mortality rate. When the proper techniques for visualization are employed, including proper measurement of the aorta, bedside ultrasound is highly sensitive and specific for detecting an AAA.
Dr Taylor is an assistant professor and director of postgraduate medical education, department of emergency medicine, Emory University School of Medicine, Atlanta, Georgia. Dr Beck is an assistant professor, department of emergency medicine, Emory University School of Medicine, Atlanta, Georgia. Dr Meer is an assistant professor and director of emergency ultrasound, department of emergency medicine, Emory University School of Medicine, Atlanta, Georgia.
Emergency Ultrasound: Pneumothorax Assessment
Background
In practiced hands, ultrasound is more sensitive than chest X-ray in evaluating patients with suspected pneumothorax. Due to its portability, this modality can rapidly identify pathology and facilitate prompt intervention in a decompensating patient. This article reviews the proper techniques for evaluating patients for pneumothorax as well as the classic signs indicative of this condition.
Performing the Scan
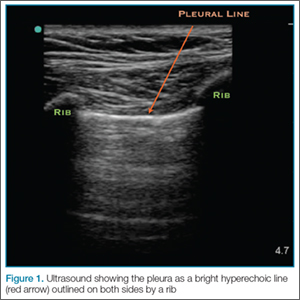
The probe also should be oriented as perpendicular to the chest wall as possible, which will make the pleura appear brighter. Once this view is achieved, the clinician can evaluate for evidence of lung sliding. Since air in pneumothorax rises to the least dependent portion of the chest, this is the area that should be evaluated. In the supine patient, the probe is placed on the anterior chest wall in the second intercostal space, midclavicular line. A high-frequency linear probe is best for evaluating pneumothorax and should be positioned with the indicator marker toward the head. The clinician will need to adjust the probe to visualize the pleura, which will appear as a bright hyperechoic line outlined on both sides by a rib with shadowing beneath (Figure 1).

Lung Siding and Comet-Tail Artifacts
The appearance of lung sliding or a comet-tail artifact on the ultrasound confirms the lung is inflated. Lung sliding has been described as a shimmering appearance of the pleura, or like tiny ants marching on a string. The pleura will seem to slide back and forth as the patient breathes. Comet tails, vertical artifacts originating from the pleura, may be visible on ultrasound, also proving the lung is inflated (Figure 2).
The Lung Point
By continuing to scan laterally down the chest, the clinician may encounter the “lung point”—the junction between the normally inflated lung and pneumothorax. This point moves with respiration, and if visualized, confirms pneumothorax.
Motion Mode
Since lung sliding is sometimes challenging to visualize, using the motion mode (M-mode) on ultrasound can help to confirm findings. The M-mode takes a single line of echoes from the two-dimensional image and plots it against time. (The manner in which the image is produced may be thought of as a graph, with the x-axis representing time and the y-axis the depth.) When using M-mode, the screen will vary in appearance depending on the type of ultrasound being used. While performing the ultrasound, it is important to always keep the probe as still as possible to identify independent motion at the pleura.
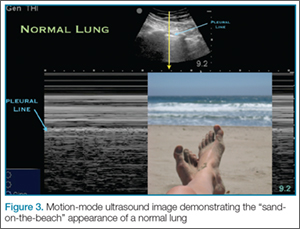
Sand-on-the-Beach Sign
In a normal lung, M-mode images are often described as having a “sand-on-the-beach” appearance (Figure 3). As a normal lung inflates, the motion of the lung changes the brightness of the echoes that return to the machine, creating a speckled appearance like grains of sand beneath the bright pleural line. The soft tissues above the pleural line do not vary with time and thus have a linear appearance.
Barcode or Stratosphere Sign
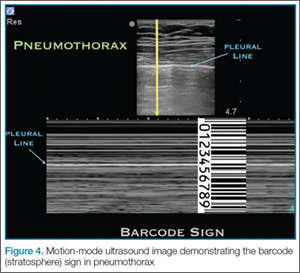
In pneumothorax, however, the granular sand appearance is absent. Instead, the M-mode shows a linear pattern below the pleural line. This pattern is described as the “barcode sign” or “stratosphere sign” (Figure 4).
Pitfalls
There are several pitfalls that can limit the ability to correctly diagnose a pneumothorax. The presence of scarring and adhesions may cause the patient to develop loculated air collections. If one evaluates only the anterior chest, air trapped in another location may be missed. The clinician should also be mindful of the presence of bullae as the appearance of sliding may be diminished in patients with bullous disease. Using the M-mode in these cases may help to identify inflated lung in patients with limited movement at the pleural line.
Furthermore, since it is easy to confuse a bright layer of fascia with the pleura, the clinician should always make sure to identify landmarks. In some cases of pneumothorax, subcutaneous air may obscure the pleura. The ribs should always be identified to ensure one is looking at the pleural line.
Although absence of lung sliding can suggest pneumothorax, other conditions, such as severe consolidation, acute respiratory distress syndrome, and mainstem intubation, can give a similar appearance. Remember, visualization of the lung point is pathnognomic for pneumothorax.
Conclusion
Pneumothorax is a medical emergency requiring immediate diagnosis and treatment. Patients presenting with suspected pneumothorax can be assessed quickly through bedside ultrasound. Once visualization of the pleura is established, the lung may be assessed for the presence or absence of normal lung sliding and comet-tail artifacts. The M-mode setting further enhances visualization and aids in the diagnosis of pneumothorax.
Dr Beck is an assistant professor, department of emergency medicine, Emory University School of Medicine, Atlanta, Georgia. Dr Meer is an assistant professor and director of emergency ultrasound, department of emergency medicine, Emory University School of Medicine, Atlanta, Georgia. Dr Taylor is an assistant professor and director of postgraduate medical education, department of emergency medicine, Emory University School of Medicine, Atlanta, Georgia.
An example of ultrasound demonstrating normal lung sliding, no sliding, and lung point in the presence of pneumothorax may be accessed at https://youtu.be/gRmPh_j_RE8.
Additional information and a video demonstrating lung sliding, may be accessed at http://www.em.emory.edu/ultrasound/ImageWeek/2012/lung_point.html.
Background
In practiced hands, ultrasound is more sensitive than chest X-ray in evaluating patients with suspected pneumothorax. Due to its portability, this modality can rapidly identify pathology and facilitate prompt intervention in a decompensating patient. This article reviews the proper techniques for evaluating patients for pneumothorax as well as the classic signs indicative of this condition.
Performing the Scan
The probe also should be oriented as perpendicular to the chest wall as possible, which will make the pleura appear brighter. Once this view is achieved, the clinician can evaluate for evidence of lung sliding. Since air in pneumothorax rises to the least dependent portion of the chest, this is the area that should be evaluated. In the supine patient, the probe is placed on the anterior chest wall in the second intercostal space, midclavicular line. A high-frequency linear probe is best for evaluating pneumothorax and should be positioned with the indicator marker toward the head. The clinician will need to adjust the probe to visualize the pleura, which will appear as a bright hyperechoic line outlined on both sides by a rib with shadowing beneath (Figure 1).
Lung Siding and Comet-Tail Artifacts
The appearance of lung sliding or a comet-tail artifact on the ultrasound confirms the lung is inflated. Lung sliding has been described as a shimmering appearance of the pleura, or like tiny ants marching on a string. The pleura will seem to slide back and forth as the patient breathes. Comet tails, vertical artifacts originating from the pleura, may be visible on ultrasound, also proving the lung is inflated (Figure 2).
The Lung Point
By continuing to scan laterally down the chest, the clinician may encounter the “lung point”—the junction between the normally inflated lung and pneumothorax. This point moves with respiration, and if visualized, confirms pneumothorax.
Motion Mode
Since lung sliding is sometimes challenging to visualize, using the motion mode (M-mode) on ultrasound can help to confirm findings. The M-mode takes a single line of echoes from the two-dimensional image and plots it against time. (The manner in which the image is produced may be thought of as a graph, with the x-axis representing time and the y-axis the depth.) When using M-mode, the screen will vary in appearance depending on the type of ultrasound being used. While performing the ultrasound, it is important to always keep the probe as still as possible to identify independent motion at the pleura.
Sand-on-the-Beach Sign
In a normal lung, M-mode images are often described as having a “sand-on-the-beach” appearance (Figure 3). As a normal lung inflates, the motion of the lung changes the brightness of the echoes that return to the machine, creating a speckled appearance like grains of sand beneath the bright pleural line. The soft tissues above the pleural line do not vary with time and thus have a linear appearance.
Barcode or Stratosphere Sign
In pneumothorax, however, the granular sand appearance is absent. Instead, the M-mode shows a linear pattern below the pleural line. This pattern is described as the “barcode sign” or “stratosphere sign” (Figure 4).
Pitfalls
There are several pitfalls that can limit the ability to correctly diagnose a pneumothorax. The presence of scarring and adhesions may cause the patient to develop loculated air collections. If one evaluates only the anterior chest, air trapped in another location may be missed. The clinician should also be mindful of the presence of bullae as the appearance of sliding may be diminished in patients with bullous disease. Using the M-mode in these cases may help to identify inflated lung in patients with limited movement at the pleural line.
Furthermore, since it is easy to confuse a bright layer of fascia with the pleura, the clinician should always make sure to identify landmarks. In some cases of pneumothorax, subcutaneous air may obscure the pleura. The ribs should always be identified to ensure one is looking at the pleural line.
Although absence of lung sliding can suggest pneumothorax, other conditions, such as severe consolidation, acute respiratory distress syndrome, and mainstem intubation, can give a similar appearance. Remember, visualization of the lung point is pathnognomic for pneumothorax.
Conclusion
Pneumothorax is a medical emergency requiring immediate diagnosis and treatment. Patients presenting with suspected pneumothorax can be assessed quickly through bedside ultrasound. Once visualization of the pleura is established, the lung may be assessed for the presence or absence of normal lung sliding and comet-tail artifacts. The M-mode setting further enhances visualization and aids in the diagnosis of pneumothorax.
Dr Beck is an assistant professor, department of emergency medicine, Emory University School of Medicine, Atlanta, Georgia. Dr Meer is an assistant professor and director of emergency ultrasound, department of emergency medicine, Emory University School of Medicine, Atlanta, Georgia. Dr Taylor is an assistant professor and director of postgraduate medical education, department of emergency medicine, Emory University School of Medicine, Atlanta, Georgia.
An example of ultrasound demonstrating normal lung sliding, no sliding, and lung point in the presence of pneumothorax may be accessed at https://youtu.be/gRmPh_j_RE8.
Additional information and a video demonstrating lung sliding, may be accessed at http://www.em.emory.edu/ultrasound/ImageWeek/2012/lung_point.html.

Emergency Ultrasound: Soft-Tissue Assessment
Background
Emergency physicians and other clinicians frequently encounter patients presenting with soft-tissue complaints. Oftentimes, there is diagnostic uncertainty as to whether a patient has cellulitis, an abscess, or both. A prospective observational study by Tayal et al,1 demonstrated that bedside ultrasound assisted in identifying and differentiating abscess versus cellulitis, altering management in half of the patients.
Anatomy
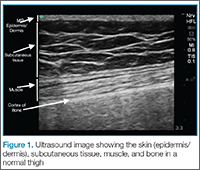
The epidermis and dermis are indistinguishable by ultrasound, and appear as a single thin bright layer. Below the epidermis and dermis, the subcutaneous layer appears as dark layer, which represents fat and bright connective tissue layer. Deep to that is the fascia, which is a linear bright layer. Below the fascia, muscle fascicles can be seen, which appear as bright striations in a fibrillar pattern.
Preparation and Technique

For practical and infection-control purposes, a tegaderm barrier dressing is recommended for covering the end of the probe (Figure 2). Structures should be viewed in at least two planes (ie, longitudinal and short axis).
Cellulitis

. This finding, however, is not specific to cellulitis alone, but can be seen in other conditions that cause interstitial swelling, such as congestive heart failure and peripheral edema.
Abscess
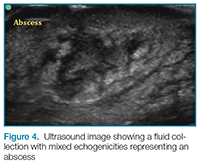
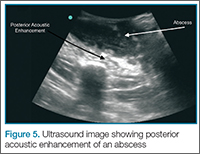
Putting a little downward pressure with the linear transducer over the abscess can produce swirling or movement within the abscess cavity, and has been informally coined “pustalsis” (Figure 5).
Lymph Nodes
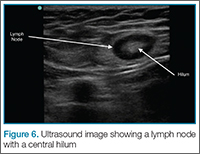
If color flow is placed on the area, blood flow into the node can be seen. Ultrasound can avoid unnecessary incision and drainage procedure in a patient with lymphadenopathy.
Conclusion
Bedside ultrasound is a useful and easily accessible tool to confirm the diagnosis and facilitate treatment in patients with soft-tissue complaints, including cellulitis, abscess, and lymphadenopathy. This modality is especially helpful in identifying vascular structures in areas such as the axilla or groin when incision and drainage are indicated, and can also help avoid mistaking an abdominal wall hernia for an abscess.
Dr Meer is an assistant professor and director of emergency ultrasound, department of emergency medicine, Emory University School of Medicine, Atlanta, Georgia. Dr Taylor is an assistant professor and director of postgraduate medical education, department of emergency medicine, Emory University School of Medicine, Atlanta, Georgia. Dr Beck is an assistant professor, department of emergency medicine, Emory University School of Medicine, Atlanta, Georgia.
Reference
- Tayal VS, Hasan N, Norton HJ, Tomaszewski CA. The effect of soft-tissue ultrasound on the management of cellulitis in the emergency department. Acad Emerg Med. 2006;13(4):384-388.
Background
Emergency physicians and other clinicians frequently encounter patients presenting with soft-tissue complaints. Oftentimes, there is diagnostic uncertainty as to whether a patient has cellulitis, an abscess, or both. A prospective observational study by Tayal et al,1 demonstrated that bedside ultrasound assisted in identifying and differentiating abscess versus cellulitis, altering management in half of the patients.
Anatomy
The epidermis and dermis are indistinguishable by ultrasound, and appear as a single thin bright layer. Below the epidermis and dermis, the subcutaneous layer appears as dark layer, which represents fat and bright connective tissue layer. Deep to that is the fascia, which is a linear bright layer. Below the fascia, muscle fascicles can be seen, which appear as bright striations in a fibrillar pattern.
Preparation and Technique
For practical and infection-control purposes, a tegaderm barrier dressing is recommended for covering the end of the probe (Figure 2). Structures should be viewed in at least two planes (ie, longitudinal and short axis).
Cellulitis
. This finding, however, is not specific to cellulitis alone, but can be seen in other conditions that cause interstitial swelling, such as congestive heart failure and peripheral edema.
Abscess
Putting a little downward pressure with the linear transducer over the abscess can produce swirling or movement within the abscess cavity, and has been informally coined “pustalsis” (Figure 5).
Lymph Nodes
If color flow is placed on the area, blood flow into the node can be seen. Ultrasound can avoid unnecessary incision and drainage procedure in a patient with lymphadenopathy.
Conclusion
Bedside ultrasound is a useful and easily accessible tool to confirm the diagnosis and facilitate treatment in patients with soft-tissue complaints, including cellulitis, abscess, and lymphadenopathy. This modality is especially helpful in identifying vascular structures in areas such as the axilla or groin when incision and drainage are indicated, and can also help avoid mistaking an abdominal wall hernia for an abscess.
Dr Meer is an assistant professor and director of emergency ultrasound, department of emergency medicine, Emory University School of Medicine, Atlanta, Georgia. Dr Taylor is an assistant professor and director of postgraduate medical education, department of emergency medicine, Emory University School of Medicine, Atlanta, Georgia. Dr Beck is an assistant professor, department of emergency medicine, Emory University School of Medicine, Atlanta, Georgia.
Reference
- Tayal VS, Hasan N, Norton HJ, Tomaszewski CA. The effect of soft-tissue ultrasound on the management of cellulitis in the emergency department. Acad Emerg Med. 2006;13(4):384-388.
Reference
- Tayal VS, Hasan N, Norton HJ, Tomaszewski CA. The effect of soft-tissue ultrasound on the management of cellulitis in the emergency department. Acad Emerg Med. 2006;13(4):384-388.

Emergency Ultrasound: Ultrasound-Guided Posterior Tibial Nerve Block
Posterior Tibial Nerve Block
Identifying the Posterior Tibial Nerve

Performing the Block
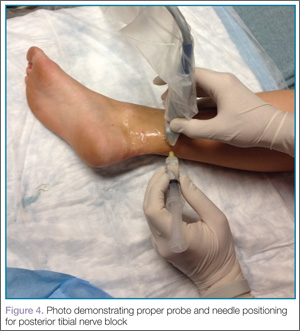
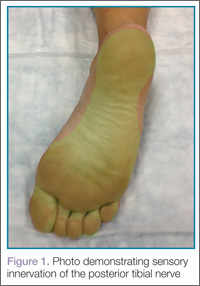
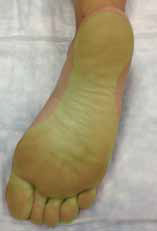
It is important to remember that the medial and lateral aspects of the sole of the foot receive variable degrees of innervation from the saphenous and sural nerves respectively; therefore, the EP should always ensure the area of interest is completely anesthetized before beginning the procedure.
Conclusion
Penetrating injuries to the sole of the foot are a common presentation in the ED. Achieving adequate anesthesia to the area with local anesthetic alone can be a difficult and painful process. However, with practice, ultrasound guidance can improve procedural success and decrease the risk of nerve injury as compared to blind nerve blocks.
Dr Beck is an assistant professor, department of emergency medicine, Emory University School of Medicine, Atlanta, Georgia. Dr Taylor is an assistant professor and director of postgraduate medical education, department of emergency medicine, Emory University School of Medicine, Atlanta, Georgia. Dr Meer is an assistant professor and director of emergency ultrasound, department of emergency medicine, Emory University School of Medicine, Atlanta, Georgia.
Reference
- Redborg KE, Antonakakis JG, Beach ML, Chinn CD, Sites BD. Ultrasound improves the success rate of a tibial nerve block at the ankle regional anesthesia and pain medicine. Reg Anesth Pain Med. 2009;34(3):256-260.
Posterior Tibial Nerve Block
Identifying the Posterior Tibial Nerve
Performing the Block
It is important to remember that the medial and lateral aspects of the sole of the foot receive variable degrees of innervation from the saphenous and sural nerves respectively; therefore, the EP should always ensure the area of interest is completely anesthetized before beginning the procedure.
Conclusion
Penetrating injuries to the sole of the foot are a common presentation in the ED. Achieving adequate anesthesia to the area with local anesthetic alone can be a difficult and painful process. However, with practice, ultrasound guidance can improve procedural success and decrease the risk of nerve injury as compared to blind nerve blocks.
Dr Beck is an assistant professor, department of emergency medicine, Emory University School of Medicine, Atlanta, Georgia. Dr Taylor is an assistant professor and director of postgraduate medical education, department of emergency medicine, Emory University School of Medicine, Atlanta, Georgia. Dr Meer is an assistant professor and director of emergency ultrasound, department of emergency medicine, Emory University School of Medicine, Atlanta, Georgia.
Reference
- Redborg KE, Antonakakis JG, Beach ML, Chinn CD, Sites BD. Ultrasound improves the success rate of a tibial nerve block at the ankle regional anesthesia and pain medicine. Reg Anesth Pain Med. 2009;34(3):256-260.
Reference
- Redborg KE, Antonakakis JG, Beach ML, Chinn CD, Sites BD. Ultrasound improves the success rate of a tibial nerve block at the ankle regional anesthesia and pain medicine. Reg Anesth Pain Med. 2009;34(3):256-260.
Emergency Ultrasound: Lung Assessment
Lung ultrasound can be a valuable addition to the emergency physician’s (EP’s) diagnostic armamentarium. This article reviews how this modality may be used to differentiate between chronic obstructive pulmonary disease (COPD) and coronary heart failure (CHF) exacerbations. As patients often have a history of both of these diseases, it is difficult to distinguish which condition is the cause of a patient’s dyspnea. This examination is easy to learn and in most cases, it can be performed within 3 to 4 minutes. Most importantly, lung ultrasound can assist in making clinical decisions in real time at the bedside. Although the following is not a comprehensive review, it does provide the basic essentials, allowing the clinician to begin using this modality in the ED.
Getting Started
The curvilinear probe is required to perform ultrasound of the lungs. Most studies divide the lung into regions, though consensus on exactly how many regions are required remains unclear. The blue protocol, which is probably the most well-known study, divides the lung into the anterior, lateral, and posterolateral sections.1 The superior and inferior aspects of each zone are evaluated with a total of six ultrasound views
per lung.
Artifacts
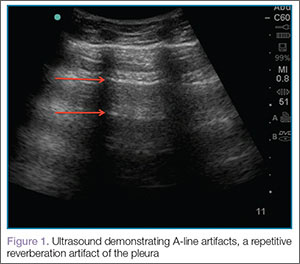

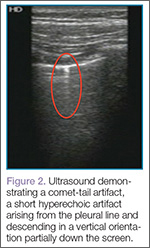
Lung sliding is movement of the parietal pleura sliding against the visceral pleura. A lines are a repetitive reverberation artifact of the pleura (Figure 1). Occasional comet-tail artifacts—short hyperechoic artifacts that arise from the pleural line and descend in a vertical orientation partially down the screen (Figure 2).

Differential Diagnosis
When using ultrasound to differentiate between CHF and COPD, this examination has been shown to have a sensitivity of 100% and a specificity of 92%.2 By performing lung ultrasound immediately upon a patient’s arrival to the ED, the clinician can obtain quick and accurate insight into whether a patient would benefit from albuterol or nitroglycerin. In the acutely dyspneic patient, combining lung ultrasound with focused echocardiogram and sonographic inferior vena cava assessment will provide additional information to support the diagnosis.
Conclusion
As with other bedside imaging techniques, lung ultrasound in the ED can help to quickly assess the dyspneic patient and facilitate initiation of appropriate treatment.
Dr Taylor is an assistant professor and director of postgraduate medical education, department of emergency medicine, Emory University School of Medicine, Atlanta, Georgia. Dr Meer is an assistant professor and director of emergency ultrasound, department of emergency medicine, Emory University School of Medicine, Atlanta, Georgia. Dr Beck is an assistant professor, department of emergency medicine, Emory University School of Medicine, Atlanta, Georgia.
- Lichtenstein DA, Mezière GA. Relevance of lung ultrasound in the diagnosis of acute respiratory failure: the BLUE protocol. Chest. 2008;134(1):117-125.
- Lichtenstein D, Mezière G. A lung ultrasound sign allowing bedside distinction between pulmonary edema and COPD: the comet-tail artifact. Intensive Care Med. 1998;24(12):1331-1334.
Lung ultrasound can be a valuable addition to the emergency physician’s (EP’s) diagnostic armamentarium. This article reviews how this modality may be used to differentiate between chronic obstructive pulmonary disease (COPD) and coronary heart failure (CHF) exacerbations. As patients often have a history of both of these diseases, it is difficult to distinguish which condition is the cause of a patient’s dyspnea. This examination is easy to learn and in most cases, it can be performed within 3 to 4 minutes. Most importantly, lung ultrasound can assist in making clinical decisions in real time at the bedside. Although the following is not a comprehensive review, it does provide the basic essentials, allowing the clinician to begin using this modality in the ED.
Getting Started
The curvilinear probe is required to perform ultrasound of the lungs. Most studies divide the lung into regions, though consensus on exactly how many regions are required remains unclear. The blue protocol, which is probably the most well-known study, divides the lung into the anterior, lateral, and posterolateral sections.1 The superior and inferior aspects of each zone are evaluated with a total of six ultrasound views
per lung.
Artifacts
Lung sliding is movement of the parietal pleura sliding against the visceral pleura. A lines are a repetitive reverberation artifact of the pleura (Figure 1). Occasional comet-tail artifacts—short hyperechoic artifacts that arise from the pleural line and descend in a vertical orientation partially down the screen (Figure 2).
Differential Diagnosis
When using ultrasound to differentiate between CHF and COPD, this examination has been shown to have a sensitivity of 100% and a specificity of 92%.2 By performing lung ultrasound immediately upon a patient’s arrival to the ED, the clinician can obtain quick and accurate insight into whether a patient would benefit from albuterol or nitroglycerin. In the acutely dyspneic patient, combining lung ultrasound with focused echocardiogram and sonographic inferior vena cava assessment will provide additional information to support the diagnosis.
Conclusion
As with other bedside imaging techniques, lung ultrasound in the ED can help to quickly assess the dyspneic patient and facilitate initiation of appropriate treatment.
Dr Taylor is an assistant professor and director of postgraduate medical education, department of emergency medicine, Emory University School of Medicine, Atlanta, Georgia. Dr Meer is an assistant professor and director of emergency ultrasound, department of emergency medicine, Emory University School of Medicine, Atlanta, Georgia. Dr Beck is an assistant professor, department of emergency medicine, Emory University School of Medicine, Atlanta, Georgia.
- Lichtenstein DA, Mezière GA. Relevance of lung ultrasound in the diagnosis of acute respiratory failure: the BLUE protocol. Chest. 2008;134(1):117-125.
- Lichtenstein D, Mezière G. A lung ultrasound sign allowing bedside distinction between pulmonary edema and COPD: the comet-tail artifact. Intensive Care Med. 1998;24(12):1331-1334.
Emergency Ultrasound: Bedside Ultrasound for Ocular Emergencies
Ocular Ultrasound
Since the eye is predominantly composed of fluid, it is the perfect organ for ultrasound evaluation. As shown in a prospective observational study by Blaivas et al in 2002,1 the use of bedside ultrasound in the ED can assist in the rapid diagnosis of time-sensitive conditions such as retinal detachment, vitreous hemorrhage, and lens dislocation.
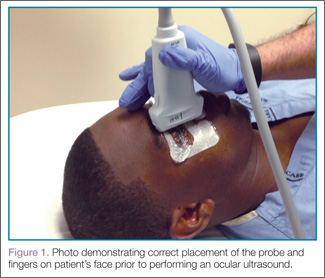
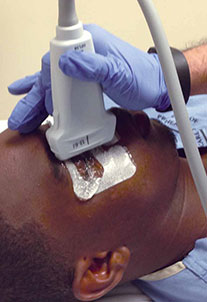
Using a high-frequency transducer, the clinician should place a tegaderm barrier over the closed eyelid of the reclined patient before next applying copious amounts of sterile gel to the top of the barrier (ultrasound gel is not bacteriostatic). Then he or she should brace a hand on the patient’s forehead or cheek to control the downward pressure exerted on the transducer (Figure 1). The transducer will sit on top of the gel and make indirect contact with the eyelid.
It is important to note that while ocular ultrasound is an excellent imaging modality, it is contraindicated in patients in whom globe rupture is suspected or obvious due to the risk of pressing on the globe with resulting increase in intraocular pressure.
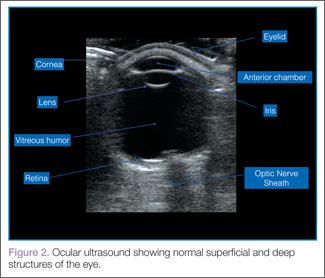
When performing ocular ultrasound, it is recommended that the clinician should scan/sweep the normal eye first and then the abnormal eye. Figure 2 demonstrates the ocular structures easily visualized by ultrasound.. Both eyes should be imaged in at least 2 planes. In addition, the patient should be instructed to look through all of the cardinal positions of gaze to maximize the ocular structures visualized.
Over-gaining the image is also helpful when looking at the posterior chamber for hemorrhage or retinal detachment. However, the time spent scanning the eye should be limited, since ultrasound could theoretically cause heating and cavitation over a prolonged period of time.
Retinal Detachment
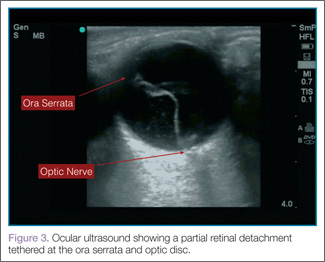
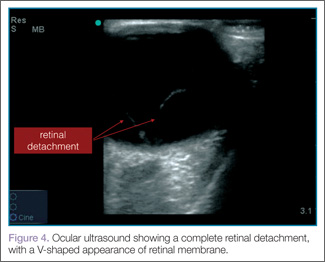
When evaluating for retinal detachment, one should focus on the posterior chamber of the eye and turn-up the far-field gain. The retina is firmly attached at two sites: the optic nerve posteriorly and the ora serrata anteriorly. Even with a complete retinal detachment, the retina is tethered at these points. Therefore, during examination, look for a hyperechoic membrane floating and moving within the vitreous body, but tethered anteriorly and posteriorly when the patient moves his or her eyes. Figures 3 and 4 are examples of ultrasound demonstrating partial and complete retinal detachment.
 |  |
Vitreous Hemorrhage
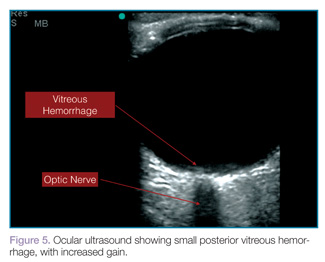
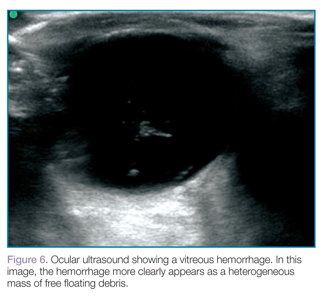
Vitreous hemorrhages will appear as hyperechoic particles or opacities within the posterior chamber (Figures 5 and 6). The appearance of hemorrhage will vary depending on age and degree, and can have the appearance of swirling or rotating particles during eye movement, resembling the movement of clothes in a washing machine.
 |  |
Lens Dislocation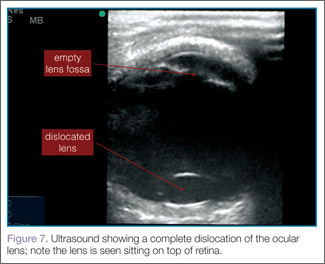
Lens dislocations are quite easy to visualize on ultrasound and are divided into partial or full dislocations. Complete dislocations are diagnosed when the lens is out of the expected position, dislodged into the anterior chamber or vitreous (Figure 7). Partial dislocations are harder to diagnose and require careful attention during active range of movement of the eye—the lens will appear to move independent of the rest of the iris/ciliary body complex.2
Conclusion
Bedside ultrasound performed in the ED can rapidly and accurately evaluate and diagnose ocular emergencies, facilitating prompt treatment.
Dr Taylor is an assistant professor and director of postgraduate medical education, department of emergency medicine, Emory University School of Medicine, Atlanta, Georgia. Dr Meer is an assistant professor and director of emergency ultrasound, department of emergency medicine, Emory University School of Medicine, Atlanta, Georgia. Dr Beck is an assistant professor, department of emergency medicine, Emory University School of Medicine, Atlanta, Georgia.
- Blaivas M, Theodoro D, Sierzenski PR. A study of bedside ocular ultrasonography in the emergency department. Acad Emerg Med. 2002;9(8):791-799.
- Roque PJ, Hatch N, Barr L, Wu TS. Bedside ocular ultrasound. Crit Care Clin. 2014;30(2):227-241.
For a video clip showing a retinal detachment with acute bleeding behind the retina, visit the authors’ Web site at http://www.em.emory.edu/ultrasound/ImageWeek/lens_dislocation.
For a video clip showing the appearance of a vitreous hemorrhage as a swirling action with eye movement, visit http://youtu.be/psE1znjBF2o.
Ocular Ultrasound
Since the eye is predominantly composed of fluid, it is the perfect organ for ultrasound evaluation. As shown in a prospective observational study by Blaivas et al in 2002,1 the use of bedside ultrasound in the ED can assist in the rapid diagnosis of time-sensitive conditions such as retinal detachment, vitreous hemorrhage, and lens dislocation.
Using a high-frequency transducer, the clinician should place a tegaderm barrier over the closed eyelid of the reclined patient before next applying copious amounts of sterile gel to the top of the barrier (ultrasound gel is not bacteriostatic). Then he or she should brace a hand on the patient’s forehead or cheek to control the downward pressure exerted on the transducer (Figure 1). The transducer will sit on top of the gel and make indirect contact with the eyelid.
It is important to note that while ocular ultrasound is an excellent imaging modality, it is contraindicated in patients in whom globe rupture is suspected or obvious due to the risk of pressing on the globe with resulting increase in intraocular pressure.
When performing ocular ultrasound, it is recommended that the clinician should scan/sweep the normal eye first and then the abnormal eye. Figure 2 demonstrates the ocular structures easily visualized by ultrasound.. Both eyes should be imaged in at least 2 planes. In addition, the patient should be instructed to look through all of the cardinal positions of gaze to maximize the ocular structures visualized.
Over-gaining the image is also helpful when looking at the posterior chamber for hemorrhage or retinal detachment. However, the time spent scanning the eye should be limited, since ultrasound could theoretically cause heating and cavitation over a prolonged period of time.
Retinal Detachment
When evaluating for retinal detachment, one should focus on the posterior chamber of the eye and turn-up the far-field gain. The retina is firmly attached at two sites: the optic nerve posteriorly and the ora serrata anteriorly. Even with a complete retinal detachment, the retina is tethered at these points. Therefore, during examination, look for a hyperechoic membrane floating and moving within the vitreous body, but tethered anteriorly and posteriorly when the patient moves his or her eyes. Figures 3 and 4 are examples of ultrasound demonstrating partial and complete retinal detachment.
| |
Vitreous Hemorrhage
Vitreous hemorrhages will appear as hyperechoic particles or opacities within the posterior chamber (Figures 5 and 6). The appearance of hemorrhage will vary depending on age and degree, and can have the appearance of swirling or rotating particles during eye movement, resembling the movement of clothes in a washing machine.
| |
Lens Dislocation
Lens dislocations are quite easy to visualize on ultrasound and are divided into partial or full dislocations. Complete dislocations are diagnosed when the lens is out of the expected position, dislodged into the anterior chamber or vitreous (Figure 7). Partial dislocations are harder to diagnose and require careful attention during active range of movement of the eye—the lens will appear to move independent of the rest of the iris/ciliary body complex.2
Conclusion
Bedside ultrasound performed in the ED can rapidly and accurately evaluate and diagnose ocular emergencies, facilitating prompt treatment.
Dr Taylor is an assistant professor and director of postgraduate medical education, department of emergency medicine, Emory University School of Medicine, Atlanta, Georgia. Dr Meer is an assistant professor and director of emergency ultrasound, department of emergency medicine, Emory University School of Medicine, Atlanta, Georgia. Dr Beck is an assistant professor, department of emergency medicine, Emory University School of Medicine, Atlanta, Georgia.
- Blaivas M, Theodoro D, Sierzenski PR. A study of bedside ocular ultrasonography in the emergency department. Acad Emerg Med. 2002;9(8):791-799.
- Roque PJ, Hatch N, Barr L, Wu TS. Bedside ocular ultrasound. Crit Care Clin. 2014;30(2):227-241.
For a video clip showing a retinal detachment with acute bleeding behind the retina, visit the authors’ Web site at http://www.em.emory.edu/ultrasound/ImageWeek/lens_dislocation.
For a video clip showing the appearance of a vitreous hemorrhage as a swirling action with eye movement, visit http://youtu.be/psE1znjBF2o.