User login
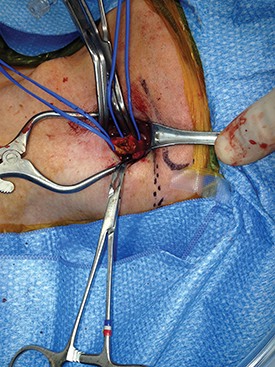
Carotid-axillary bypass for revascularization of the left subclavian artery in zone-2 TEVAR
Stent-graft coverage of the left subclavian artery (LSA) is often performed during TEVAR treatment of thoracic aortic pathologies and, consequently, debranching of the LSA is frequently performed in such settings. The carotid-subclavian bypass (CSB) is undoubtedly the cervical bypass option preferred by most surgeons for this purpose.1,2 The technique was first described by Lyons and Galbraith in 1957,3 and popularized by Diethrich et al. who reported their large experience in a well-known article published 10 years later.4 In the ensuing decades, CSB became the overwhelming favorite of surgeons everywhere performing LSA revascularization for management of arterial occlusive disease and, more recently, in the context of zone-2 TEVAR. Well- documented good results would seem to justify such preference,5 but some level of concern has been voiced consistently over the years about some technical complexities and potential complications such as phrenic nerve and thoracic duct injuries.6 My own personal experience substantiated these reservations early on, prompting adoption of an alternative operative solution with use of the carotid-axillary bypass (CAB),7 an operation first reported by Shumacker in 1973.8 In my hands, it has produced equivalent results to the carotid-subclavian technique in terms of efficacy and durability, and with the additional appeal of distinct practical advantages – mainly because the axillary artery tends to be an easier vessel to expose and handle, and through the avoidance of complications resulting from damage to anatomical structures that are often in harm’s way when exposing the LSA.
Technical aspects
End-to-side anastomoses proximally and distally are constructed in routine manner (Fig. 2). We do not use carotid shunting for this procedure.
Occasionally one may want to combine a carotid endarterectomy with the cervical bypass, in which case the proximal vascular graft anastomosis is constructed at the endarterectomy site (Fig. 3). Close attention must be paid to careful length-tailoring the conduit to achieve the desirable gently curving course without undue tension or redundancy.
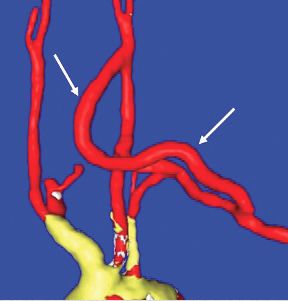
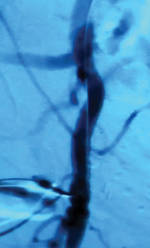
Proximal ligation of the LSA, often performed during the CSB, cannot be a component of the carotid-axillary operation because of inaccessibility. Some experts look upon this as a disadvantage, but I tend to view such limitation as advantageous because it eliminates the potential for a misplaced ligation distal to the left vertebral artery origin which present-day CTA studies show it to be the case more frequently than previously suspected. If interruption of the LSA is deemed necessary, it is arguably best to use an endovascular (retrograde trans-brachial) approach with precise deployment of a vascular plug device under angiographic guidance (Fig. 4). ■
Dr. Criado is at MedStar Union Memorial Hospital, Baltimore.
References
1. J Endovasc Ther 2002;9(suppl 2):1132-1138.
2. Ann Cardiothorac Surg 2013;2:247-260.
3. Ann Surg 1957;146:487-494.
4. Am J Surg 1967;114:800-808.
5. J Vasc Surg 2008;48:555-560.
6. Ann Vasc Surg 2008;22:70-78.
7. J Vasc Surg 1995;22:717-723.
8. Surg Gynecol Obstet 1973;136:447-8.
9. J Vasc Surg 1999;30:1106-1112.
Stent-graft coverage of the left subclavian artery (LSA) is often performed during TEVAR treatment of thoracic aortic pathologies and, consequently, debranching of the LSA is frequently performed in such settings. The carotid-subclavian bypass (CSB) is undoubtedly the cervical bypass option preferred by most surgeons for this purpose.1,2 The technique was first described by Lyons and Galbraith in 1957,3 and popularized by Diethrich et al. who reported their large experience in a well-known article published 10 years later.4 In the ensuing decades, CSB became the overwhelming favorite of surgeons everywhere performing LSA revascularization for management of arterial occlusive disease and, more recently, in the context of zone-2 TEVAR. Well- documented good results would seem to justify such preference,5 but some level of concern has been voiced consistently over the years about some technical complexities and potential complications such as phrenic nerve and thoracic duct injuries.6 My own personal experience substantiated these reservations early on, prompting adoption of an alternative operative solution with use of the carotid-axillary bypass (CAB),7 an operation first reported by Shumacker in 1973.8 In my hands, it has produced equivalent results to the carotid-subclavian technique in terms of efficacy and durability, and with the additional appeal of distinct practical advantages – mainly because the axillary artery tends to be an easier vessel to expose and handle, and through the avoidance of complications resulting from damage to anatomical structures that are often in harm’s way when exposing the LSA.
Technical aspects
End-to-side anastomoses proximally and distally are constructed in routine manner (Fig. 2). We do not use carotid shunting for this procedure.
Occasionally one may want to combine a carotid endarterectomy with the cervical bypass, in which case the proximal vascular graft anastomosis is constructed at the endarterectomy site (Fig. 3). Close attention must be paid to careful length-tailoring the conduit to achieve the desirable gently curving course without undue tension or redundancy.
Proximal ligation of the LSA, often performed during the CSB, cannot be a component of the carotid-axillary operation because of inaccessibility. Some experts look upon this as a disadvantage, but I tend to view such limitation as advantageous because it eliminates the potential for a misplaced ligation distal to the left vertebral artery origin which present-day CTA studies show it to be the case more frequently than previously suspected. If interruption of the LSA is deemed necessary, it is arguably best to use an endovascular (retrograde trans-brachial) approach with precise deployment of a vascular plug device under angiographic guidance (Fig. 4). ■
Dr. Criado is at MedStar Union Memorial Hospital, Baltimore.
References
1. J Endovasc Ther 2002;9(suppl 2):1132-1138.
2. Ann Cardiothorac Surg 2013;2:247-260.
3. Ann Surg 1957;146:487-494.
4. Am J Surg 1967;114:800-808.
5. J Vasc Surg 2008;48:555-560.
6. Ann Vasc Surg 2008;22:70-78.
7. J Vasc Surg 1995;22:717-723.
8. Surg Gynecol Obstet 1973;136:447-8.
9. J Vasc Surg 1999;30:1106-1112.
Tips and Tricks: Dealing with a troublesome peritoneal dialysis catheter
When faced with a poorly performing or nonfunctional peritoneal dialysis catheter, there is a very simple trick to make laparoscopic exploration easier. Prep the catheter into the field and take extra care to prep the cover of the catheter. It is usually easier to remove the extended portion of the catheter (A) and just leave the shorter piece (B).

As soon as the port is in, simply switch the CO2 over to it from the catheter. This technique comes in handy quite often, as many patients with difficult PD catheters have undergone multiple explorations or laparoscopies. Not rocket science, but it can definitely save you and the patient some difficulty!
Dr. Rigberg is Clinical Professor of Surgery and Program Director, University of California, Los Angeles, Division of Vascular Surgery, and an associate medical editor for Vascular Specialist.
When faced with a poorly performing or nonfunctional peritoneal dialysis catheter, there is a very simple trick to make laparoscopic exploration easier. Prep the catheter into the field and take extra care to prep the cover of the catheter. It is usually easier to remove the extended portion of the catheter (A) and just leave the shorter piece (B).
As soon as the port is in, simply switch the CO2 over to it from the catheter. This technique comes in handy quite often, as many patients with difficult PD catheters have undergone multiple explorations or laparoscopies. Not rocket science, but it can definitely save you and the patient some difficulty!
Dr. Rigberg is Clinical Professor of Surgery and Program Director, University of California, Los Angeles, Division of Vascular Surgery, and an associate medical editor for Vascular Specialist.
Tips and Tricks: Using a ‘Roman sandal’ after compartment syndrome treatment
Compartment syndrome is a common complication after revascularization for acute lower extremity ischemia. Treatment with four compartment fasciotomy can result in significant morbidity, with wounds that are challenging to manage for both the patient and practitioner.
An alternative to wound VAC or simple wet-to-dry dressings, the “Roman sandal” technique makes bedside closure of these wounds possible, especially in patients with minimal postdecompression muscle edema.
Upper arm loop grafts
Many forearm loop grafts have multiple outflow interventions before failure. These angioplasties and outflow stents create inflammation around the vein just above the antecubital area. This inflammation makes arterial exposure difficult for a standard upper arm graft configuration. Accordingly, surgeons may avoid this area by performing an upper arm loop graft, which originates and terminates in one high arm incision. Upper arm loop grafts are also used for high bifurcation of the radial and ulnar arteries and when prior access grafts make other configurations difficult. Surgeons appear to place these upper arm loops routed with one limb running subcutaneously parallel to the brachial artery, placing half of the loop in an awkward position for cannulation.

Dr. Showalter is clinical assistant professor of surgery, Florida State University Medical School, Tallahassee, and attending vascular surgeon, Sarasota Vascular Specialists.
Many forearm loop grafts have multiple outflow interventions before failure. These angioplasties and outflow stents create inflammation around the vein just above the antecubital area. This inflammation makes arterial exposure difficult for a standard upper arm graft configuration. Accordingly, surgeons may avoid this area by performing an upper arm loop graft, which originates and terminates in one high arm incision. Upper arm loop grafts are also used for high bifurcation of the radial and ulnar arteries and when prior access grafts make other configurations difficult. Surgeons appear to place these upper arm loops routed with one limb running subcutaneously parallel to the brachial artery, placing half of the loop in an awkward position for cannulation.
Dr. Showalter is clinical assistant professor of surgery, Florida State University Medical School, Tallahassee, and attending vascular surgeon, Sarasota Vascular Specialists.
Using a retrojugular approach to the carotid
Carotid endarterectomy is one of the most common operations for vascular surgeons. The standard approach, anteriorly, requires division of the facial vein, frequently additional small tributaries, and sacrifice of the ansa cervicalis.
The facial vein is not infrequently the cause of bleeding on patients returned to the OR who truly have surgical bleeding. The vagus nerve is not well visualized during the standard approach, unless maneuvers are taken to specifically identify it. Although this approach gives good access to the common carotid artery, and to the external carotid, it requires additional maneuvers in order to gain access to the distal internal carotid artery (ICA), which is located more posterolaterally.
This frequently requires ligation of the vascular bundle around the hypoglossal nerve, which can lead to bleeding if not properly addressed. Visualization of the distal ICA is not ideal with this approach.
An alternative: The retrojugular approach
The surgery is performed with the patient prepped in the same fashion as for standard CEA. Skin incision and initial dissection is identical for standard CEA approach, and is made along the sternocleidomastoid, with division of the platysma.
Dissection is carried out just along the border of the SCM until the carotid sheath is encountered. At this point, the dissection differs. Dissection is continued along the lateral border of the internal jugular vein, which is gently dissected from the surrounding tissue.
There are rarely branches along the lateral or posterior border that require ligation. This area is sharply dissected due to the proximity of nervous structures. The vagus nerve is easily visualized utilizing this approach, and left lateral to the carotid artery. Once a sufficient length of jugular has been mobilized, a blunt whietlander is placed, retracting the vein medially. The Carotid artery is then easily visualized, with a long segment of the ICA easily visible.
The hypoglossal nerve and facial vein are not visualized. The ansa cervicalis is not divided. Standard mobilization of the CCA, ICA, and ECA is then performed. With this approach, the ICA is anterior.
Visualization of the ECA is slightly more limited with this approach, but the proximal ECA and superior thyroidal arteries are easily identified and looped. CEA, either with eversion or standard longitudinal incision, is completed in standard fashion. After completion of the CEA, and confirmation of adequate hemostasis, the IJ is simply allowed to return to its normal position. The wound is then closed in standard fashion.
This approach permits significant exposure to a markedly longer segment of the ICA, without division of additional vascular branches, nor mobilization of nerves. There is slightly less visibility of the ECA, but more than adequate for the necessary vascular control. The approach also has less risk of postoperative bleed, and has been reported to be slightly faster than the anterior approach.
Dr. Harris is division chief, Vascular Surgery, at the State University of New York at Buffalo, and an associate medical editor of Vascular Specialist.

Using the gracilis muscle flap
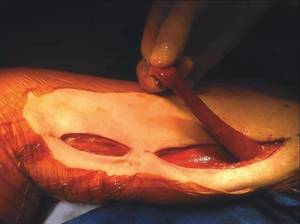
Muscle flaps have come to play an invaluable role in the management of complex groin wounds (Figure 1). We have found that the gracilis muscle offers significant advantages over other local muscle flaps. In comparison to the segmental blood supply of the sartorius muscle which can be disrupted during mobilization, the gracilis muscle has a single vascular pedicle that arises reliably from the medial femoral circumflex vessels. Unlike the sartorius muscle which may be damaged by the infectious/inflammatory process in the groin, the gracilis muscle is remote from the groin wound itself. In addition, the procedure is relatively simple and can be completed in less than thirty minutes.
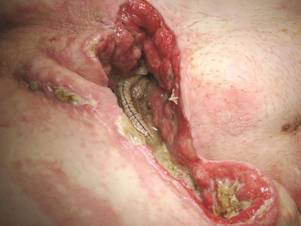
The procedure is performed with the patient in the supine position with the knee slightly flexed. The gracilis muscle can be palpated along the medial aspect of the thigh and the longitudinal incision is placed directly over the muscle . After the deep fascia is divided, the muscle can be easily freed from surrounding attachments (Figure 2). We completely mobilize the distal two-thirds of the muscle and divide it at the musculotendinous insertion on the femur. We do not mobilize the proximal one-third of the muscle to avoid injury to the vascular pedicle). The muscle is retroflexed into the groin wound using a ringed-forceps. The muscle provides excellent coverage of the femoral triangle. A vacuum dressing may be applied without concern for injury to the femoral vessels.
We used the gracilis flap to treat complex groin wounds in 68 limbs in 64 patients at the University of Arkansas for Medical Sciences, Little Rock. Complete healing was achieved in 91%. In six patients (9%), recurrent or persistent infection led to bleeding that required surgical management. Limb salvage was achieved in 86%.
The presence of autogenous vascular reconstruction was associated with a reduced risk of persistent/recurrent infection in comparison to synthetic grafts (2.3% vs 23.8%, P = .006). Age greater than 75 years was associated with worse outcomes overall. Wound problems (infection, hematoma, seroma) at the harvest site were rare.
We prefer the gracilis flap to the sartorius or other groin muscle flaps in the management of complex groin wounds. The procedure is simple enough for a vascular surgeon, the muscle is reliable in location and blood supply, and the results are satisfactory given the complexity of the problem.
Dr. Eidt is at Greenville Health System, University of South Carolina School of Medicine Greenville, and Dr. Ali is at University of Arkansas for Medical Sciences, Little Rock.
Muscle flaps have come to play an invaluable role in the management of complex groin wounds (Figure 1). We have found that the gracilis muscle offers significant advantages over other local muscle flaps. In comparison to the segmental blood supply of the sartorius muscle which can be disrupted during mobilization, the gracilis muscle has a single vascular pedicle that arises reliably from the medial femoral circumflex vessels. Unlike the sartorius muscle which may be damaged by the infectious/inflammatory process in the groin, the gracilis muscle is remote from the groin wound itself. In addition, the procedure is relatively simple and can be completed in less than thirty minutes.
The procedure is performed with the patient in the supine position with the knee slightly flexed. The gracilis muscle can be palpated along the medial aspect of the thigh and the longitudinal incision is placed directly over the muscle . After the deep fascia is divided, the muscle can be easily freed from surrounding attachments (Figure 2). We completely mobilize the distal two-thirds of the muscle and divide it at the musculotendinous insertion on the femur. We do not mobilize the proximal one-third of the muscle to avoid injury to the vascular pedicle). The muscle is retroflexed into the groin wound using a ringed-forceps. The muscle provides excellent coverage of the femoral triangle. A vacuum dressing may be applied without concern for injury to the femoral vessels.
We used the gracilis flap to treat complex groin wounds in 68 limbs in 64 patients at the University of Arkansas for Medical Sciences, Little Rock. Complete healing was achieved in 91%. In six patients (9%), recurrent or persistent infection led to bleeding that required surgical management. Limb salvage was achieved in 86%.
The presence of autogenous vascular reconstruction was associated with a reduced risk of persistent/recurrent infection in comparison to synthetic grafts (2.3% vs 23.8%, P = .006). Age greater than 75 years was associated with worse outcomes overall. Wound problems (infection, hematoma, seroma) at the harvest site were rare.
We prefer the gracilis flap to the sartorius or other groin muscle flaps in the management of complex groin wounds. The procedure is simple enough for a vascular surgeon, the muscle is reliable in location and blood supply, and the results are satisfactory given the complexity of the problem.
Dr. Eidt is at Greenville Health System, University of South Carolina School of Medicine Greenville, and Dr. Ali is at University of Arkansas for Medical Sciences, Little Rock.
Reducing radiation exposure
SCOTTSDALE, Ariz.– “It’s surprising to me today, when I go proctor or watch a case, how people don’t understand the impact of radiation,” Dr. Mark A. Farber, professor of surgery and radiology at the University of North Carolina, Chapel Hill, said at the Southern Association for Vascular Surgery annual meeting. “Many times, I see people’s hands underneath the machine and on the fluoroscopy image.”
This flouting of the so-called ALARA (as low as reasonably achievable) principle happens in part because the number of complex procedures performed by vascular surgeons is increasing, despite what presenter Dr. Melissa Kirkwood, a vascular surgeon at the University of Texas Southwestern Medical Center, Dallas, told the audience is a lack of training in radiation dose terminology and basic safety principles. Yet, practicing excellent radiation safety protocols is “paramount” according to Dr. Farber who, along with Dr. Kirkwood, shared insights on how to minimize dose to both patients and vascular specialists, whether it be from primary, leakage, or scatter radiation.

Table up, detector down
Minimizing the air gap by as little as 100 mm – from 700 mm to 600 mm, for example – can reduce the dose of radiation from 17%-29%, whereas a 10-cm increase in the air gap can result in as much as a 20%-38% increase in the radiation skin dose. This is essentially the application of the inverse square law, according to Dr. Kirkwood.
Dr. Farber said that some of the newer, more advanced machines have sensors that automatically detect where the collector should be in relation to the patient, but if your machine doesn’t have these “bells and whistles … remember that the skin dose decreases as the air gap decreases.”
Another advantage to using new imaging systems, according to Dr. Farber, is that they allow the use of pulsed fluoroscopy for as few as 2 or 3 pulses/sec. The selected pulse rate determines the number of fluoroscopic image frames that are generated by the machine per second. This is significant when the dose savings are essential and when performing simpler procedures, he said. “If you go from 7.5 frames down to 3 frames/sec, you can decrease the exposure for both you and your patient.”
Use between 15 and 30 pulses/sec for critical procedures where precision is crucial, but reducing the rate to 7.5 pulses/sec may result in as much as 70% less of a skin dose.
Add radiation barriers
Don’t assume that the lead shielding is doing the job. “It’s important that you keep up on this and have it tested regularly,” said Dr. Farber, who recently discovered his thyroid shield was cracked and needed to be replaced. Also, consider the lead shielding of your staff, which, even if it is not used as frequently as the physician’s, can suffer from improper handling. “They fold it or crinkle it up and drop it on the floor. This can lead to problems,” he said. And be sure to remember leaded glasses, lead drapes for the sides of the table, and leaded ceiling-mounted or standing shields.
For extra protection, Dr. Farber recommended the use of disposable protective drapes with cut-outs that allow access to the patient while helping to reduce the amount of scatter radiation exposure to the operator’s limbs. At a tally of anywhere from 1 to 10 mGy/hour, scatter radiation emanating from the patient is a particular risk to the operator’s legs from the knees down, said Dr. Kirkwood, “depending on how tall you are.”
Using the disposable drapes also can result in a 12-fold decrease in the amount of scatter on the eyes, a 25-fold decrease in thyroid exposure to scatter, and a 29-fold decrease in the hands being exposed. “They can be cumbersome at times, I admit,” Dr. Farber said. “But there is no substitute for using protective drapes.”
Leaded aprons also help cut radiation transmission rates, even if they are not foolproof. Wearing two-piece leaded apron systems can help cut down the body strain from the weight of the aprons; however, Dr. Farber said that, at his institution, they use a suspended body shield system operated by a boom so there is no physical stress on the clinician. Because the weightless system also provides additional protection for the specialist’s head and limbs, Dr. Farber said that the hefty price tag is justified. “The way I sold it to the hospital was I told them I could stop doing procedures, or they could get me one of these systems so I could do more procedures,” he said, adding he is having a weightless system installed on each side of the table. “They’ll get their money’s worth by the fact that you’re not over your exposure limit.”
And finally, don’t forget to protect the anesthesiologist! A standing shield that gives broad coverage area should suffice, Dr. Farber said.
Alter the intensifier position
Altering the angle can help ensure that one area of the patient’s body isn’t being overexposed to radiation. Since previously irradiated skin reacts abnormally when re-exposed to radiation because the regeneration and repair of the dermis can take up to several weeks after the initial insult, the timing of the intervals between exposures is critical, said Dr. Kirkwood, adding that the Joint Commission recommended that all doses of fluoroscopically guided interventions performed within the past 6-12 months should be considered when assessing potential skin injury risk.
Use collimation
Making it tighter, for example, can help improve image quality and reduce the radiation dose to both the patient and the operator, as can varying the acquisition rates.
Exit the room during DSA
During digital subtraction angiography, Dr. Farber said to “get away from the table if you can! It’s a huge dose you don’t need to be exposed to if you don’t need to be right next to the machine.” Dr. Kirkwood agreed: “Angiography is 10-100 times more dose than fluoroscopy.”
Reduce magnification
Using a larger monitor allows the operator to see more detail without increasing the magnification, which also increases the dose in the amount of the diameter over the diameter squared. “By not magnifying up [from a field of view of 14 to 28], you will save yourself a factor of at least 4,” Dr. Farber said. “And the actual dose may be even less.”
Optimize imaging
Today’s advanced imaging systems make it easy to produce many high-quality images – CT scans and ultrasounds – that allow a more comprehensive picture. Having various image sources on screen at once is “practice changing” because it can help clinicians see more possibilities for “how to do the case,” said Dr. Farber. “I’ve never heard anyone say, ’Well, I wish I didn’t have that extra imaging next to me.’ ”
Save images
But once you get it, don’t forget to keep it. “Many times you do an acquisition, you move the machine, and you realize you forget to save the image and now you’ve got to go back and do it all over again,” Dr. Farber lamented. But by once again making technology your friend, with functions that allow auto-return to previous positions, among other auto-commands, you can save the needed information and reduce any unnecessary dose exposure for both yourself and the patient, he said.
Protect your eyes
Cataracts are still all too common in the field, according to Dr. Farber. “It’s important that you have side shields on your glasses to cut down on the amount of radiation that comes in and around the glasses.” Eschew glasses that don’t overtly hug your face.
Geometric differences
Don’t forget that, if you’re standing on the side of the imaging source, the scattering effect will be greater than if you’re on the side of the image receptor. Once again, an understanding of the inverse square law can be protective, according to Dr. Kirkwood: “As x-rays exit the source, there is an exponential decrease in the number of x-rays per unit area as the distance from the source increases.”
“It’s simple stuff,” concluded Dr. Farber. “If you get in the habit of doing these things you will cut down your radiation exposure.”
Neither Dr. Farber nor Dr. Kirkwood had any relevant disclosures.
wmcknight@frontlinemedcom.com On Twitter @whitneymcknight
SCOTTSDALE, Ariz.– “It’s surprising to me today, when I go proctor or watch a case, how people don’t understand the impact of radiation,” Dr. Mark A. Farber, professor of surgery and radiology at the University of North Carolina, Chapel Hill, said at the Southern Association for Vascular Surgery annual meeting. “Many times, I see people’s hands underneath the machine and on the fluoroscopy image.”
This flouting of the so-called ALARA (as low as reasonably achievable) principle happens in part because the number of complex procedures performed by vascular surgeons is increasing, despite what presenter Dr. Melissa Kirkwood, a vascular surgeon at the University of Texas Southwestern Medical Center, Dallas, told the audience is a lack of training in radiation dose terminology and basic safety principles. Yet, practicing excellent radiation safety protocols is “paramount” according to Dr. Farber who, along with Dr. Kirkwood, shared insights on how to minimize dose to both patients and vascular specialists, whether it be from primary, leakage, or scatter radiation.
Table up, detector down
Minimizing the air gap by as little as 100 mm – from 700 mm to 600 mm, for example – can reduce the dose of radiation from 17%-29%, whereas a 10-cm increase in the air gap can result in as much as a 20%-38% increase in the radiation skin dose. This is essentially the application of the inverse square law, according to Dr. Kirkwood.
Dr. Farber said that some of the newer, more advanced machines have sensors that automatically detect where the collector should be in relation to the patient, but if your machine doesn’t have these “bells and whistles … remember that the skin dose decreases as the air gap decreases.”
Another advantage to using new imaging systems, according to Dr. Farber, is that they allow the use of pulsed fluoroscopy for as few as 2 or 3 pulses/sec. The selected pulse rate determines the number of fluoroscopic image frames that are generated by the machine per second. This is significant when the dose savings are essential and when performing simpler procedures, he said. “If you go from 7.5 frames down to 3 frames/sec, you can decrease the exposure for both you and your patient.”
Use between 15 and 30 pulses/sec for critical procedures where precision is crucial, but reducing the rate to 7.5 pulses/sec may result in as much as 70% less of a skin dose.
Add radiation barriers
Don’t assume that the lead shielding is doing the job. “It’s important that you keep up on this and have it tested regularly,” said Dr. Farber, who recently discovered his thyroid shield was cracked and needed to be replaced. Also, consider the lead shielding of your staff, which, even if it is not used as frequently as the physician’s, can suffer from improper handling. “They fold it or crinkle it up and drop it on the floor. This can lead to problems,” he said. And be sure to remember leaded glasses, lead drapes for the sides of the table, and leaded ceiling-mounted or standing shields.
For extra protection, Dr. Farber recommended the use of disposable protective drapes with cut-outs that allow access to the patient while helping to reduce the amount of scatter radiation exposure to the operator’s limbs. At a tally of anywhere from 1 to 10 mGy/hour, scatter radiation emanating from the patient is a particular risk to the operator’s legs from the knees down, said Dr. Kirkwood, “depending on how tall you are.”
Using the disposable drapes also can result in a 12-fold decrease in the amount of scatter on the eyes, a 25-fold decrease in thyroid exposure to scatter, and a 29-fold decrease in the hands being exposed. “They can be cumbersome at times, I admit,” Dr. Farber said. “But there is no substitute for using protective drapes.”
Leaded aprons also help cut radiation transmission rates, even if they are not foolproof. Wearing two-piece leaded apron systems can help cut down the body strain from the weight of the aprons; however, Dr. Farber said that, at his institution, they use a suspended body shield system operated by a boom so there is no physical stress on the clinician. Because the weightless system also provides additional protection for the specialist’s head and limbs, Dr. Farber said that the hefty price tag is justified. “The way I sold it to the hospital was I told them I could stop doing procedures, or they could get me one of these systems so I could do more procedures,” he said, adding he is having a weightless system installed on each side of the table. “They’ll get their money’s worth by the fact that you’re not over your exposure limit.”
And finally, don’t forget to protect the anesthesiologist! A standing shield that gives broad coverage area should suffice, Dr. Farber said.
Alter the intensifier position
Altering the angle can help ensure that one area of the patient’s body isn’t being overexposed to radiation. Since previously irradiated skin reacts abnormally when re-exposed to radiation because the regeneration and repair of the dermis can take up to several weeks after the initial insult, the timing of the intervals between exposures is critical, said Dr. Kirkwood, adding that the Joint Commission recommended that all doses of fluoroscopically guided interventions performed within the past 6-12 months should be considered when assessing potential skin injury risk.
Use collimation
Making it tighter, for example, can help improve image quality and reduce the radiation dose to both the patient and the operator, as can varying the acquisition rates.
Exit the room during DSA
During digital subtraction angiography, Dr. Farber said to “get away from the table if you can! It’s a huge dose you don’t need to be exposed to if you don’t need to be right next to the machine.” Dr. Kirkwood agreed: “Angiography is 10-100 times more dose than fluoroscopy.”
Reduce magnification
Using a larger monitor allows the operator to see more detail without increasing the magnification, which also increases the dose in the amount of the diameter over the diameter squared. “By not magnifying up [from a field of view of 14 to 28], you will save yourself a factor of at least 4,” Dr. Farber said. “And the actual dose may be even less.”
Optimize imaging
Today’s advanced imaging systems make it easy to produce many high-quality images – CT scans and ultrasounds – that allow a more comprehensive picture. Having various image sources on screen at once is “practice changing” because it can help clinicians see more possibilities for “how to do the case,” said Dr. Farber. “I’ve never heard anyone say, ’Well, I wish I didn’t have that extra imaging next to me.’ ”
Save images
But once you get it, don’t forget to keep it. “Many times you do an acquisition, you move the machine, and you realize you forget to save the image and now you’ve got to go back and do it all over again,” Dr. Farber lamented. But by once again making technology your friend, with functions that allow auto-return to previous positions, among other auto-commands, you can save the needed information and reduce any unnecessary dose exposure for both yourself and the patient, he said.
Protect your eyes
Cataracts are still all too common in the field, according to Dr. Farber. “It’s important that you have side shields on your glasses to cut down on the amount of radiation that comes in and around the glasses.” Eschew glasses that don’t overtly hug your face.
Geometric differences
Don’t forget that, if you’re standing on the side of the imaging source, the scattering effect will be greater than if you’re on the side of the image receptor. Once again, an understanding of the inverse square law can be protective, according to Dr. Kirkwood: “As x-rays exit the source, there is an exponential decrease in the number of x-rays per unit area as the distance from the source increases.”
“It’s simple stuff,” concluded Dr. Farber. “If you get in the habit of doing these things you will cut down your radiation exposure.”
Neither Dr. Farber nor Dr. Kirkwood had any relevant disclosures.
wmcknight@frontlinemedcom.com On Twitter @whitneymcknight
'Walk out the snot'
Balloon embolectomy revolutionized the treatment of acute thromboembolism involving peripheral arteries. However, an often overlooked method that actually may be more beneficial is to "walk out the snot."
This may sound somewhat disgusting but as can be seen from the accompanying photograph, the surgeon can often retrieve the entire clot from the main artery including extensions into collateral vessels.
In this picture of a patient undergoing femoral embolectomy with this technique, we retrieved a cast of the entire superficial femoral artery as well as the peroneal and posterior tibial arteries and two major collaterals.

The technique is simple. With proximal control of the inflow artery, the visible clot is gently pulled out of the arteriotomy in a slow but deliberate fashion, hand over hand. Often back bleeding will aid in pushing the specimen out of the arteriotomy. The maneuver is very similar to what children do when they feel the need to empty their nostrils! (No adult would do that – would they?)
Retrieval of a specimen like the one in the photo will usually reassure the surgeon that there will not be more thrombus left behind.
The technique also prevents possible arterial injury from a balloon catheter. For both reasons a postcompletion arteriogram may sometimes be avoided.
Dr. Showalter is clinical assistant professor of surgery at Florida State University Medical School and attending vascular surgeon, Sarasota Vascular Specialists.
Dr. Samson is clinical professor of surgery at Florida State University Medical School, attending vascular surgeon, Sarasota Vascular Specialists, and the medical editor of Vascular Specialist.
Balloon embolectomy revolutionized the treatment of acute thromboembolism involving peripheral arteries. However, an often overlooked method that actually may be more beneficial is to "walk out the snot."
This may sound somewhat disgusting but as can be seen from the accompanying photograph, the surgeon can often retrieve the entire clot from the main artery including extensions into collateral vessels.
In this picture of a patient undergoing femoral embolectomy with this technique, we retrieved a cast of the entire superficial femoral artery as well as the peroneal and posterior tibial arteries and two major collaterals.
The technique is simple. With proximal control of the inflow artery, the visible clot is gently pulled out of the arteriotomy in a slow but deliberate fashion, hand over hand. Often back bleeding will aid in pushing the specimen out of the arteriotomy. The maneuver is very similar to what children do when they feel the need to empty their nostrils! (No adult would do that – would they?)
Retrieval of a specimen like the one in the photo will usually reassure the surgeon that there will not be more thrombus left behind.
The technique also prevents possible arterial injury from a balloon catheter. For both reasons a postcompletion arteriogram may sometimes be avoided.
Dr. Showalter is clinical assistant professor of surgery at Florida State University Medical School and attending vascular surgeon, Sarasota Vascular Specialists.
Dr. Samson is clinical professor of surgery at Florida State University Medical School, attending vascular surgeon, Sarasota Vascular Specialists, and the medical editor of Vascular Specialist.

Percutaneous closure
Editor’s Note: I urge readers unfamiliar with the Perclose Proglide® device to pay special attention to the instructions for use and to follow them carefully. The device is relatively simple to use but it is a complex piece of equipment and so it is also easy to misuse it with dire consequences. I suggest that one at least read the section on "Troubleshooting," since preventing some of these problems can be lifesaving.

The key to successful percutaneous closure is selecting the appropriate site of entry into the common femoral artery (CFA). Using ultrasound (in transverse and longitudinal planes) and fluoroscopy, I gain access at a noncalcified spot 1 cm above the bifurcation of the CFA (Fig. 1). This is immediately confirmed with an oblique angiogram while pulling the 5F sheath to the ipsilateral side (Fig. 2). This small last maneuver allows me to see exactly where the puncture was and confirms that I will be able to use a closure device.
If using a sheath larger than 12F, I would dilate the track and cut any skin bridges within the puncture site using 11 blade. Doing this maneuver at the end of the procedure could result in inadvertently cutting the sutures. The Proglide device is then inserted and the sutures deployed as per the instructions for use.
At the end of the case, the sheath is pulled over a nonstiff wire while pulling on the nonrail (blue end) wire in a coaxial fashion. I can’t stress enough the need to be calm and not to pull too hard on the suture. This can result in the suture breaking or being pulled out of the artery. The knot pusher is then used on each suture sequentially. At this point, I tug on the wire to make sure it is "snug" within the arteriotomy. This signifies adequate closure but I also check briefly to ensure that there is no significant bleeding. Then I can go ahead and remove the wire and slide the knot pusher again.
The final step is to advance the knot pusher over the two sutures and cut the suture just under the skin. There is no need to slide the knot pusher all the way down to cut the suture as this may inadvertently cut the knot. Steristrips and Band-Aid are applied and I reverse the heparin after confirming the status of distal pulses
Dr. Mussa is an assistant professor of surgery at New York University School of Medicine and Langone Medical Center.
Editor’s Note: I urge readers unfamiliar with the Perclose Proglide® device to pay special attention to the instructions for use and to follow them carefully. The device is relatively simple to use but it is a complex piece of equipment and so it is also easy to misuse it with dire consequences. I suggest that one at least read the section on "Troubleshooting," since preventing some of these problems can be lifesaving.
The key to successful percutaneous closure is selecting the appropriate site of entry into the common femoral artery (CFA). Using ultrasound (in transverse and longitudinal planes) and fluoroscopy, I gain access at a noncalcified spot 1 cm above the bifurcation of the CFA (Fig. 1). This is immediately confirmed with an oblique angiogram while pulling the 5F sheath to the ipsilateral side (Fig. 2). This small last maneuver allows me to see exactly where the puncture was and confirms that I will be able to use a closure device.
If using a sheath larger than 12F, I would dilate the track and cut any skin bridges within the puncture site using 11 blade. Doing this maneuver at the end of the procedure could result in inadvertently cutting the sutures. The Proglide device is then inserted and the sutures deployed as per the instructions for use.
At the end of the case, the sheath is pulled over a nonstiff wire while pulling on the nonrail (blue end) wire in a coaxial fashion. I can’t stress enough the need to be calm and not to pull too hard on the suture. This can result in the suture breaking or being pulled out of the artery. The knot pusher is then used on each suture sequentially. At this point, I tug on the wire to make sure it is "snug" within the arteriotomy. This signifies adequate closure but I also check briefly to ensure that there is no significant bleeding. Then I can go ahead and remove the wire and slide the knot pusher again.
The final step is to advance the knot pusher over the two sutures and cut the suture just under the skin. There is no need to slide the knot pusher all the way down to cut the suture as this may inadvertently cut the knot. Steristrips and Band-Aid are applied and I reverse the heparin after confirming the status of distal pulses
Dr. Mussa is an assistant professor of surgery at New York University School of Medicine and Langone Medical Center.

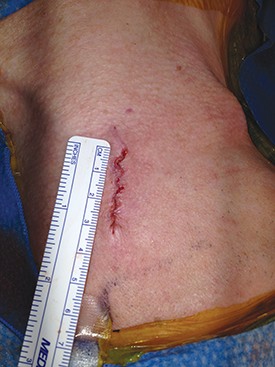
How To Maximize a Minimal Incision
Mini-incision carotid surgery was first reported (not necessarily performed) by Ascher et al. in 2005. In light of this report and an ever-growing patient demand for minimally invasive procedures, it is surprising that this procedure has not been widely adopted by the vascular surgical community. The reasons for this are probably multifactorial and may include a concern that cranial nerve injuries are more likely to occur as well as an added difficulty in placing a shunt or sewing in a patch. These concerns are mitigated by a thorough knowledge of the usual and variant anatomy of this area and a broad experience in carotid surgery. If performed properly, mini-incision is not synonymous with mini exposure carotid surgery.

It is important to identify the carotid bifurcation with duplex ultrasound prior to making the skin incision. It is my preference to make a vertical skin incision which extends from approximately 2 cm above to below the carotid bifurcation at a slight outside to inside angle to the anterior border of the sternocleidomastoid muscle (some surgeons prefer a transverse skin incision). The platysma muscle is identified and divided for a short distance between forceps.
The edges of the platysma are grasped with DeBakey forceps while the skin is retracted as far inferiorly as possible.
The platysma is then divided to this point following which this is repeated at the superior aspect of the wound. The extended division of the platysma is what allows for an exposure equal to that of a much larger incision. Now adequate visualization of the common and internal carotid arteries is achieved by use of a small retractor applied alternately to the inferior and superior ends of the wound respectively.
Using this technique, I have easily been able to perform both standard and eversion endarterectomies (as in photo), place a shunt when necessary, and/or sew on a carotid patch.
Once completed the platysma is closed with an absorbable suture and skin is closed with an absorbable monofilament suture.
In my experience, patients have less postoperative pain than those with a larger neck incision. They are also exceptionally pleased with the small, barely visible, neck scar. Finally, I have used the mini-incision for my carotid surgeries for more than 10 years during which time no patient has suffered a permanent cranial nerve injury.
Dr. Dietzek is the chief of the vascular and endovascular surgery section and the Linda and Stephen R. Cohen chair in vascular surgery at Danbury Hospital, Danbury Conn. He is also a clinical associate professor of surgery at the University of Vermont College of Medicine in Burlington.
Editor’s Note: If you would like to submit a similarly useful Tips and Tricks, contact us at vascularspecialist@frontlinemedcom.com.
Mini-incision carotid surgery was first reported (not necessarily performed) by Ascher et al. in 2005. In light of this report and an ever-growing patient demand for minimally invasive procedures, it is surprising that this procedure has not been widely adopted by the vascular surgical community. The reasons for this are probably multifactorial and may include a concern that cranial nerve injuries are more likely to occur as well as an added difficulty in placing a shunt or sewing in a patch. These concerns are mitigated by a thorough knowledge of the usual and variant anatomy of this area and a broad experience in carotid surgery. If performed properly, mini-incision is not synonymous with mini exposure carotid surgery.
It is important to identify the carotid bifurcation with duplex ultrasound prior to making the skin incision. It is my preference to make a vertical skin incision which extends from approximately 2 cm above to below the carotid bifurcation at a slight outside to inside angle to the anterior border of the sternocleidomastoid muscle (some surgeons prefer a transverse skin incision). The platysma muscle is identified and divided for a short distance between forceps.
The edges of the platysma are grasped with DeBakey forceps while the skin is retracted as far inferiorly as possible.
The platysma is then divided to this point following which this is repeated at the superior aspect of the wound. The extended division of the platysma is what allows for an exposure equal to that of a much larger incision. Now adequate visualization of the common and internal carotid arteries is achieved by use of a small retractor applied alternately to the inferior and superior ends of the wound respectively.
Using this technique, I have easily been able to perform both standard and eversion endarterectomies (as in photo), place a shunt when necessary, and/or sew on a carotid patch.
Once completed the platysma is closed with an absorbable suture and skin is closed with an absorbable monofilament suture.
In my experience, patients have less postoperative pain than those with a larger neck incision. They are also exceptionally pleased with the small, barely visible, neck scar. Finally, I have used the mini-incision for my carotid surgeries for more than 10 years during which time no patient has suffered a permanent cranial nerve injury.
Dr. Dietzek is the chief of the vascular and endovascular surgery section and the Linda and Stephen R. Cohen chair in vascular surgery at Danbury Hospital, Danbury Conn. He is also a clinical associate professor of surgery at the University of Vermont College of Medicine in Burlington.
Editor’s Note: If you would like to submit a similarly useful Tips and Tricks, contact us at vascularspecialist@frontlinemedcom.com.