User login
Limited-Incision Knotless Achilles Tendon Repair
The incidence of midsubstance Achilles tendon ruptures is increasing in patients 30 years to 50 years of age, and more than 50% of these injuries occur during recreational basketball.1,2 Achilles ruptures occur more in deconditioned individuals engaged in explosive push-off and jumping activities. Management of these injuries has been controversial over the past decade; there is no consensus on nonoperative treatment, surgical repair, or optimal repair technique.1,3-7 According to American Academy of Orthopaedic Surgeons (AAOS) clinical practice guidelines, limited-incision approaches have fewer overall complications relative to traditional open repair.3,4
Modern repair techniques, such as the Percutaneous Achilles Repair System (PARS; Arthrex), combine limited soft-tissue dissection with percutaneous suture insertion and knot tying.1,8 This limited-incision technique, employed since 2010, uses a 2-cm transverse incision and nondisposable metal jig with divergent needle passes and locking suture fixation options to secure and fix both tendon ends with minimal dissection of skin, subcutaneous tissue, and paratenon. A review of 270 surgically treated Achilles tendon ruptures (101 PARS, 169 traditional open repair) found that, compared with the open repair group, the PARS group had significantly shorter operative times and more patients returning to baseline physical activities within 5 months after surgery.1 Although the difference was not statistically significant, the overall postoperative complication rate was 5% for the PARS group and 11% for the open repair group. The PARS group had no cases of sural neuritis or deep infection requiring reoperation.
Although the PARS technique has had good outcomes with few complications, care must be taken during surgery to prevent sutures from pulling through the tendon near the rupture site, which can result from overtensioning and from suture knot irritation against superficial soft tissues. Given these potential issues, the PARS procedure was modified (Achilles Midsubstance SpeedBridge; Arthrex) to provide knotless restoration of musculotendinous length in a reliable, reproducible fashion and direct fixation of tendon to bone for early mobilization.9 This new procedure bypasses suture fixation in the compromised tendon ends adjacent to the rupture site, thereby reducing suture slippage and allowing for potential early range of motion and weight-bearing relative to previous techniques. Preliminary results from a cohort of 34 patients treated with this technique are promising: Average return to baseline activities was 18.2 weeks (range, 9-26 weeks), and there were no wound complications, nerve injuries, or reruptures.9Indications are overall health and an acute midsubstance Achilles rupture that presents within 3 weeks after injury (the time limit is used to ensure that both tendon ends can be mobilized and repaired to appropriate length). A relative contraindication is delayed presentation (≥4 weeks), which may require open reconstruction in combination with V-Y lengthening or other adjuvant procedures. Other relative contraindications are insertional rupture, Achilles tendinopathy, and a significant medical comorbidity that prohibits surgical intervention.
Surgical Technique
Operating Room Setup and Approach
The patient is positioned prone with chest rolls and kneepads and with arms at <90° of abduction (Figures 1A-1E). 
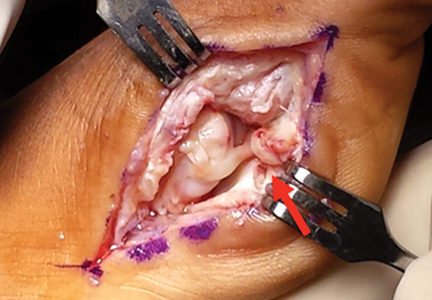
A “no-touch” technique is used without pickups, and soft tissues are carefully dissected with small scissors down to the paratenon. The sural nerve typically is not visible in the operative field, but, if it is, it can be dissected out and retracted out of the way. A transverse incision is made through the paratenon, and expression of rupture hematoma often follows. Paratenon preservation is key in minimizing disruption of the native vascular supply of the tendon and allowing for repair at the end of the case. A freer can be placed within the wound to confirm that the center of the rupture has been identified.
An Allis clamp is inserted into the wound, and the proximal tendon stump is secured and then pulled about 1 cm through the wound. A freer is circumferentially run along the sides of the proximal tendon to release any potential adhesions that may limit distal excursion.
PARS Jig Insertion and Suture Passing
The PARS jig is inserted into the wound with the inner prongs in the narrowest position possible. The curved jig is inserted proximally, and the center turn wheel is used to widen the inner prongs so they can slide along the sides of the tendon in the paratenon. Proper jig placement should be smooth and encounter little resistance. The proximal tendon is in a superficial location and can be palpated within the prongs of the jig to double-check that the tendon is centered within the jig. A frequent error is to insert the jig too deep, which subsequently causes needles and sutures to miss the tendon and pull through.
Keeping the jig centralized in neutral rotation minimizes improper suture passing and avoids iatrogenic injury to the medial and lateral neurovascular structures. During suture passing, all needles (1.6 mm) with nitinol loops are first used unloaded without suture. The first 2 needles are inserted into their respective, numbered holes, through the tendon, and then through the opposite side of the jig. Each needle is checked to make sure that it does not pass outside the jig. Having 2 needles within the jig and tendon at all times during suture passing helps stabilize the jig and avoids adjacent suture piercing with the subsequent needle.
A No. 2 FiberWire suture (Arthrex) is then passed through the first hole using the needle suture passer and made even in length on both sides. The specific colors of the suture are not important, but the order of the sutures placed is. An assistant can write down the colors and order of the sutures passed. Before the second suture is passed, the first needle is inserted back through the jig and tendon into the third hole. The third and fourth sutures (green-striped) differ from the other sutures in that one end has a loop and the other has a tail, and they are passed in an oblique, crossing pattern. These sutures later help create a locking suture on either side of the tendon.
After these sutures are passed, the final result should be 1 green-striped loop and 1 green-striped tail on either side of the tendon. The fifth suture is passed straight across the tendon in a trajectory similar to that of the first suture. In large laborers, obese patients, and elite athletes, 2 additional green-striped sutures can be passed through the optional sixth and seventh holes to create an additional locking suture.
PARS Jig Removal and Suture Management
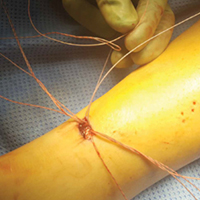
After all sutures are passed, the turn wheel is used to narrow the inner prongs while gentle, controlled tension is applied to the jig to remove it from the wound (Figures 2A-2C). 
Pullout of any suture from the tendon indicates that the tendon was not centered in the jig or was not proximal enough along the tendon during suture passing. If a suture pulls out, it is removed, and the previous steps are repeated with close attention paid to tendon positioning within the jig. It is not advised to extend the incision longitudinally on either end of the transverse incision, as doing so can lead to potential wound-healing complications. After proximal fixation is achieved, all sutures on each side of the tendon are neatly spread apart in the following order from proximal to distal: first suture, second suture, looped green-striped (third) suture, tail green-striped (fourth) suture, fifth suture. The second suture on both sides is then looped around the 2 green-striped sutures and back proximally through the looped end of the green-striped suture.
The green-striped suture tail is pulled through the tendon to the opposite side to create a locking suture on both sides of the tendon. In the end, there are 2 nonlocking sutures and 1 locking suture on either side of the tendon. Each pair of sutures is pulled distally to confirm fixation and remove any initial suture creep from the system. A hemostat is placed on each group of 3 sutures to keep them out of the way during distal anchor preparation.
Distal Anchor Preparation and Banana SutureLasso Passing
Two longitudinal 5-mm incisions are made along the posterior aspect of the heel just distal to the area of maximal heel convexity. Incisions are spaced 1.5 cm apart along the sides of the Achilles tendon insertion. A 3.5-mm drill and a drill guide are used through each incision and placed flush against bone (Figures 3A-3E). 
A Banana SutureLasso (Arthrex) with inner nitinol wire is passed through the center of the distal Achilles tendon stump and out the proximal incision to retrieve one side of the proximal sutures. SutureLasso passage through tendon can be facilitated with tactile feedback. The surgeon’s nondominant thumb is placed directly against the distal tendon while the dominant hand grasps the SutureLasso with the thumb near the tip. As the SutureLasso is advanced proximally through the tendon, the surgeon can feel its tip meeting mild resistance. Confirm that the tip of the SutureLasso is in the center of the distal tendon by direct visual inspection through the wound.
The inner nitinol wire is advanced 2 cm to 3 cm out of the tip of the SutureLasso, and sutures are passed through the distal Achilles tendon. During suture passing, the nitinol wire is drawn back to the tip of the SutureLasso, and then the entire SutureLasso is removed from the distal incision. Trying to pass the sutures only through the inner nitinol wire can result in suture tangling and increased resistance. The process is then repeated for the sutures on the opposite side. Suture pairs are placed under maximal tension and cycled multiple times (5-10) to remove any residual proximal suture creep.10
Achilles Tensioning and Anchor Insertion
The ankle is plantar flexed to tension the Achilles tendon relative to the contralateral limb and is held in place by an assistant (Figures 4A-4E). 
Position of the drill holes can be rechecked with a Kirschner wire before anchor insertion, as their relative position changes with ankle plantar flexion. It is not necessary to premeasure and adjust suture length at the tip of the anchor as in other blind tunnel anchor insertion techniques (eg, InternalBrace; Arthrex). Once the anchor tip is malleted into bone, the free suture ends are released to avoid overtensioning the tendon. Before the anchor insertion handle is completely removed, the tip of a mosquito clamp can be used to feel the bony surface and confirm the anchor is completely seated.
With the ankle still held in the appropriate amount of plantarflexion, the process is repeated and the other SwiveLock anchor inserted. Sutures are cut flush with the anchor, and the surgeon performs wound irrigation and layered closure, with absorbable suture, of the paratenon and subcutaneous tissues. After skin closure with nylon suture, resting ankle plantarflexion is assessed and the Thompson test performed. The patient is placed in a well-padded non-weight-bearing plantar flexion splint for incision and initial tendon healing during the first 2 weeks after surgery.
Discussion
A key aspect of recovery is the balance achieved between skin and tendon healing and early mobilization, as outcomes of surgical repair of Achilles ruptures are improved with early weight-bearing and functional rehabilitation.11-13 Some surgeons recommend weight-bearing immediately after surgery, given the direct tendon-to-bone fixation achieved with repair.9 I prefer 2 weeks of non-weight-bearing, which allows the skin to heal adequately and the initial soft-tissue inflammation to subside. If the incision is healed at 2 weeks, sutures are removed, and the patient is transitioned to a tall, non-weight-bearing CAM (controlled ankle motion) boot, worn for 1 to 2 weeks with initiation of gentle ankle range-of-motion exercises. If there is any concern about wound healing, sutures are maintained for another 1 to 2 weeks.
Between 3 and 8 weeks after surgery, progressive weight-bearing is initiated with a peel-away heel lift (~2 cm thick total, 3 layers). Each lift layer is removed as pain allows, every 2 to 3 days. The goal is full weight-bearing with the foot flat 5 to 6 weeks after surgery. Physical therapy focusing on ankle motion and gentle Achilles stretching and strengthening is started 5 to 6 weeks after surgery, depending on progression and functional needs. Between 8 and 12 weeks after surgery, the patient is transitioned to normal shoe wear with increased activities. Running and jumping are allowed, as pain and swelling allow, starting at 12 weeks.
Although preliminary outcomes and experience with the Achilles Midsubstance SpeedBridge have been favorable, long-term clinical and functional studies are needed to determine the specific advantages and disadvantages of this new technique relative to other repairs. The main benefits observed thus far are reduced subjective knot tying and tensioning, decreased reliance on suture fixation in compromised tissue at the rupture site, reduced risk of FiberWire knot irritation of superficial soft tissues, lower risk of distal suture pullout, and earlier mobilization owing to bony fixation of the tendon. Potential complications include anchor-site heel pain caused by prominent anchors or by the bone edema that occurs when a patient increases physical activity by a significant amount at 12 weeks.9 Heel pain caused by bone edema resolves by 20 weeks without intervention.
Stress shielding of the distal Achilles tendon is a theoretical concern given the tendon–bone construct, but there have been no reports of tendon atrophy or repair failure caused by stress shielding. The original PARS technique was often used to create Achilles tension with the ankle maximally plantar flexed—the idea being that the tendon would gradually stretch over time.1 Overtensioning the Achilles repair is a potential complication with the SpeedBridge, as the distal anchors provide a more rigid point of distal fixation. Surgeons can avoid this complication by cycling the sutures to remove any residual creep and then tensioning the Achilles according to the contralateral limb and/or palpating tendon opposition at the rupture site.
Overall, this new limited-incision knotless Achilles tendon repair technique allows for minimal soft-tissue dissection, restoration of Achilles musculotendinous length, and direct tendon-to-bone fixation. Early results are promising, but long-term clinical outcomes and comparative analysis are needed. In addition, many details of this technique must be clarified—including incidence of short- and long-term complications in larger cohorts, optimal suture material and configuration, and risks and benefits of immediate (<2 weeks) and delayed (2-4 weeks) weight-bearing.
Am J Orthop. 2016;45(7):E487-E492. Copyright Frontline Medical Communications Inc. 2016. All rights reserved.
1. Hsu AR, Jones CP, Cohen BE, Davis WH, Ellington JK, Anderson RB. Clinical outcomes and complications of Percutaneous Achilles Repair System versus open technique for acute Achilles tendon ruptures. Foot Ankle Int. 2015;36(11):1279-1286.
2. Raikin SM, Garras DN, Krapchev PV. Achilles tendon injuries in a United States population. Foot Ankle Int. 2013;34(4):475-480.
3. Chiodo CP, Glazebrook M, Bluman EM, et al; American Academy of Orthopaedic Surgeons. American Academy of Orthopaedic Surgeons clinical practice guideline on treatment of Achilles tendon rupture. J Bone Joint Surg Am. 2010;92(14):2466-2468.
4. Chiodo CP, Glazebrook M, Bluman EM, et al; American Academy of Orthopaedic Surgeons. Diagnosis and treatment of acute Achilles tendon rupture. J Am Acad Orthop Surg. 2010;18(8):503-510.
5. Khan RJ, Fick D, Keogh A, Crawford J, Brammar T, Parker M. Treatment of acute Achilles tendon ruptures. A meta-analysis of randomized, controlled trials. J Bone Joint Surg Am. 2005;87(10):2202-2210.
6. Renninger CH, Kuhn K, Fellars T, Youngblood S, Bellamy J. Operative and nonoperative management of Achilles tendon ruptures in active duty military population. Foot Ankle Int. 2016;37(3):269-273.
7. Khan RJ, Carey Smith RL. Surgical interventions for treating acute Achilles tendon ruptures. Cochrane Database Syst Rev. 2010;(9):CD003674.
8. McCullough KA, Shaw CM, Anderson RB. Mini-open repair of Achilles rupture in the National Football League. J Surg Orthop Adv. 2014;23(4):179-183.
9. McWilliam JR, Mackay G. The internal brace for midsubstance Achilles ruptures. Foot Ankle Int. 2016;37(7):794-800.
10. Clanton TO, Haytmanek CT, Williams BT, et al. A biomechanical comparison of an open repair and 3 minimally invasive percutaneous Achilles tendon repair techniques during a simulated, progressive rehabilitation protocol. Am J Sports Med. 2015;43(8):1957-1964.
11. Aoki M, Ogiwara N, Ohta T, Nabeta Y. Early active motion and weightbearing after cross-stitch Achilles tendon repair. Am J Sports Med. 1998;26(6):794-800.
12. Kangas J, Pajala A, Ohtonen P, Leppilahti J. Achilles tendon elongation after rupture repair: a randomized comparison of 2 postoperative regimens. Am J Sports Med. 2007;35(1):59-64.
13. Kangas J, Pajala A, Siira P, Hämäläinen M, Leppilahti J. Early functional treatment versus early immobilization in tension of the musculotendinous unit after Achilles rupture repair: a prospective, randomized, clinical study. J Trauma. 2003;54(6):1171-1180.
The incidence of midsubstance Achilles tendon ruptures is increasing in patients 30 years to 50 years of age, and more than 50% of these injuries occur during recreational basketball.1,2 Achilles ruptures occur more in deconditioned individuals engaged in explosive push-off and jumping activities. Management of these injuries has been controversial over the past decade; there is no consensus on nonoperative treatment, surgical repair, or optimal repair technique.1,3-7 According to American Academy of Orthopaedic Surgeons (AAOS) clinical practice guidelines, limited-incision approaches have fewer overall complications relative to traditional open repair.3,4
Modern repair techniques, such as the Percutaneous Achilles Repair System (PARS; Arthrex), combine limited soft-tissue dissection with percutaneous suture insertion and knot tying.1,8 This limited-incision technique, employed since 2010, uses a 2-cm transverse incision and nondisposable metal jig with divergent needle passes and locking suture fixation options to secure and fix both tendon ends with minimal dissection of skin, subcutaneous tissue, and paratenon. A review of 270 surgically treated Achilles tendon ruptures (101 PARS, 169 traditional open repair) found that, compared with the open repair group, the PARS group had significantly shorter operative times and more patients returning to baseline physical activities within 5 months after surgery.1 Although the difference was not statistically significant, the overall postoperative complication rate was 5% for the PARS group and 11% for the open repair group. The PARS group had no cases of sural neuritis or deep infection requiring reoperation.
Although the PARS technique has had good outcomes with few complications, care must be taken during surgery to prevent sutures from pulling through the tendon near the rupture site, which can result from overtensioning and from suture knot irritation against superficial soft tissues. Given these potential issues, the PARS procedure was modified (Achilles Midsubstance SpeedBridge; Arthrex) to provide knotless restoration of musculotendinous length in a reliable, reproducible fashion and direct fixation of tendon to bone for early mobilization.9 This new procedure bypasses suture fixation in the compromised tendon ends adjacent to the rupture site, thereby reducing suture slippage and allowing for potential early range of motion and weight-bearing relative to previous techniques. Preliminary results from a cohort of 34 patients treated with this technique are promising: Average return to baseline activities was 18.2 weeks (range, 9-26 weeks), and there were no wound complications, nerve injuries, or reruptures.9Indications are overall health and an acute midsubstance Achilles rupture that presents within 3 weeks after injury (the time limit is used to ensure that both tendon ends can be mobilized and repaired to appropriate length). A relative contraindication is delayed presentation (≥4 weeks), which may require open reconstruction in combination with V-Y lengthening or other adjuvant procedures. Other relative contraindications are insertional rupture, Achilles tendinopathy, and a significant medical comorbidity that prohibits surgical intervention.
Surgical Technique
Operating Room Setup and Approach
The patient is positioned prone with chest rolls and kneepads and with arms at <90° of abduction (Figures 1A-1E).
A “no-touch” technique is used without pickups, and soft tissues are carefully dissected with small scissors down to the paratenon. The sural nerve typically is not visible in the operative field, but, if it is, it can be dissected out and retracted out of the way. A transverse incision is made through the paratenon, and expression of rupture hematoma often follows. Paratenon preservation is key in minimizing disruption of the native vascular supply of the tendon and allowing for repair at the end of the case. A freer can be placed within the wound to confirm that the center of the rupture has been identified.
An Allis clamp is inserted into the wound, and the proximal tendon stump is secured and then pulled about 1 cm through the wound. A freer is circumferentially run along the sides of the proximal tendon to release any potential adhesions that may limit distal excursion.
PARS Jig Insertion and Suture Passing
The PARS jig is inserted into the wound with the inner prongs in the narrowest position possible. The curved jig is inserted proximally, and the center turn wheel is used to widen the inner prongs so they can slide along the sides of the tendon in the paratenon. Proper jig placement should be smooth and encounter little resistance. The proximal tendon is in a superficial location and can be palpated within the prongs of the jig to double-check that the tendon is centered within the jig. A frequent error is to insert the jig too deep, which subsequently causes needles and sutures to miss the tendon and pull through.
Keeping the jig centralized in neutral rotation minimizes improper suture passing and avoids iatrogenic injury to the medial and lateral neurovascular structures. During suture passing, all needles (1.6 mm) with nitinol loops are first used unloaded without suture. The first 2 needles are inserted into their respective, numbered holes, through the tendon, and then through the opposite side of the jig. Each needle is checked to make sure that it does not pass outside the jig. Having 2 needles within the jig and tendon at all times during suture passing helps stabilize the jig and avoids adjacent suture piercing with the subsequent needle.
A No. 2 FiberWire suture (Arthrex) is then passed through the first hole using the needle suture passer and made even in length on both sides. The specific colors of the suture are not important, but the order of the sutures placed is. An assistant can write down the colors and order of the sutures passed. Before the second suture is passed, the first needle is inserted back through the jig and tendon into the third hole. The third and fourth sutures (green-striped) differ from the other sutures in that one end has a loop and the other has a tail, and they are passed in an oblique, crossing pattern. These sutures later help create a locking suture on either side of the tendon.
After these sutures are passed, the final result should be 1 green-striped loop and 1 green-striped tail on either side of the tendon. The fifth suture is passed straight across the tendon in a trajectory similar to that of the first suture. In large laborers, obese patients, and elite athletes, 2 additional green-striped sutures can be passed through the optional sixth and seventh holes to create an additional locking suture.
PARS Jig Removal and Suture Management
After all sutures are passed, the turn wheel is used to narrow the inner prongs while gentle, controlled tension is applied to the jig to remove it from the wound (Figures 2A-2C).
Pullout of any suture from the tendon indicates that the tendon was not centered in the jig or was not proximal enough along the tendon during suture passing. If a suture pulls out, it is removed, and the previous steps are repeated with close attention paid to tendon positioning within the jig. It is not advised to extend the incision longitudinally on either end of the transverse incision, as doing so can lead to potential wound-healing complications. After proximal fixation is achieved, all sutures on each side of the tendon are neatly spread apart in the following order from proximal to distal: first suture, second suture, looped green-striped (third) suture, tail green-striped (fourth) suture, fifth suture. The second suture on both sides is then looped around the 2 green-striped sutures and back proximally through the looped end of the green-striped suture.
The green-striped suture tail is pulled through the tendon to the opposite side to create a locking suture on both sides of the tendon. In the end, there are 2 nonlocking sutures and 1 locking suture on either side of the tendon. Each pair of sutures is pulled distally to confirm fixation and remove any initial suture creep from the system. A hemostat is placed on each group of 3 sutures to keep them out of the way during distal anchor preparation.
Distal Anchor Preparation and Banana SutureLasso Passing
Two longitudinal 5-mm incisions are made along the posterior aspect of the heel just distal to the area of maximal heel convexity. Incisions are spaced 1.5 cm apart along the sides of the Achilles tendon insertion. A 3.5-mm drill and a drill guide are used through each incision and placed flush against bone (Figures 3A-3E).
A Banana SutureLasso (Arthrex) with inner nitinol wire is passed through the center of the distal Achilles tendon stump and out the proximal incision to retrieve one side of the proximal sutures. SutureLasso passage through tendon can be facilitated with tactile feedback. The surgeon’s nondominant thumb is placed directly against the distal tendon while the dominant hand grasps the SutureLasso with the thumb near the tip. As the SutureLasso is advanced proximally through the tendon, the surgeon can feel its tip meeting mild resistance. Confirm that the tip of the SutureLasso is in the center of the distal tendon by direct visual inspection through the wound.
The inner nitinol wire is advanced 2 cm to 3 cm out of the tip of the SutureLasso, and sutures are passed through the distal Achilles tendon. During suture passing, the nitinol wire is drawn back to the tip of the SutureLasso, and then the entire SutureLasso is removed from the distal incision. Trying to pass the sutures only through the inner nitinol wire can result in suture tangling and increased resistance. The process is then repeated for the sutures on the opposite side. Suture pairs are placed under maximal tension and cycled multiple times (5-10) to remove any residual proximal suture creep.10
Achilles Tensioning and Anchor Insertion
The ankle is plantar flexed to tension the Achilles tendon relative to the contralateral limb and is held in place by an assistant (Figures 4A-4E).
Position of the drill holes can be rechecked with a Kirschner wire before anchor insertion, as their relative position changes with ankle plantar flexion. It is not necessary to premeasure and adjust suture length at the tip of the anchor as in other blind tunnel anchor insertion techniques (eg, InternalBrace; Arthrex). Once the anchor tip is malleted into bone, the free suture ends are released to avoid overtensioning the tendon. Before the anchor insertion handle is completely removed, the tip of a mosquito clamp can be used to feel the bony surface and confirm the anchor is completely seated.
With the ankle still held in the appropriate amount of plantarflexion, the process is repeated and the other SwiveLock anchor inserted. Sutures are cut flush with the anchor, and the surgeon performs wound irrigation and layered closure, with absorbable suture, of the paratenon and subcutaneous tissues. After skin closure with nylon suture, resting ankle plantarflexion is assessed and the Thompson test performed. The patient is placed in a well-padded non-weight-bearing plantar flexion splint for incision and initial tendon healing during the first 2 weeks after surgery.
Discussion
A key aspect of recovery is the balance achieved between skin and tendon healing and early mobilization, as outcomes of surgical repair of Achilles ruptures are improved with early weight-bearing and functional rehabilitation.11-13 Some surgeons recommend weight-bearing immediately after surgery, given the direct tendon-to-bone fixation achieved with repair.9 I prefer 2 weeks of non-weight-bearing, which allows the skin to heal adequately and the initial soft-tissue inflammation to subside. If the incision is healed at 2 weeks, sutures are removed, and the patient is transitioned to a tall, non-weight-bearing CAM (controlled ankle motion) boot, worn for 1 to 2 weeks with initiation of gentle ankle range-of-motion exercises. If there is any concern about wound healing, sutures are maintained for another 1 to 2 weeks.
Between 3 and 8 weeks after surgery, progressive weight-bearing is initiated with a peel-away heel lift (~2 cm thick total, 3 layers). Each lift layer is removed as pain allows, every 2 to 3 days. The goal is full weight-bearing with the foot flat 5 to 6 weeks after surgery. Physical therapy focusing on ankle motion and gentle Achilles stretching and strengthening is started 5 to 6 weeks after surgery, depending on progression and functional needs. Between 8 and 12 weeks after surgery, the patient is transitioned to normal shoe wear with increased activities. Running and jumping are allowed, as pain and swelling allow, starting at 12 weeks.
Although preliminary outcomes and experience with the Achilles Midsubstance SpeedBridge have been favorable, long-term clinical and functional studies are needed to determine the specific advantages and disadvantages of this new technique relative to other repairs. The main benefits observed thus far are reduced subjective knot tying and tensioning, decreased reliance on suture fixation in compromised tissue at the rupture site, reduced risk of FiberWire knot irritation of superficial soft tissues, lower risk of distal suture pullout, and earlier mobilization owing to bony fixation of the tendon. Potential complications include anchor-site heel pain caused by prominent anchors or by the bone edema that occurs when a patient increases physical activity by a significant amount at 12 weeks.9 Heel pain caused by bone edema resolves by 20 weeks without intervention.
Stress shielding of the distal Achilles tendon is a theoretical concern given the tendon–bone construct, but there have been no reports of tendon atrophy or repair failure caused by stress shielding. The original PARS technique was often used to create Achilles tension with the ankle maximally plantar flexed—the idea being that the tendon would gradually stretch over time.1 Overtensioning the Achilles repair is a potential complication with the SpeedBridge, as the distal anchors provide a more rigid point of distal fixation. Surgeons can avoid this complication by cycling the sutures to remove any residual creep and then tensioning the Achilles according to the contralateral limb and/or palpating tendon opposition at the rupture site.
Overall, this new limited-incision knotless Achilles tendon repair technique allows for minimal soft-tissue dissection, restoration of Achilles musculotendinous length, and direct tendon-to-bone fixation. Early results are promising, but long-term clinical outcomes and comparative analysis are needed. In addition, many details of this technique must be clarified—including incidence of short- and long-term complications in larger cohorts, optimal suture material and configuration, and risks and benefits of immediate (<2 weeks) and delayed (2-4 weeks) weight-bearing.
Am J Orthop. 2016;45(7):E487-E492. Copyright Frontline Medical Communications Inc. 2016. All rights reserved.
1. Hsu AR, Jones CP, Cohen BE, Davis WH, Ellington JK, Anderson RB. Clinical outcomes and complications of Percutaneous Achilles Repair System versus open technique for acute Achilles tendon ruptures. Foot Ankle Int. 2015;36(11):1279-1286.
2. Raikin SM, Garras DN, Krapchev PV. Achilles tendon injuries in a United States population. Foot Ankle Int. 2013;34(4):475-480.
3. Chiodo CP, Glazebrook M, Bluman EM, et al; American Academy of Orthopaedic Surgeons. American Academy of Orthopaedic Surgeons clinical practice guideline on treatment of Achilles tendon rupture. J Bone Joint Surg Am. 2010;92(14):2466-2468.
4. Chiodo CP, Glazebrook M, Bluman EM, et al; American Academy of Orthopaedic Surgeons. Diagnosis and treatment of acute Achilles tendon rupture. J Am Acad Orthop Surg. 2010;18(8):503-510.
5. Khan RJ, Fick D, Keogh A, Crawford J, Brammar T, Parker M. Treatment of acute Achilles tendon ruptures. A meta-analysis of randomized, controlled trials. J Bone Joint Surg Am. 2005;87(10):2202-2210.
6. Renninger CH, Kuhn K, Fellars T, Youngblood S, Bellamy J. Operative and nonoperative management of Achilles tendon ruptures in active duty military population. Foot Ankle Int. 2016;37(3):269-273.
7. Khan RJ, Carey Smith RL. Surgical interventions for treating acute Achilles tendon ruptures. Cochrane Database Syst Rev. 2010;(9):CD003674.
8. McCullough KA, Shaw CM, Anderson RB. Mini-open repair of Achilles rupture in the National Football League. J Surg Orthop Adv. 2014;23(4):179-183.
9. McWilliam JR, Mackay G. The internal brace for midsubstance Achilles ruptures. Foot Ankle Int. 2016;37(7):794-800.
10. Clanton TO, Haytmanek CT, Williams BT, et al. A biomechanical comparison of an open repair and 3 minimally invasive percutaneous Achilles tendon repair techniques during a simulated, progressive rehabilitation protocol. Am J Sports Med. 2015;43(8):1957-1964.
11. Aoki M, Ogiwara N, Ohta T, Nabeta Y. Early active motion and weightbearing after cross-stitch Achilles tendon repair. Am J Sports Med. 1998;26(6):794-800.
12. Kangas J, Pajala A, Ohtonen P, Leppilahti J. Achilles tendon elongation after rupture repair: a randomized comparison of 2 postoperative regimens. Am J Sports Med. 2007;35(1):59-64.
13. Kangas J, Pajala A, Siira P, Hämäläinen M, Leppilahti J. Early functional treatment versus early immobilization in tension of the musculotendinous unit after Achilles rupture repair: a prospective, randomized, clinical study. J Trauma. 2003;54(6):1171-1180.
Foot and Ankle Injuries in American Football
Foot and ankle injuries are common in American football, with injury rates significantly increasing over the past decade.1-5 Epidemiologic studies of collegiate football players have shown an annual incidence of foot and ankle injuries ranging from 9% to 39%,3,6 with as many as 72% of all collegiate players presenting to the National Football League (NFL) Combine with a history of a foot or ankle injury and 13% undergoing surgical treatment.5 Player position influences the rate and type of foot and ankle injury. Offensive and “skill position” players, including linemen, running backs, and wide receivers, are particularly susceptible to foot and ankle injuries due to high levels of force and torque placed on the distal extremity during running, cutting, and tackling. Shoe wear changes, playing field conditions, increasing player size and speed, and improved reporting of injuries are also contributing to increasing injury rates.
The interaction between player cleats and the playing surface is a central issue of foot and ankle injuries in football. Improved traction relates to performance, but increased subsequent torque on the lower extremity is associated with injury. While lateral ankle sprains are the most common foot and ankle injury experienced by football players,7 numerous other injuries can occur, including turf toe, Jones fractures, Lisfranc injuries, syndesmotic disruption, deltoid complex avulsion, and Achilles ruptures. It is important for physicians to be able to recognize, diagnose, and appropriately treat these injuries in players in order to expedite recovery, restore function, and help prevent future injury and long-term sequelae. This review focuses on updated treatment principles, surgical advances, and rehabilitation protocols for common football foot and ankle injuries.
Turf Toe
The term “turf toe” was first used in 1976 to refer to hyperextension injuries and plantar capsule-ligament sprains of the hallux metatarsophalangeal (MTP) joint that can lead to progressive cock-up deformity.8 While these injuries can occur on any surface and disrupt soft tissue balance with functional implications, predisposing factors include increasing playing surface hardness and decreasing shoe stiffness. In a classic scenario, the foot is fixed in equinus as an axial load is placed on the back of the heel, resulting in forced dorsiflexion of the hallux MTP joint.9 As the proximal phalanx extends, the sesamoids are drawn distally and the more dorsal portion of the metatarsal head articular surface bears the majority of the load, causing partial or complete tearing of the plantar plate with or without hallux MTP dislocation. Osteochondral lesions of the MTP joint and subchondral edema of the metatarsal head can occur concurrently as the proximal phalanx impacts or shears across the metatarsal head articular surface.
Clinical examination should focus on hallux swelling, alignment, and flexor hallucis longus (FHL) function along with vertical instability of the hallux MTP joint using a Lachman test. Radiographs should be evaluated for proximal migration of the sesamoids or diastasis (Figures W1A-W1C). 

Indications for surgical intervention include loss of push-off strength, gross MTP instability, proximal migration of the sesamoids, and progressive hallux malalignment or clawing after immobilization. Cases can involve one or a combination of the following: (1) large capsular avulsion with unstable MTP joint; (2) diastasis of bipartite sesamoid; (3) diastasis of sesamoid fracture; (4) retraction of sesamoid; (5) traumatic hallux valgus deformity; (6) vertical instability (positive Lachman test); (7) loose body in MTP joint; or (8) chondral injury in MTP joint. The goal of surgery is the restoration of anatomy in order to restore normal function of the hallux MTP joint.
We have found that using dual medial and plantar incisions places less traction on the plantar medial cutaneous nerve, improves lateral exposure, and provides better wound healing. The medial capsulotomy extends from the metatarsal neck to the mid-phalanx to provide complete visualization of the sesamoid complex (Figures 1A-1F). 

It is important to recognize that not all turf toe injuries involve pure hyperextension on artificial playing surfaces. In recent years, we have found an increasing rate of medial variant turf toe injuries in which a forceful valgus stress on the hallux leads to rupture of the medial collateral ligament, medial or plantar-medial capsule, and/or abductor halluces. Medial variant turf toe can lead to progressive hallux valgus and a traumatic bunion with a significant loss of push-off strength and difficulty with cutting maneuvers. Surgical treatment requires a modified McBride bunionectomy with adductor tenotomy and direct repair of the medial soft tissue defect.
Postoperative management is just as important as proper surgical technique for these injuries and involves a delicate balance between protecting the repair and starting early range of motion (ROM). Patients are immobilized non-weight-bearing (NWB) for 5 to 7 days maximum followed immediately with the initiation of passive hallux plantarflexion to keep the sesamoids moving. Active hallux plantarflexion is started at 4 weeks after surgery with active dorsiflexion from 6 to 8 weeks. Patients are transitioned to an accommodative shoe with stiff hallux insert 8 weeks postoperative with continued therapy focusing on hallux ROM. Running is initiated at 12 weeks and return to play (RTP) is typically allowed 4 months after surgery.
Jones Fractures
Jones fractures are fractures of the 5th metatarsal at the metaphyseal-diaphyseal junction, where there is a watershed area of decreased vascularity between the intramedullary nutrient and metaphyseal arteries. Current thought is that the rising rate of Jones fractures among football players is partially caused by the use of flexible, narrow cleats that do not provide enough stiffness and lateral support for the 5th metatarsal during running and cutting. Additionally, lateral overload from a baseline cavovarus foot posture with or without metatarsus adductus and/or skewfoot is thought to contribute to Jones fractures.10 Preoperative radiographs should be evaluated for fracture location, orientation, amount of cortical thickening, and overall geometry of the foot and 5th metatarsal. In elite athletes, the threshold for surgical intervention is decreasing in order to expedite healing and recovery and decrease re-fracture risk. This rationale is based on delayed union rates of 25% to 66%, nonunion rates of 7% to 28%,11 and re-fracture rates of up to 33% associated with nonoperative treatment.12 Nonoperative management is usually not feasible in the competitive athlete, as it typically involves a period of protected weight-bearing in a tall controlled ankle motion (CAM) boot for 6 to 8 weeks with serial radiographs to evaluate healing.
Our preference for surgical intervention involves percutaneous screw fixation with a “high and inside” starting point on fluoroscopy (Figures 2A-2D). 

In career athletes, we augment the fracture site using a mixture of bone marrow aspirate concentrate (BMA) (Magellan, Arteriocyte Medical Systems) and demineralized bone matrix (DBM) (Mini Ignite, Wright Medical Technology) injected percutaneously in and around the fracture site under fluoroscopic guidance. Using this technique in a cohort of 25 NFL players treated operatively for Jones fractures, we found that 100% of athletes were able to RTP in the NFL in an average of 9.5 weeks.14 Two patients (7.5%) suffered re-fractures requiring revision surgery with iliac crest bone graft and repeat screw placement with a RTP after 15 weeks. We did not find an association between RTP and re-fracture rate.
The appropriate rehabilitation protocol for Jones fractures after surgery remains controversial and dependent on individual needs and abilities.15,16 For athletes in-season, we recommend a brief period of NWB for 1 to 2 weeks followed by toe-touch weight-bearing in a tall CAM boot for 2 to 4 weeks. After 4 weeks, patients begin gentle exercises on a stationary bike and pool therapy to reduce impact on the fracture site. Low-intensity pulsed ultrasound bone stimulators (Exogen, Bioventus) are frequently used directly over fracture site throughout the postoperative protocol as an adjuvant therapy. If clinically nontender over the fracture site, patients are allowed to begin running in modified protective shoe wear 4 weeks after surgery with an average RTP of 6 to 8 weeks. RTP is determined clinically, as radiographic union may not be evident for 12 to 16 weeks. Useful custom orthoses include turf toe plates with a cushioned lateral column and lateral heel wedge if hindfoot varus is present preoperatively.10 The solid intramedullary screw is left in place permanently.
In our experience, we have found the average re-fracture and nonunion rate to be approximately 8% across all athletes. Our observation that union rates do not appear to be related to RTP times suggests that underlying biology such as Vitamin D deficiency may play a larger role in union rates than previously thought. We have found that most Jones re-fractures occur in the first year after the initial injury, but can occur up to 2.5 years afterwards as well.14 For the management of symptomatic re-fractures and nonunions, the previous screw must be first removed. This can be difficult if the screw is bent or broken, and may require a lateral corticotomy of the metatarsal.
After hardware removal, we advocate open bone grafting of the fracture site using bone from the iliac crest retrieved with a small, percutaneous trephine. Re-fixation should be achieved using a larger, solid screw and postoperative adjuvants may include bone stimulators, Vitamin D and calcium supplemention, and possible teriparatide use (Forteo, Eli Lilly), depending on individual patient profile. In a cohort of 21 elite athletes treated for Jones fracture revision surgery with screw exchange and bone grafting, we found that 100% of patients had computed tomography (CT) evidence of union, with an average RTP of 12.3 weeks.17
Lisfranc Injuries
Lisfranc injuries include any bony or ligamentous damage that involves the tarsometatarsal (TMT) joints. While axial loading of a fixed, plantarflexed foot has traditionally been thought of as the most common mechanism of Lisfranc injury, we have found that noncontact twisting injuries leading to Lisfranc disruption are actually more common among NFL players. This mechanism is similar to noncontact turf toe and results in a purely ligamentous injury. We have found this to be particularly true in the case of defensive ends engaged with offensive linemen in which no axial loading or contact of the foot occurs. Clinically, patients often have painful weight-bearing, inability to perform a single limb heel rise, plantar ecchymosis, and swelling and point tenderness across the bases of the 1st and 2nd metatarsals.
It is critical to obtain comparison weight-bearing radiographs of both feet during initial work-up to look for evidence of instability. Subtle radiographic findings of Lisfranc injury include a bony “fleck” sign, compression fracture of the cuboid, and diastasis between the base of the 1st and 2nd metatarsals and/or medial and middle cuneiforms (Figures 3A, 3B). 
The goal of surgical intervention is to obtain and maintain anatomic reduction of all unstable joints in order to restore a normal foot posture. One of the difficulties with Lisfranc injuries is that there are no exact diastasis parameters and individuals should be treated based on symptoms, functional needs, and degree of instability. It has been shown that 5 mm of displacement can have good long-term clinical results in select cases without surgery.18 For surgery, we recommend open reduction to remove interposed soft tissue debris and directly assess the articular surfaces (Figures 4A-4D). 
Proximal-medial column Lisfranc injury variants are increasingly common among football players.20 In these injuries, the force of injury extends through the intercuneiform joint and exits out the naviculocuneiform joint, thus causing instability at multiple joints and an unstable 1st ray. Patients often have minimal clinical findings and normal radiographs and stress radiographs. MRI of the foot often reveals edema at the naviculocuneiform joint. Often patients fail to improve with nonoperative immobilization with continued inability to push off from the hallux. Unrecognized or untreated instability will lead to rapid deterioration of the naviculocuneiform joint. Surgical intervention requires a homerun screw and intercuneiform screw. We do not recommend primary arthrodesis in athletes due to significant risk of malunion and nonunion unless severe articular damage is present.
Patients are typically kept NWB in a splint for 2 weeks after surgery followed by NWB in a tall CAM from 3 to 4 weeks postoperative. Progressive weight-bearing and ROM exercises are initiated from 4 to 8 weeks, followed by return to accommodative shoe wear from 10 to 12 weeks. Hardware removal is performed 4 to 6 months after surgery, typically in the off-season to allow for 6 to 8 weeks or protected recovery afterwards. Premature hardware removal can lead to loss of reduction, particularly at the intercuneiform joints. All hardware crossing the TMT joints should be removed, while the homerun screw can be left in place in addition to the intercuneiform screw. RTP in football typically occurs 6 to 7 months after surgery. Final functional outcome is related to the adequacy of initial reduction and severity of the initial injury.21
Syndesmotic Disruption
Syndesmotic injuries comprise 1% to 18% of ankle sprains in the general population, but occur at much higher rates in football due to the increased rotation forces placed on the ankle during cutting and tackling. RTP after syndesmotic injury often takes twice as long when compared to isolated lateral ankle ligamentous injury.22 Missed injuries are common and if not treated properly can lead to chronic ankle instability and posttraumatic ankle arthritis.23 Syndesmotic injury can occur in isolation or with concomitant adjacent bony, cartilaginous, or ligamentous injuries. Therefore, clinical examination and imaging work-up are critical to successful management.
Syndesmotic injuries often result from an external rotation force applied to a hyperdorsiflexed ankle while the foot is planted. This mechanism causes the fibula to externally rotate while translating posteriorly and laterally, resulting in rupture of the anterior inferior tibiofibular ligament (AITFL) first, followed by the deep deltoid ligament, interosseous ligament (IOL), and lastly posterior talofibular ligament.24 Most syndesmotic injuries involve rupture of only the AITFL and IOL.25 Multiple clinical stress tests have been designed to assess syndesmotic stability, including the squeeze test, external rotation stress test, crossed-leg test, and fibula-translation test.26-29 However, no physical examination maneuver has been shown to reliably predict the presence or degree of syndesmotic injury and therefore imaging studies are necessary.30
Initial imaging should include standing radiographs of the affected ankle. An increase in the medial clear space between the medial malleolus and talus can occur with a combined syndesmotic and deltoid disruption. In the case of subtle syndesmotic injuries, contralateral comparison weight-bearing radiographs are recommended. CT and MRI can provide additional information, but these static imaging tests cannot identify instability. Fluoroscopic stress evaluation is beneficial but has a high false-negative rate in low-grade injuries and may not detect partial rupture of the AITFL and IOL.31 It has been shown that malrotation of as much as 30° of external rotation can occur if relying on intraoperative fluoroscopy alone.32 It has been our practice to recommend surgical reduction and stabilization for any syndesmotic injury with documented diastasis or instability seen on imaging and/or arthroscopy.
Nonoperative treatment is indicated for truly stable grade I syndesmotic injuries. This involves rest and immobilization followed by a progressive rehabilitation program consisting of stretching, strengthening, and proprioceptive exercises.33 After 1 week of protected weight-bearing in a cast or tall CAM boot, progression to full weight-bearing should occur over the following week. Active-assisted ankle ROM exercises and light proprioceptive training should then be initiated followed by sport-specific exercises 2 to 3 weeks after injury.
Arthroscopy can be a valuable diagnostic tool in the setting of subtle syndesmotic injury with negative radiographs, positive MRI for edema, and a protracted recovery course with vague pain (Figures W5A-W5E). 
Implants are placed above the true syndesmotic joint (at least 15 mm above the tibial plafond) angled 30° posterior to anterior to follow the normal relationship of the fibula to the distal tibia in the incisura. Typically 2 suture-buttons are used, with the devices placed in a divergent fashion. We highly recommend the use of a fibular buttress plate with button placement in individuals returning to contact activity. This construct increases surface area distribution while preventing stress risers and the risk of fibula fractures. In a cadaver model with deliberate syndesmotic malreduction, suture-button stabilization resulted in decreased postoperative displacement as opposed to conventional screw fixation.34 Therefore, dynamic syndesmotic fixation may help to decrease the negative sequelae of iatrogenic clamp malreduction.
Postoperative rehabilitation involves NWB in a cast or tall CAM boot for 4 weeks followed by ankle ROM exercises and progressive weight-bearing and physical therapy. Patients are transitioned to a lace-up ankle brace and athletic shoe from 6 to 12 weeks postoperative with increasing activity. Running and jumping is permitted 4 months after surgery with RTP typically at 6 to 7 months. Athletes who have had surgical stabilization for documented instability without any diastasis may engage in a more rapid recovery and RTP as symptoms and function allow.
Deltoid Complex Avulsion
Missed or neglected deltoid ligament injuries can lead to progressive chondral injury and joint degeneration. These injuries are often subtle and difficult to diagnose. An inability to perform a single limb heel rise, persistent pain with activity, and lack of normal functional improvement despite appropriate care are indicators of subtle ligament instability. These injuries often require an examination under anesthesia with combined ankle arthroscopy. Valgus stress testing of the ankle while directly visualizing the deltoid ligament from the anterolateral portal can reveal medial laxity in addition to potential osteochondral lesions along the anterolateral talar dome.
In American football players, we have observed that infolding and retraction of an avulsed superficial deltoid ligament complex after an ankle fracture, Maisonneuve injury, or severe high ankle sprain can be a source of persistent increased medial clear space, malreduction, and postoperative pain and medial instability. We have found that there is often complete avulsion of the superficial deltoid complex off the proximal aspect of the medial malleolus during high-energy ankle fractures in football players that is amenable to direct repair to bone (Figures W6A-W6E). 
During surgical repair, an incision is made along the anterior aspect of the medial malleolus and the superficial deltoid ligament complex can often be found flipped and interposed in the medial gutter. A rongeur is used to create a bleeding cancellous bone surface for soft-tissue healing and 1 to 2 suture anchors are used to repair and imbricate the deltoid ligament complex back to the medial malleolus. The goal of these sutures is to repair the tibionavicular and tibial spring ligaments back to the medial malleolus. We believe that superficial deltoid complex avulsion during high-energy ankle fractures is a distinct injury pattern that should be recognized and may benefit from primary open repair.
We currently open explore every deltoid ligament complex in athletes with unstable syndesmotic injuries, as we believe that deltoid avulsion injuries are underrecognized and do not heal in an anatomic fashion if left alone. Postoperative recovery follows the same immobilization, progressive weight-bearing, and physical therapy protocol as that for syndesmotic disruption.
Achilles Ruptures
Acute midsubstance Achilles tendon ruptures are an increasingly common injury in patients 30 to 50 years of age, with more than 50% of all injuries occurring during basketball.36,37 Among NFL players, we have found that Achilles ruptures tend to occur at a higher rate during training camp, when athletes are deconditioned and quickly returning to explosive push-off activities. Physical examination should include a Thompson test, palpation of a gap within the tendon, and evaluation of resting ankle dorsiflexion in the affected extremity in the prone position with the knees bent. Lateral radiographs should be analyzed for the presence of a bony avulsion fragment indicative of an insertional avulsion injury or midsubstance calcium deposition reflecting chronic Achilles tendinosis, as both of these conditions will change surgical management. MRI is not recommended with acute midsubstance ruptures but may be helpful in the case of chronic ruptures or more proximal tears of the musculotendinous junction.
The management of acute midsubstance Achilles tendon ruptures is controversial, with no general consensus in the literature regarding nonoperative treatment, surgical repair, and ideal repair technique.36,38-42 American Academy of Orthopaedic Surgeons clinical practice guidelines report moderate evidence that nonoperative treatment of Achilles tendon ruptures has lower wound healing complications but higher rates of re-rupture.38,39 Additionally, limited incision approaches have been found to have fewer overall complications compared with traditional open repair. In an effort to reduce the incidence of postoperative wound complications while improving functional recovery, modern repair techniques focus on a limited incision repair using percutaneous suture insertion and management (PARS Achilles Jig System, Arthrex).36 The limited incision technique utilizes a 2-cm transverse incision and non-disposable jig with divergent needle passes and locking suture fixation options to secure and fixate both tendon ends with minimal dissection of skin, subcutaneous tissue, and paratenon. Limited incision repair is ideally performed within 2 weeks of the injury to ensure that both tendon ends are easy to identify, mobilize, and repair. An open repair is generally recommended for midsubstance ruptures more than 4 weeks old and cases of insertional rupture and Achilles tendinopathy.
In a cohort of 9 NFL players treated for midsubstance Achilles ruptures using the PARS technique, we found no re-ruptures, no wound complications, and no sural nerve issues after surgery.43 A comparative review of 270 cases of operatively treated Achilles tendon ruptures (101 PARS, 169 traditional open repair) showed that the PARS group had significantly shorter operative times and a higher number of patients able to return to baseline physical activities by 5 months compared to open repair.36 Although not statistically significant, the overall PARS complication rate was 5% while the open complication rate was 11%. The PARS group had no cases of sural neuritis or deep infection requiring reoperation. We currently use a limited incision technique for all acute midsubstance Achilles ruptures in athletes regardless of sport, patient size, or position played.
During surgery, a 2-cm transverse incision is made over the gap in the Achilles tendon and dissection is carried down to the rupture site with minimal manipulation of the skin (Figures 5A-5F). 
A key aspect of postoperative recovery is avoiding excessive ankle dorsiflexion while the tendon is healing during the first 4 weeks after surgery, as this can lead to an elongated tendon with loss of push-off strength. Patients are kept in a plantarflexion splint NWB for 2 weeks after surgery. If the incision is healed at 2 weeks, sutures are removed and patients are transitioned into a NWB tall CAM boot for 2 weeks with gentle ankle ROM exercises. If there is any concern regarding wound healing status, sutures are maintained for an additional 1 to 2 weeks.
From 4 to 8 weeks after surgery, progressive weight-bearing with continued ankle ROM exercises is initiated with peel-away heel lifts (~2 cm thick total, 3 layers). Each layer of the heel lift is gradually removed as pain allows every 2 to 3 days with the goal of being full weight-bearing with the foot flat at 6 weeks postoperative. Physical therapy focusing on ankle ROM and gentle Achilles stretching and strengthening is also started 6 weeks after surgery. From 8 to 12 weeks postoperative, patients are transitioned out of the tall CAM boot into normal, accommodative shoe wear with full weight-bearing. We avoid ankle dorsiflexion past neutral until 12 weeks after surgery, as overlengthening of the Achilles complex and the subsequent loss of push-off power can be devastating to running athletes. Activity levels are increased as tolerated, with no running or jumping from 12 to 16 weeks with full release to all activities after 16 weeks. RTP often takes 5 to 6 months after surgery, depending on the position played.
Am J Orthop. 2016;45(6):358-367. Copyright Frontline Medical Communications Inc. 2016. All rights reserved.
1. Canale ST, Cantler ED Jr, Sisk TD, Freeman BL 3rd. A chronicle of injuries of an American intercollegiate football team. Am J Sports Med. 1981;9(6):384-389.2. Robey JM, Blyth CS, Mueller FO. Athletic injuries. Application of epidemiologic methods. JAMA. 1971;217(2):184-189.
3. Saal JA. Common American football injuries. Sports Med. 1991;12(2):132-147.
4. Thompson N, Halpern B, Curl WW, et al. High school football injuries: evaluation. Am J Sports Med. 1987;15(2):117-124.
5. Kaplan LD, Jost PW, Honkamp N, Norwig J, West R, Bradley JP. Incidence and variance of foot and ankle injuries in elite college football players. Am J Orthop. 2011;40(1):40-44.
6. DeLee JC, Farney WC. Incidence of injury in Texas high school football. Am J Sports Med. 1992;20(5):575-580.
7. Brophy RH, Barnes R, Rodeo SA, Warren RF. Prevalence of musculoskeletal disorders at the NFL Combine--trends from 1987 to 2000. Med Sci Sports Exerc. 2007;39(1):22-27.
8. Bowers KD Jr, Martin RB. Turf-toe: a shoe-surface related football injury. Med Sci Sports. 1976;8(2):81-83.
9. McCormick JJ, Anderson RB. Turf toe: anatomy, diagnosis, and treatment. Sports Health. 2010;2(6):487-494.
10. Raikin SM, Slenker N, Ratigan B. The association of a varus hindfoot and fracture of the fifth metatarsal metaphyseal-diaphyseal junction: the Jones fracture. Am J Sports Med. 2008;36(7):1367-1372.
11. Title CI, Katchis SD. Traumatic foot and ankle injuries in the athlete. Orthop Clin North Am. 2002;33(3):587-598.
12. Quill GE Jr. Fractures of the proximal fifth metatarsal. Orthop Clin North Am. 1995;26(2):353-361.
13. Nunley JA, Glisson RR. A new option for intramedullary fixation of Jones fractures: the Charlotte Carolina Jones Fracture System. Foot Ankle Int. 2008;29(12):1216-1221.
14. Lareau CR, Hsu AR, Anderson RB. Return to play in National Football League players after operative Jones fracture treatment. Foot Ankle Int. 2016;37(1):8-16.
15. Larson CM, Almekinders LC, Taft TN, Garrett WE. Intramedullary screw fixation of Jones fractures. Analysis of failure. Am J Sports Med. 2002;30(1):55-60.
16. Portland G, Kelikian A, Kodros S. Acute surgical management of Jones’ fractures. Foot Ankle Int. 2003;24(11):829-833.
17. Hunt KJ, Anderson RB. Treatment of Jones fracture nonunions and refractures in the elite athlete: outcomes of intramedullary screw fixation with bone grafting. Am J Sports Med. 2011;39(9):1948-1954.
18. Nunley JA, Vertullo CJ. Classification, investigation, and management of midfoot sprains: Lisfranc injuries in the athlete. Am J Sports Med. 2002;30(6):871-878.
19. Alberta FG, Aronow MS, Barrero M, Diaz-Doran V, Sullivan RJ, Adams DJ. Ligamentous Lisfranc joint injuries: a biomechanical comparison of dorsal plate and transarticular screw fixation. Foot Ankle Int. 2005;26(6):462-473.
20. Ardoin GT, Anderson RB. Subtle Lisfranc injury. Tech Foot Ankle Surg. 2010;9(3):100-106.
21. Kuo RS, Tejwani NC, Digiovanni CW, et al. Outcome after open reduction and internal fixation of Lisfranc joint injuries. J Bone Joint Surg Am. 2000;82-A(11):1609-1618.
22. Wright RW, Barile RJ, Surprenant DA, Matava MJ. Ankle syndesmosis sprains in national hockey league players. Am J Sports Med. 2004;32(8):1941-1945.
23. Williams GN, Jones MH, Amendola A. Syndesmotic ankle sprains in athletes. Am J Sports Med. 2007;35(7):1197-1207.
24. Beumer A, Valstar ER, Garling EH, et al. Effects of ligament sectioning on the kinematics of the distal tibiofibular syndesmosis: a radiostereometric study of 10 cadaveric specimens based on presumed trauma mechanisms with suggestions for treatment. Acta Orthop. 2006;77(3):531-540.
25. McCollum GA, van den Bekerom MP, Kerkhoffs GM, Calder JD, van Dijk CN. Syndesmosis and deltoid ligament injuries in the athlete. Knee Surg Sports Traumatol Arthrosc. 2013;21(6):1328-1337.
26. Boytim MJ, Fischer DA, Neumann L. Syndesmotic ankle sprains. Am J Sports Med. 1991;19(3):294-298.
27. Nussbaum ED, Hosea TM, Sieler SD, Incremona BR, Kessler DE. Prospective evaluation of syndesmotic ankle sprains without diastasis. Am J Sports Med. 2001;29(1):31-35.
28. Kiter E, Bozkurt M. The crossed-leg test for examination of ankle syndesmosis injuries. Foot Ankle Int. 2005;26(2):187-188.
29. Beumer A, van Hemert WL, Swierstra BA, Jasper LE, Belkoff SM. A biomechanical evaluation of clinical stress tests for syndesmotic ankle instability. Foot Ankle Int. 2003;24(4):358-363.
30. Amendola A, Williams G, Foster D. Evidence-based approach to treatment of acute traumatic syndesmosis (high ankle) sprains. Sports Med Arthrosc. 2006;14(4):232-236.
31. Beumer A, Valstar ER, Garling EH, et al. External rotation stress imaging in syndesmotic injuries of the ankle: comparison of lateral radiography and radiostereometry in a cadaveric model. Acta Orthop Scand. 2003;74(2):201-205.
32. Marmor M, Hansen E, Han HK, Buckley J, Matityahu A. Limitations of standard fluoroscopy in detecting rotational malreduction of the syndesmosis in an ankle fracture model. Foot Ankle Int. 2011;32(6):616-622.
33. Williams GN, Allen EJ. Rehabilitation of syndesmotic (high) ankle sprains. Sports Health. 2010;2(6):460-470.
34. Westermann RW, Rungprai C, Goetz JE, Femino J, Amendola A, Phisitkul P. The effect of suture-button fixation on simulated syndesmotic malreduction: a cadaveric study. J Bone Joint Surg Am. 2014;96(20):1732-1738.
35. Hsu AR, Lareau CR, Anderson RB. Repair of acute superficial deltoid complex avulsion during ankle fracture fixation in National Football League players. Foot Ankle Int. 2015;36(11):1272-1278.
36. Hsu AR, Jones CP, Cohen BE, Davis WH, Ellington JK, Anderson RB. Clinical outcomes and complications of percutaneous Achilles repair system versus open technique for acute achilles tendon ruptures. Foot Ankle Int. 2015;36(11):1279-1286.
37. Raikin SM, Garras DN, Krapchev PV. Achilles tendon injuries in a United States population. Foot Ankle Int. 2013;34(4):475-480.
38. Chiodo CP, Glazebrook M, Bluman EM, et al. American Academy of Orthopaedic Surgeons clinical practice guideline on treatment of achilles tendon rupture. J Bone Joint Surg Am. 2010;92(14):2466-2468.
39. Chiodo CP, Glazebrook M, Bluman EM, et al. Diagnosis and treatment of acute achilles tendon rupture. J Am Acad Orthop Surg. 2010;18(8):503-510.
40. Khan RJ, Fick D, Keogh A, Crawford J, Brammar T, Parker M. Treatment of acute achilles tendon ruptures. A meta-analysis of randomized, controlled trials. J Bone Joint Surg Am. 2005;87(10):2202-2210.
41. Renninger CH, Kuhn K, Fellars T, Youngblood S, Bellamy J. Operative and nonoperative management of achilles tendon ruptures in active duty military population. Foot Ankle Int. 2016;37(3):269-273.
42. Khan RJ, Carey Smith RL. Surgical interventions for treating acute achilles tendon ruptures. Cochrane Database Syst Rev. 2010;(9):CD003674.
43. McCullough KA, Shaw CM, Anderson RB. Mini-open repair of achilles rupture in the national football league. J Surg Orthop Adv. 2014;23(4):179-183.
Foot and ankle injuries are common in American football, with injury rates significantly increasing over the past decade.1-5 Epidemiologic studies of collegiate football players have shown an annual incidence of foot and ankle injuries ranging from 9% to 39%,3,6 with as many as 72% of all collegiate players presenting to the National Football League (NFL) Combine with a history of a foot or ankle injury and 13% undergoing surgical treatment.5 Player position influences the rate and type of foot and ankle injury. Offensive and “skill position” players, including linemen, running backs, and wide receivers, are particularly susceptible to foot and ankle injuries due to high levels of force and torque placed on the distal extremity during running, cutting, and tackling. Shoe wear changes, playing field conditions, increasing player size and speed, and improved reporting of injuries are also contributing to increasing injury rates.
The interaction between player cleats and the playing surface is a central issue of foot and ankle injuries in football. Improved traction relates to performance, but increased subsequent torque on the lower extremity is associated with injury. While lateral ankle sprains are the most common foot and ankle injury experienced by football players,7 numerous other injuries can occur, including turf toe, Jones fractures, Lisfranc injuries, syndesmotic disruption, deltoid complex avulsion, and Achilles ruptures. It is important for physicians to be able to recognize, diagnose, and appropriately treat these injuries in players in order to expedite recovery, restore function, and help prevent future injury and long-term sequelae. This review focuses on updated treatment principles, surgical advances, and rehabilitation protocols for common football foot and ankle injuries.
Turf Toe
The term “turf toe” was first used in 1976 to refer to hyperextension injuries and plantar capsule-ligament sprains of the hallux metatarsophalangeal (MTP) joint that can lead to progressive cock-up deformity.8 While these injuries can occur on any surface and disrupt soft tissue balance with functional implications, predisposing factors include increasing playing surface hardness and decreasing shoe stiffness. In a classic scenario, the foot is fixed in equinus as an axial load is placed on the back of the heel, resulting in forced dorsiflexion of the hallux MTP joint.9 As the proximal phalanx extends, the sesamoids are drawn distally and the more dorsal portion of the metatarsal head articular surface bears the majority of the load, causing partial or complete tearing of the plantar plate with or without hallux MTP dislocation. Osteochondral lesions of the MTP joint and subchondral edema of the metatarsal head can occur concurrently as the proximal phalanx impacts or shears across the metatarsal head articular surface.
Clinical examination should focus on hallux swelling, alignment, and flexor hallucis longus (FHL) function along with vertical instability of the hallux MTP joint using a Lachman test. Radiographs should be evaluated for proximal migration of the sesamoids or diastasis (Figures W1A-W1C).
Indications for surgical intervention include loss of push-off strength, gross MTP instability, proximal migration of the sesamoids, and progressive hallux malalignment or clawing after immobilization. Cases can involve one or a combination of the following: (1) large capsular avulsion with unstable MTP joint; (2) diastasis of bipartite sesamoid; (3) diastasis of sesamoid fracture; (4) retraction of sesamoid; (5) traumatic hallux valgus deformity; (6) vertical instability (positive Lachman test); (7) loose body in MTP joint; or (8) chondral injury in MTP joint. The goal of surgery is the restoration of anatomy in order to restore normal function of the hallux MTP joint.
We have found that using dual medial and plantar incisions places less traction on the plantar medial cutaneous nerve, improves lateral exposure, and provides better wound healing. The medial capsulotomy extends from the metatarsal neck to the mid-phalanx to provide complete visualization of the sesamoid complex (Figures 1A-1F).
It is important to recognize that not all turf toe injuries involve pure hyperextension on artificial playing surfaces. In recent years, we have found an increasing rate of medial variant turf toe injuries in which a forceful valgus stress on the hallux leads to rupture of the medial collateral ligament, medial or plantar-medial capsule, and/or abductor halluces. Medial variant turf toe can lead to progressive hallux valgus and a traumatic bunion with a significant loss of push-off strength and difficulty with cutting maneuvers. Surgical treatment requires a modified McBride bunionectomy with adductor tenotomy and direct repair of the medial soft tissue defect.
Postoperative management is just as important as proper surgical technique for these injuries and involves a delicate balance between protecting the repair and starting early range of motion (ROM). Patients are immobilized non-weight-bearing (NWB) for 5 to 7 days maximum followed immediately with the initiation of passive hallux plantarflexion to keep the sesamoids moving. Active hallux plantarflexion is started at 4 weeks after surgery with active dorsiflexion from 6 to 8 weeks. Patients are transitioned to an accommodative shoe with stiff hallux insert 8 weeks postoperative with continued therapy focusing on hallux ROM. Running is initiated at 12 weeks and return to play (RTP) is typically allowed 4 months after surgery.
Jones Fractures
Jones fractures are fractures of the 5th metatarsal at the metaphyseal-diaphyseal junction, where there is a watershed area of decreased vascularity between the intramedullary nutrient and metaphyseal arteries. Current thought is that the rising rate of Jones fractures among football players is partially caused by the use of flexible, narrow cleats that do not provide enough stiffness and lateral support for the 5th metatarsal during running and cutting. Additionally, lateral overload from a baseline cavovarus foot posture with or without metatarsus adductus and/or skewfoot is thought to contribute to Jones fractures.10 Preoperative radiographs should be evaluated for fracture location, orientation, amount of cortical thickening, and overall geometry of the foot and 5th metatarsal. In elite athletes, the threshold for surgical intervention is decreasing in order to expedite healing and recovery and decrease re-fracture risk. This rationale is based on delayed union rates of 25% to 66%, nonunion rates of 7% to 28%,11 and re-fracture rates of up to 33% associated with nonoperative treatment.12 Nonoperative management is usually not feasible in the competitive athlete, as it typically involves a period of protected weight-bearing in a tall controlled ankle motion (CAM) boot for 6 to 8 weeks with serial radiographs to evaluate healing.
Our preference for surgical intervention involves percutaneous screw fixation with a “high and inside” starting point on fluoroscopy (Figures 2A-2D).
In career athletes, we augment the fracture site using a mixture of bone marrow aspirate concentrate (BMA) (Magellan, Arteriocyte Medical Systems) and demineralized bone matrix (DBM) (Mini Ignite, Wright Medical Technology) injected percutaneously in and around the fracture site under fluoroscopic guidance. Using this technique in a cohort of 25 NFL players treated operatively for Jones fractures, we found that 100% of athletes were able to RTP in the NFL in an average of 9.5 weeks.14 Two patients (7.5%) suffered re-fractures requiring revision surgery with iliac crest bone graft and repeat screw placement with a RTP after 15 weeks. We did not find an association between RTP and re-fracture rate.
The appropriate rehabilitation protocol for Jones fractures after surgery remains controversial and dependent on individual needs and abilities.15,16 For athletes in-season, we recommend a brief period of NWB for 1 to 2 weeks followed by toe-touch weight-bearing in a tall CAM boot for 2 to 4 weeks. After 4 weeks, patients begin gentle exercises on a stationary bike and pool therapy to reduce impact on the fracture site. Low-intensity pulsed ultrasound bone stimulators (Exogen, Bioventus) are frequently used directly over fracture site throughout the postoperative protocol as an adjuvant therapy. If clinically nontender over the fracture site, patients are allowed to begin running in modified protective shoe wear 4 weeks after surgery with an average RTP of 6 to 8 weeks. RTP is determined clinically, as radiographic union may not be evident for 12 to 16 weeks. Useful custom orthoses include turf toe plates with a cushioned lateral column and lateral heel wedge if hindfoot varus is present preoperatively.10 The solid intramedullary screw is left in place permanently.
In our experience, we have found the average re-fracture and nonunion rate to be approximately 8% across all athletes. Our observation that union rates do not appear to be related to RTP times suggests that underlying biology such as Vitamin D deficiency may play a larger role in union rates than previously thought. We have found that most Jones re-fractures occur in the first year after the initial injury, but can occur up to 2.5 years afterwards as well.14 For the management of symptomatic re-fractures and nonunions, the previous screw must be first removed. This can be difficult if the screw is bent or broken, and may require a lateral corticotomy of the metatarsal.
After hardware removal, we advocate open bone grafting of the fracture site using bone from the iliac crest retrieved with a small, percutaneous trephine. Re-fixation should be achieved using a larger, solid screw and postoperative adjuvants may include bone stimulators, Vitamin D and calcium supplemention, and possible teriparatide use (Forteo, Eli Lilly), depending on individual patient profile. In a cohort of 21 elite athletes treated for Jones fracture revision surgery with screw exchange and bone grafting, we found that 100% of patients had computed tomography (CT) evidence of union, with an average RTP of 12.3 weeks.17
Lisfranc Injuries
Lisfranc injuries include any bony or ligamentous damage that involves the tarsometatarsal (TMT) joints. While axial loading of a fixed, plantarflexed foot has traditionally been thought of as the most common mechanism of Lisfranc injury, we have found that noncontact twisting injuries leading to Lisfranc disruption are actually more common among NFL players. This mechanism is similar to noncontact turf toe and results in a purely ligamentous injury. We have found this to be particularly true in the case of defensive ends engaged with offensive linemen in which no axial loading or contact of the foot occurs. Clinically, patients often have painful weight-bearing, inability to perform a single limb heel rise, plantar ecchymosis, and swelling and point tenderness across the bases of the 1st and 2nd metatarsals.
It is critical to obtain comparison weight-bearing radiographs of both feet during initial work-up to look for evidence of instability. Subtle radiographic findings of Lisfranc injury include a bony “fleck” sign, compression fracture of the cuboid, and diastasis between the base of the 1st and 2nd metatarsals and/or medial and middle cuneiforms (Figures 3A, 3B).
The goal of surgical intervention is to obtain and maintain anatomic reduction of all unstable joints in order to restore a normal foot posture. One of the difficulties with Lisfranc injuries is that there are no exact diastasis parameters and individuals should be treated based on symptoms, functional needs, and degree of instability. It has been shown that 5 mm of displacement can have good long-term clinical results in select cases without surgery.18 For surgery, we recommend open reduction to remove interposed soft tissue debris and directly assess the articular surfaces (Figures 4A-4D).
Proximal-medial column Lisfranc injury variants are increasingly common among football players.20 In these injuries, the force of injury extends through the intercuneiform joint and exits out the naviculocuneiform joint, thus causing instability at multiple joints and an unstable 1st ray. Patients often have minimal clinical findings and normal radiographs and stress radiographs. MRI of the foot often reveals edema at the naviculocuneiform joint. Often patients fail to improve with nonoperative immobilization with continued inability to push off from the hallux. Unrecognized or untreated instability will lead to rapid deterioration of the naviculocuneiform joint. Surgical intervention requires a homerun screw and intercuneiform screw. We do not recommend primary arthrodesis in athletes due to significant risk of malunion and nonunion unless severe articular damage is present.
Patients are typically kept NWB in a splint for 2 weeks after surgery followed by NWB in a tall CAM from 3 to 4 weeks postoperative. Progressive weight-bearing and ROM exercises are initiated from 4 to 8 weeks, followed by return to accommodative shoe wear from 10 to 12 weeks. Hardware removal is performed 4 to 6 months after surgery, typically in the off-season to allow for 6 to 8 weeks or protected recovery afterwards. Premature hardware removal can lead to loss of reduction, particularly at the intercuneiform joints. All hardware crossing the TMT joints should be removed, while the homerun screw can be left in place in addition to the intercuneiform screw. RTP in football typically occurs 6 to 7 months after surgery. Final functional outcome is related to the adequacy of initial reduction and severity of the initial injury.21
Syndesmotic Disruption
Syndesmotic injuries comprise 1% to 18% of ankle sprains in the general population, but occur at much higher rates in football due to the increased rotation forces placed on the ankle during cutting and tackling. RTP after syndesmotic injury often takes twice as long when compared to isolated lateral ankle ligamentous injury.22 Missed injuries are common and if not treated properly can lead to chronic ankle instability and posttraumatic ankle arthritis.23 Syndesmotic injury can occur in isolation or with concomitant adjacent bony, cartilaginous, or ligamentous injuries. Therefore, clinical examination and imaging work-up are critical to successful management.
Syndesmotic injuries often result from an external rotation force applied to a hyperdorsiflexed ankle while the foot is planted. This mechanism causes the fibula to externally rotate while translating posteriorly and laterally, resulting in rupture of the anterior inferior tibiofibular ligament (AITFL) first, followed by the deep deltoid ligament, interosseous ligament (IOL), and lastly posterior talofibular ligament.24 Most syndesmotic injuries involve rupture of only the AITFL and IOL.25 Multiple clinical stress tests have been designed to assess syndesmotic stability, including the squeeze test, external rotation stress test, crossed-leg test, and fibula-translation test.26-29 However, no physical examination maneuver has been shown to reliably predict the presence or degree of syndesmotic injury and therefore imaging studies are necessary.30
Initial imaging should include standing radiographs of the affected ankle. An increase in the medial clear space between the medial malleolus and talus can occur with a combined syndesmotic and deltoid disruption. In the case of subtle syndesmotic injuries, contralateral comparison weight-bearing radiographs are recommended. CT and MRI can provide additional information, but these static imaging tests cannot identify instability. Fluoroscopic stress evaluation is beneficial but has a high false-negative rate in low-grade injuries and may not detect partial rupture of the AITFL and IOL.31 It has been shown that malrotation of as much as 30° of external rotation can occur if relying on intraoperative fluoroscopy alone.32 It has been our practice to recommend surgical reduction and stabilization for any syndesmotic injury with documented diastasis or instability seen on imaging and/or arthroscopy.
Nonoperative treatment is indicated for truly stable grade I syndesmotic injuries. This involves rest and immobilization followed by a progressive rehabilitation program consisting of stretching, strengthening, and proprioceptive exercises.33 After 1 week of protected weight-bearing in a cast or tall CAM boot, progression to full weight-bearing should occur over the following week. Active-assisted ankle ROM exercises and light proprioceptive training should then be initiated followed by sport-specific exercises 2 to 3 weeks after injury.
Arthroscopy can be a valuable diagnostic tool in the setting of subtle syndesmotic injury with negative radiographs, positive MRI for edema, and a protracted recovery course with vague pain (Figures W5A-W5E).
Implants are placed above the true syndesmotic joint (at least 15 mm above the tibial plafond) angled 30° posterior to anterior to follow the normal relationship of the fibula to the distal tibia in the incisura. Typically 2 suture-buttons are used, with the devices placed in a divergent fashion. We highly recommend the use of a fibular buttress plate with button placement in individuals returning to contact activity. This construct increases surface area distribution while preventing stress risers and the risk of fibula fractures. In a cadaver model with deliberate syndesmotic malreduction, suture-button stabilization resulted in decreased postoperative displacement as opposed to conventional screw fixation.34 Therefore, dynamic syndesmotic fixation may help to decrease the negative sequelae of iatrogenic clamp malreduction.
Postoperative rehabilitation involves NWB in a cast or tall CAM boot for 4 weeks followed by ankle ROM exercises and progressive weight-bearing and physical therapy. Patients are transitioned to a lace-up ankle brace and athletic shoe from 6 to 12 weeks postoperative with increasing activity. Running and jumping is permitted 4 months after surgery with RTP typically at 6 to 7 months. Athletes who have had surgical stabilization for documented instability without any diastasis may engage in a more rapid recovery and RTP as symptoms and function allow.
Deltoid Complex Avulsion
Missed or neglected deltoid ligament injuries can lead to progressive chondral injury and joint degeneration. These injuries are often subtle and difficult to diagnose. An inability to perform a single limb heel rise, persistent pain with activity, and lack of normal functional improvement despite appropriate care are indicators of subtle ligament instability. These injuries often require an examination under anesthesia with combined ankle arthroscopy. Valgus stress testing of the ankle while directly visualizing the deltoid ligament from the anterolateral portal can reveal medial laxity in addition to potential osteochondral lesions along the anterolateral talar dome.
In American football players, we have observed that infolding and retraction of an avulsed superficial deltoid ligament complex after an ankle fracture, Maisonneuve injury, or severe high ankle sprain can be a source of persistent increased medial clear space, malreduction, and postoperative pain and medial instability. We have found that there is often complete avulsion of the superficial deltoid complex off the proximal aspect of the medial malleolus during high-energy ankle fractures in football players that is amenable to direct repair to bone (Figures W6A-W6E).
During surgical repair, an incision is made along the anterior aspect of the medial malleolus and the superficial deltoid ligament complex can often be found flipped and interposed in the medial gutter. A rongeur is used to create a bleeding cancellous bone surface for soft-tissue healing and 1 to 2 suture anchors are used to repair and imbricate the deltoid ligament complex back to the medial malleolus. The goal of these sutures is to repair the tibionavicular and tibial spring ligaments back to the medial malleolus. We believe that superficial deltoid complex avulsion during high-energy ankle fractures is a distinct injury pattern that should be recognized and may benefit from primary open repair.
We currently open explore every deltoid ligament complex in athletes with unstable syndesmotic injuries, as we believe that deltoid avulsion injuries are underrecognized and do not heal in an anatomic fashion if left alone. Postoperative recovery follows the same immobilization, progressive weight-bearing, and physical therapy protocol as that for syndesmotic disruption.
Achilles Ruptures
Acute midsubstance Achilles tendon ruptures are an increasingly common injury in patients 30 to 50 years of age, with more than 50% of all injuries occurring during basketball.36,37 Among NFL players, we have found that Achilles ruptures tend to occur at a higher rate during training camp, when athletes are deconditioned and quickly returning to explosive push-off activities. Physical examination should include a Thompson test, palpation of a gap within the tendon, and evaluation of resting ankle dorsiflexion in the affected extremity in the prone position with the knees bent. Lateral radiographs should be analyzed for the presence of a bony avulsion fragment indicative of an insertional avulsion injury or midsubstance calcium deposition reflecting chronic Achilles tendinosis, as both of these conditions will change surgical management. MRI is not recommended with acute midsubstance ruptures but may be helpful in the case of chronic ruptures or more proximal tears of the musculotendinous junction.
The management of acute midsubstance Achilles tendon ruptures is controversial, with no general consensus in the literature regarding nonoperative treatment, surgical repair, and ideal repair technique.36,38-42 American Academy of Orthopaedic Surgeons clinical practice guidelines report moderate evidence that nonoperative treatment of Achilles tendon ruptures has lower wound healing complications but higher rates of re-rupture.38,39 Additionally, limited incision approaches have been found to have fewer overall complications compared with traditional open repair. In an effort to reduce the incidence of postoperative wound complications while improving functional recovery, modern repair techniques focus on a limited incision repair using percutaneous suture insertion and management (PARS Achilles Jig System, Arthrex).36 The limited incision technique utilizes a 2-cm transverse incision and non-disposable jig with divergent needle passes and locking suture fixation options to secure and fixate both tendon ends with minimal dissection of skin, subcutaneous tissue, and paratenon. Limited incision repair is ideally performed within 2 weeks of the injury to ensure that both tendon ends are easy to identify, mobilize, and repair. An open repair is generally recommended for midsubstance ruptures more than 4 weeks old and cases of insertional rupture and Achilles tendinopathy.
In a cohort of 9 NFL players treated for midsubstance Achilles ruptures using the PARS technique, we found no re-ruptures, no wound complications, and no sural nerve issues after surgery.43 A comparative review of 270 cases of operatively treated Achilles tendon ruptures (101 PARS, 169 traditional open repair) showed that the PARS group had significantly shorter operative times and a higher number of patients able to return to baseline physical activities by 5 months compared to open repair.36 Although not statistically significant, the overall PARS complication rate was 5% while the open complication rate was 11%. The PARS group had no cases of sural neuritis or deep infection requiring reoperation. We currently use a limited incision technique for all acute midsubstance Achilles ruptures in athletes regardless of sport, patient size, or position played.
During surgery, a 2-cm transverse incision is made over the gap in the Achilles tendon and dissection is carried down to the rupture site with minimal manipulation of the skin (Figures 5A-5F).
A key aspect of postoperative recovery is avoiding excessive ankle dorsiflexion while the tendon is healing during the first 4 weeks after surgery, as this can lead to an elongated tendon with loss of push-off strength. Patients are kept in a plantarflexion splint NWB for 2 weeks after surgery. If the incision is healed at 2 weeks, sutures are removed and patients are transitioned into a NWB tall CAM boot for 2 weeks with gentle ankle ROM exercises. If there is any concern regarding wound healing status, sutures are maintained for an additional 1 to 2 weeks.
From 4 to 8 weeks after surgery, progressive weight-bearing with continued ankle ROM exercises is initiated with peel-away heel lifts (~2 cm thick total, 3 layers). Each layer of the heel lift is gradually removed as pain allows every 2 to 3 days with the goal of being full weight-bearing with the foot flat at 6 weeks postoperative. Physical therapy focusing on ankle ROM and gentle Achilles stretching and strengthening is also started 6 weeks after surgery. From 8 to 12 weeks postoperative, patients are transitioned out of the tall CAM boot into normal, accommodative shoe wear with full weight-bearing. We avoid ankle dorsiflexion past neutral until 12 weeks after surgery, as overlengthening of the Achilles complex and the subsequent loss of push-off power can be devastating to running athletes. Activity levels are increased as tolerated, with no running or jumping from 12 to 16 weeks with full release to all activities after 16 weeks. RTP often takes 5 to 6 months after surgery, depending on the position played.
Am J Orthop. 2016;45(6):358-367. Copyright Frontline Medical Communications Inc. 2016. All rights reserved.
1. Canale ST, Cantler ED Jr, Sisk TD, Freeman BL 3rd. A chronicle of injuries of an American intercollegiate football team. Am J Sports Med. 1981;9(6):384-389.2. Robey JM, Blyth CS, Mueller FO. Athletic injuries. Application of epidemiologic methods. JAMA. 1971;217(2):184-189.
3. Saal JA. Common American football injuries. Sports Med. 1991;12(2):132-147.
4. Thompson N, Halpern B, Curl WW, et al. High school football injuries: evaluation. Am J Sports Med. 1987;15(2):117-124.
5. Kaplan LD, Jost PW, Honkamp N, Norwig J, West R, Bradley JP. Incidence and variance of foot and ankle injuries in elite college football players. Am J Orthop. 2011;40(1):40-44.
6. DeLee JC, Farney WC. Incidence of injury in Texas high school football. Am J Sports Med. 1992;20(5):575-580.
7. Brophy RH, Barnes R, Rodeo SA, Warren RF. Prevalence of musculoskeletal disorders at the NFL Combine--trends from 1987 to 2000. Med Sci Sports Exerc. 2007;39(1):22-27.
8. Bowers KD Jr, Martin RB. Turf-toe: a shoe-surface related football injury. Med Sci Sports. 1976;8(2):81-83.
9. McCormick JJ, Anderson RB. Turf toe: anatomy, diagnosis, and treatment. Sports Health. 2010;2(6):487-494.
10. Raikin SM, Slenker N, Ratigan B. The association of a varus hindfoot and fracture of the fifth metatarsal metaphyseal-diaphyseal junction: the Jones fracture. Am J Sports Med. 2008;36(7):1367-1372.
11. Title CI, Katchis SD. Traumatic foot and ankle injuries in the athlete. Orthop Clin North Am. 2002;33(3):587-598.
12. Quill GE Jr. Fractures of the proximal fifth metatarsal. Orthop Clin North Am. 1995;26(2):353-361.
13. Nunley JA, Glisson RR. A new option for intramedullary fixation of Jones fractures: the Charlotte Carolina Jones Fracture System. Foot Ankle Int. 2008;29(12):1216-1221.
14. Lareau CR, Hsu AR, Anderson RB. Return to play in National Football League players after operative Jones fracture treatment. Foot Ankle Int. 2016;37(1):8-16.
15. Larson CM, Almekinders LC, Taft TN, Garrett WE. Intramedullary screw fixation of Jones fractures. Analysis of failure. Am J Sports Med. 2002;30(1):55-60.
16. Portland G, Kelikian A, Kodros S. Acute surgical management of Jones’ fractures. Foot Ankle Int. 2003;24(11):829-833.
17. Hunt KJ, Anderson RB. Treatment of Jones fracture nonunions and refractures in the elite athlete: outcomes of intramedullary screw fixation with bone grafting. Am J Sports Med. 2011;39(9):1948-1954.
18. Nunley JA, Vertullo CJ. Classification, investigation, and management of midfoot sprains: Lisfranc injuries in the athlete. Am J Sports Med. 2002;30(6):871-878.
19. Alberta FG, Aronow MS, Barrero M, Diaz-Doran V, Sullivan RJ, Adams DJ. Ligamentous Lisfranc joint injuries: a biomechanical comparison of dorsal plate and transarticular screw fixation. Foot Ankle Int. 2005;26(6):462-473.
20. Ardoin GT, Anderson RB. Subtle Lisfranc injury. Tech Foot Ankle Surg. 2010;9(3):100-106.
21. Kuo RS, Tejwani NC, Digiovanni CW, et al. Outcome after open reduction and internal fixation of Lisfranc joint injuries. J Bone Joint Surg Am. 2000;82-A(11):1609-1618.
22. Wright RW, Barile RJ, Surprenant DA, Matava MJ. Ankle syndesmosis sprains in national hockey league players. Am J Sports Med. 2004;32(8):1941-1945.
23. Williams GN, Jones MH, Amendola A. Syndesmotic ankle sprains in athletes. Am J Sports Med. 2007;35(7):1197-1207.
24. Beumer A, Valstar ER, Garling EH, et al. Effects of ligament sectioning on the kinematics of the distal tibiofibular syndesmosis: a radiostereometric study of 10 cadaveric specimens based on presumed trauma mechanisms with suggestions for treatment. Acta Orthop. 2006;77(3):531-540.
25. McCollum GA, van den Bekerom MP, Kerkhoffs GM, Calder JD, van Dijk CN. Syndesmosis and deltoid ligament injuries in the athlete. Knee Surg Sports Traumatol Arthrosc. 2013;21(6):1328-1337.
26. Boytim MJ, Fischer DA, Neumann L. Syndesmotic ankle sprains. Am J Sports Med. 1991;19(3):294-298.
27. Nussbaum ED, Hosea TM, Sieler SD, Incremona BR, Kessler DE. Prospective evaluation of syndesmotic ankle sprains without diastasis. Am J Sports Med. 2001;29(1):31-35.
28. Kiter E, Bozkurt M. The crossed-leg test for examination of ankle syndesmosis injuries. Foot Ankle Int. 2005;26(2):187-188.
29. Beumer A, van Hemert WL, Swierstra BA, Jasper LE, Belkoff SM. A biomechanical evaluation of clinical stress tests for syndesmotic ankle instability. Foot Ankle Int. 2003;24(4):358-363.
30. Amendola A, Williams G, Foster D. Evidence-based approach to treatment of acute traumatic syndesmosis (high ankle) sprains. Sports Med Arthrosc. 2006;14(4):232-236.
31. Beumer A, Valstar ER, Garling EH, et al. External rotation stress imaging in syndesmotic injuries of the ankle: comparison of lateral radiography and radiostereometry in a cadaveric model. Acta Orthop Scand. 2003;74(2):201-205.
32. Marmor M, Hansen E, Han HK, Buckley J, Matityahu A. Limitations of standard fluoroscopy in detecting rotational malreduction of the syndesmosis in an ankle fracture model. Foot Ankle Int. 2011;32(6):616-622.
33. Williams GN, Allen EJ. Rehabilitation of syndesmotic (high) ankle sprains. Sports Health. 2010;2(6):460-470.
34. Westermann RW, Rungprai C, Goetz JE, Femino J, Amendola A, Phisitkul P. The effect of suture-button fixation on simulated syndesmotic malreduction: a cadaveric study. J Bone Joint Surg Am. 2014;96(20):1732-1738.
35. Hsu AR, Lareau CR, Anderson RB. Repair of acute superficial deltoid complex avulsion during ankle fracture fixation in National Football League players. Foot Ankle Int. 2015;36(11):1272-1278.
36. Hsu AR, Jones CP, Cohen BE, Davis WH, Ellington JK, Anderson RB. Clinical outcomes and complications of percutaneous Achilles repair system versus open technique for acute achilles tendon ruptures. Foot Ankle Int. 2015;36(11):1279-1286.
37. Raikin SM, Garras DN, Krapchev PV. Achilles tendon injuries in a United States population. Foot Ankle Int. 2013;34(4):475-480.
38. Chiodo CP, Glazebrook M, Bluman EM, et al. American Academy of Orthopaedic Surgeons clinical practice guideline on treatment of achilles tendon rupture. J Bone Joint Surg Am. 2010;92(14):2466-2468.
39. Chiodo CP, Glazebrook M, Bluman EM, et al. Diagnosis and treatment of acute achilles tendon rupture. J Am Acad Orthop Surg. 2010;18(8):503-510.
40. Khan RJ, Fick D, Keogh A, Crawford J, Brammar T, Parker M. Treatment of acute achilles tendon ruptures. A meta-analysis of randomized, controlled trials. J Bone Joint Surg Am. 2005;87(10):2202-2210.
41. Renninger CH, Kuhn K, Fellars T, Youngblood S, Bellamy J. Operative and nonoperative management of achilles tendon ruptures in active duty military population. Foot Ankle Int. 2016;37(3):269-273.
42. Khan RJ, Carey Smith RL. Surgical interventions for treating acute achilles tendon ruptures. Cochrane Database Syst Rev. 2010;(9):CD003674.
43. McCullough KA, Shaw CM, Anderson RB. Mini-open repair of achilles rupture in the national football league. J Surg Orthop Adv. 2014;23(4):179-183.