User login
Application of Epoxy Resin to a Solid-Foam Pelvic Model: Creating a Dry-Erase Pelvis
The value of preoperative planning and templating has been well-established in fracture surgery.1,2 Traditionally, this involves writing a surgical tactic and tracing the radiographs on paper to plan the ultimate reduction and implant placement.1 The advent of sophisticated computer programs has allowed electronic preoperative planning in trauma and arthroplasty surgery.3,4 Software for computer templating of acetabular fractures is available.5 Still, the renderings generated in these exercises are 2-dimensional, and their quality is somewhat dependent on the surgeon’s artistic ability. Ultimately, drawing a fracture is meant to help the surgeon understand its 3-dimensional (3-D) characteristics. This can be difficult working in 2 dimensions especially for bones, such as the pelvis, with complex 3-D structures. A useful alternative is to draw the fracture on a plastic-bone model.
We plan all acetabular fracture surgeries on 3-D models (plastic bones). These models are commonly provided to residents and fellows through educational courses or can be purchased online. Residents, fellows, and staff have their own models for planning, and we typically keep several models in the operating room for teaching before the surgery. Although these models are ideal for visualizing the bony anatomy, they are less than ideal for drawing fracture lines. Ink pens do not leave lines, and lines from markers and pencils cannot be easily erased. After a few planning sessions, the models typically look like a city map, making it difficult to tell the current fracture from those previously evaluated.
Here we describe a technique for turning standard plastic models into white boards so that lines can be drawn clearly with a marker and easily erased. To facilitate the correction of errors and reuse for future cases, we coat pelvic models with dry-erase epoxy resin. Although there is a commercially available product that has similar capabilities, our technique creates a significantly less expensive model that will likely be appealing to residents and fellows.

Technique
Throughout the process of creating the pelvic model, it is important to work in a well-ventilated area. Gloves should be worn at all times. The working surface should be protected with an impervious plastic sheet to avoid primer or epoxy soaking through.
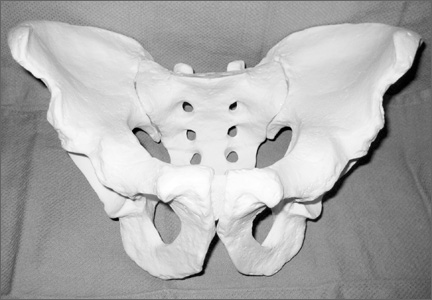
In creating our dry-erase pelvic models, we use the Sawbones large male solid-foam pelvic model (Figure 1; Model 1301, Pacific Research Laboratories, Vashon, Washington). These models are often available to residents and fellows after Arbeitsgemeinschaft für Osteosynthesefragen/Orthopaedic Trauma Association (AO/OTA) trauma courses or resident educational sessions. Alternatively, they can be purchased online.
We sand the model to smooth out surface irregularities and to prepare it to accept primer. First, use 100-grit and then 220-grit sandpaper to create the optimum surface. We recommend suspending the pelvis from string by placing an eyelet screw into the top of the sacrum or looping a string through 1 of the sacral foramen while priming, painting, and curing. To prime the pelvic model, we have used KILZ original spray primer (Masterchem Industries, Imperial, Missouri). It is important that the entire model be well coated with primer because the epoxy resin will not adhere to unprimed plastic-foam surface. Take care to apply an even coat and to avoid drip formation.
Once the primer is completely dry, apply the dry-erase epoxy resin (Rust-Oleum, Vernon Hills, Illinois). Mix the 2 parts of the epoxy resin and apply to the pelvic model with a foam brush. It is important to cover the entire surface of the model with enough epoxy to give a smooth, even finish. This requires 2 to 3 coats applied approximately 30 minutes apart (the epoxy will remain wet but will take additional coats well).
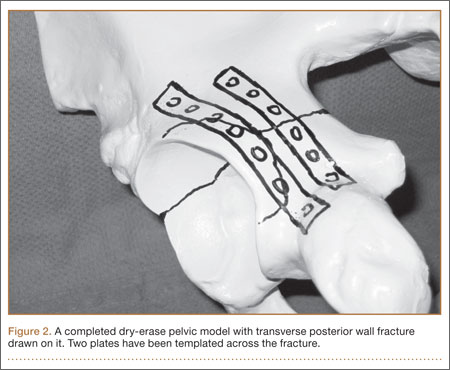
Once the final coat has been applied, the model takes about 48 hours to cure. Hang in a dry, well-ventilated location until it is fully cured. Then, use a dry-erase marker to trace fracture lines and the planned location of plates and screws (Figure 2).
An alternative to creating a dry-erase pelvis is to create a blackboard pelvis. Use Chalkboard Spray (Rust-Oleum) to create a surface that will accept white and colored chalk. The application of this product is much easier than the dry-erase epoxy, because it can be applied in a similar fashion as the spray primer. This creates a black model that can be marked with chalk. However, we have found these models to be less useful than the dry-erase versions, because chalk leaves less precise lines and is harder to remove from the model.
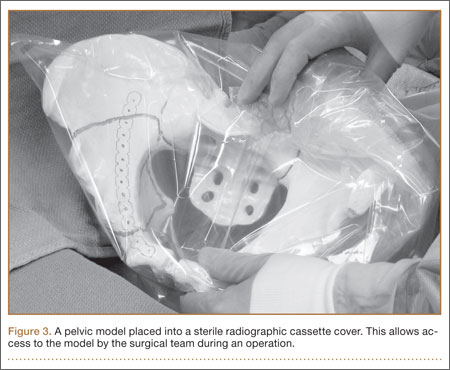
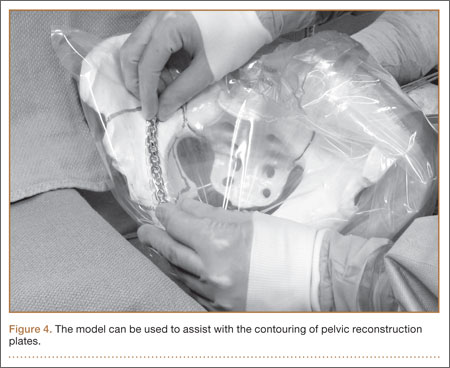
Once created, the pelvic model can be used intraoperatively to help understand fracture reduction and to facilitate the precontouring of pelvic and acetabular plates. We place the model in a sterile radiographic cassette bag (Figure 3). This gives the operating team access to the model and is useful in teaching anatomy, and particularly, screw placement. Further, the model allows an assistant to precontour plates to the model during the exposure portion of the case (Figure 4). While the precontoured plate is not always a perfect fit, it can usually be adjusted easily to fit the unique anatomy of the patient.
Discussion
Understanding the complex anatomy of pelvic and acetabular fractures can be challenging. We use models in the teaching of anatomy, in the interpretation of radiographs and computed tomography (CT) scans, and in preoperative planning. Fracture lines are traced on the pelvic model based on radiographs and/or CT scans and then compared with 3-D reconstruction images and, eventually, with operative findings. The use of our dry-erase models allows for easy correction of mistakes and reuse for further cases.
We have found dry-erase pelvic models to be an invaluable tool for resident and fellow education. While conventional 2-dimensional planning is adequate for most long-bone and periarticular fractures, the creation of these 3-D planning tools is useful in understanding the anatomy and surgical treatment of pelvic and acetabular fractures.
1. Reudi TP, Buckley R, Moran C. AO Principles of Fracture Management. New York, NY: Thieme; 2007.
2. Mast J, Jakob R, Ganz R. Planning & Reduction Techniques in Fracture Surgery. Berlin, Germany: Springer-Verlag; 2006.
3. Pilson HT, Reddix RN Jr, Mutty CE, Webb LX. The long lost art of preoperative planning—resurrected? Orthopedics. 2008;31(12):1238.
4. Unnanuntana A, Wagner D, Goodman SB. The accuracy of preoperative templating in cementless total hip arthroplasty. J Arthroplasty. 2009;24(2):180-186.
5. Reddix RN Jr, Webb LX. Computer-assisted preoperative planning in the surgical treatment of acetabular fractures. J Surg Orthop Adv. 2007;16(3):138-143.
The value of preoperative planning and templating has been well-established in fracture surgery.1,2 Traditionally, this involves writing a surgical tactic and tracing the radiographs on paper to plan the ultimate reduction and implant placement.1 The advent of sophisticated computer programs has allowed electronic preoperative planning in trauma and arthroplasty surgery.3,4 Software for computer templating of acetabular fractures is available.5 Still, the renderings generated in these exercises are 2-dimensional, and their quality is somewhat dependent on the surgeon’s artistic ability. Ultimately, drawing a fracture is meant to help the surgeon understand its 3-dimensional (3-D) characteristics. This can be difficult working in 2 dimensions especially for bones, such as the pelvis, with complex 3-D structures. A useful alternative is to draw the fracture on a plastic-bone model.
We plan all acetabular fracture surgeries on 3-D models (plastic bones). These models are commonly provided to residents and fellows through educational courses or can be purchased online. Residents, fellows, and staff have their own models for planning, and we typically keep several models in the operating room for teaching before the surgery. Although these models are ideal for visualizing the bony anatomy, they are less than ideal for drawing fracture lines. Ink pens do not leave lines, and lines from markers and pencils cannot be easily erased. After a few planning sessions, the models typically look like a city map, making it difficult to tell the current fracture from those previously evaluated.
Here we describe a technique for turning standard plastic models into white boards so that lines can be drawn clearly with a marker and easily erased. To facilitate the correction of errors and reuse for future cases, we coat pelvic models with dry-erase epoxy resin. Although there is a commercially available product that has similar capabilities, our technique creates a significantly less expensive model that will likely be appealing to residents and fellows.
Technique
Throughout the process of creating the pelvic model, it is important to work in a well-ventilated area. Gloves should be worn at all times. The working surface should be protected with an impervious plastic sheet to avoid primer or epoxy soaking through.
In creating our dry-erase pelvic models, we use the Sawbones large male solid-foam pelvic model (Figure 1; Model 1301, Pacific Research Laboratories, Vashon, Washington). These models are often available to residents and fellows after Arbeitsgemeinschaft für Osteosynthesefragen/Orthopaedic Trauma Association (AO/OTA) trauma courses or resident educational sessions. Alternatively, they can be purchased online.
We sand the model to smooth out surface irregularities and to prepare it to accept primer. First, use 100-grit and then 220-grit sandpaper to create the optimum surface. We recommend suspending the pelvis from string by placing an eyelet screw into the top of the sacrum or looping a string through 1 of the sacral foramen while priming, painting, and curing. To prime the pelvic model, we have used KILZ original spray primer (Masterchem Industries, Imperial, Missouri). It is important that the entire model be well coated with primer because the epoxy resin will not adhere to unprimed plastic-foam surface. Take care to apply an even coat and to avoid drip formation.
Once the primer is completely dry, apply the dry-erase epoxy resin (Rust-Oleum, Vernon Hills, Illinois). Mix the 2 parts of the epoxy resin and apply to the pelvic model with a foam brush. It is important to cover the entire surface of the model with enough epoxy to give a smooth, even finish. This requires 2 to 3 coats applied approximately 30 minutes apart (the epoxy will remain wet but will take additional coats well).
Once the final coat has been applied, the model takes about 48 hours to cure. Hang in a dry, well-ventilated location until it is fully cured. Then, use a dry-erase marker to trace fracture lines and the planned location of plates and screws (Figure 2).
An alternative to creating a dry-erase pelvis is to create a blackboard pelvis. Use Chalkboard Spray (Rust-Oleum) to create a surface that will accept white and colored chalk. The application of this product is much easier than the dry-erase epoxy, because it can be applied in a similar fashion as the spray primer. This creates a black model that can be marked with chalk. However, we have found these models to be less useful than the dry-erase versions, because chalk leaves less precise lines and is harder to remove from the model.
Once created, the pelvic model can be used intraoperatively to help understand fracture reduction and to facilitate the precontouring of pelvic and acetabular plates. We place the model in a sterile radiographic cassette bag (Figure 3). This gives the operating team access to the model and is useful in teaching anatomy, and particularly, screw placement. Further, the model allows an assistant to precontour plates to the model during the exposure portion of the case (Figure 4). While the precontoured plate is not always a perfect fit, it can usually be adjusted easily to fit the unique anatomy of the patient.
Discussion
Understanding the complex anatomy of pelvic and acetabular fractures can be challenging. We use models in the teaching of anatomy, in the interpretation of radiographs and computed tomography (CT) scans, and in preoperative planning. Fracture lines are traced on the pelvic model based on radiographs and/or CT scans and then compared with 3-D reconstruction images and, eventually, with operative findings. The use of our dry-erase models allows for easy correction of mistakes and reuse for further cases.
We have found dry-erase pelvic models to be an invaluable tool for resident and fellow education. While conventional 2-dimensional planning is adequate for most long-bone and periarticular fractures, the creation of these 3-D planning tools is useful in understanding the anatomy and surgical treatment of pelvic and acetabular fractures.
1. Reudi TP, Buckley R, Moran C. AO Principles of Fracture Management. New York, NY: Thieme; 2007.
2. Mast J, Jakob R, Ganz R. Planning & Reduction Techniques in Fracture Surgery. Berlin, Germany: Springer-Verlag; 2006.
3. Pilson HT, Reddix RN Jr, Mutty CE, Webb LX. The long lost art of preoperative planning—resurrected? Orthopedics. 2008;31(12):1238.
4. Unnanuntana A, Wagner D, Goodman SB. The accuracy of preoperative templating in cementless total hip arthroplasty. J Arthroplasty. 2009;24(2):180-186.
5. Reddix RN Jr, Webb LX. Computer-assisted preoperative planning in the surgical treatment of acetabular fractures. J Surg Orthop Adv. 2007;16(3):138-143.