Labral Repair Technique
The patient is taken to the surgical suite, and a general anesthetic is administered. A peripheral nerve block is not routinely used. The patient’s feet are padded, and boots for the traction table are applied. The patient is carefully placed on a Hana table in modified supine position. Balanced traction is used to achieve proper joint distraction. The C-arm is used to verify proper distraction, assess hip stability, and achieve standard anterolateral (AL) portal placement. A midanterior portal (MAP) is created and an interportal capsulotomy is performed. Capsular suspension is performed with the InJector II Capsule Restoration System (Stryker Sports Medicine) and typically 4 or 5 high-strength No. 2 sutures (Zipline; Stryker Sports Medicine).19 Diagnostic arthroscopy is performed to identify the tear type, measure the labral width, determine the impingement area, and identify the intra-articular pathology. After the intra-articular pathology is addressed, a radiofrequency Ambient HIPVAC 50 Coblation Wand (Smith & Nephew) is used to expose the acetabular rim and subspine as indicated. Acetabuloplasty or subspine decompression is performed, and then a primary repair or refixation of the labrum is performed. We do not routinely detach the labrum for acetabular rim trimming. A crucial step here is to expose a bleeding surface to which the labrum can be repaired. If the rim is sclerotic, or the rim cannot be removed because of underlying low acetabular coverage, we prefer to obtain the bleeding surface with a microdrilling device (Stryker) that is routinely used for acetabular microfracture.
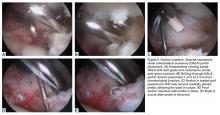
Labrum quality is used to determine which repair method to use. A hypertrophic labrum is debulked. The acetabular rim is seldom resected >3 mm, but, when it is, the newly exposed cartilage is removed. We have found that >3 mm of residual cartilage prevents refixation of the labrum directly to the bone and may interfere with anatomical positioning. When a labrum is <3 mm in width or will not hold a base technique, repair stability is the priority, and a looped method is used. A knotless anchor with No. 1 permanent suture designed for hip labral repair (CinchLock; Stryker) is our first-line anchor choice. A distal anterolateral accessory (DALA) portal is created with an outside-in technique, and anchors are drilled through this portal into zones 2 to 4 (Figures 2A-2E).
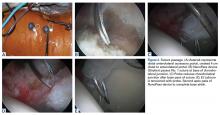
For far medial anchor placement, the anchor drill guide is offset in an attempt to avoid iatrogenic psoas irritation or medial wall penetration. The socket is visually inspected before anchor insertion to confirm complete bony insertion. In the rare case in which a small part of the medial aspect of the anchor is exposed toward the psoas, this part of the anchor is carefully resected with a burr without disrupting anchor fixation or the suture in the anchor. For posterior anchor placement, the AL portal is cannulated and used for far lateral drilling. The MAP and the DALA portal traditionally are cannulated for repairs in zones 2 to 4. With visualization through the AL portal, the probe is used to apply tension on the labral segment being repaired for reduction. A suture-passing device (NanoPass; Stryker) is used to pass (with base stitch technique) the No. 1 suture for the anchor, and the acetabular (base) side of the No. 1 suture is marked with a methylene blue marker. The key is to make the first pass of suture at the base of the chondrolabral junction. The probe is then used to apply tension on the labrum and to reduce the labrum to the chondrolabral junction through the MAP. The second pass of the suture-passing device is through the labrum apex, and the suture is retrieved. Care is taken to make sure the suture is on equal sides of the labral apex to avoid labrum distortion (Figures 2A-2E).A 2.4-mm drill guide is advanced through the DALA portal and placed in the appropriate position for drilling. We aim for 1 mm to 2 mm from the chondrolabral junction. Next, the probe is placed intra-articular and medial to the anchor insertion site, and the anchor is loaded and then inserted around the probe (Figures 3A-3E).
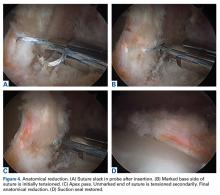
The probe allows the suture to remain free for independent tensioning. We then remove the probe and independently tension the suture ends. Gentle pulling on the marked suture end and then on the unmarked side allows for proper labrum inversion-eversion as needed, and the device is deployed. If the capsular side of the labrum does not lie flat against the bone, the nonmarked end is tightened to position the labrum so that, when the base stitch is tightened, the tissue is compressed against the bone to maximize healing. For a standard 3-cm repair, it is routine to use 3 or 4 anchors placed 6 mm to 8 mm apart (Figures 4A-4D).The hip is then reduced. If indicated, a T-capsulotomy is performed for femoral osteochondroplasty.
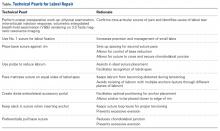
Routinely, the capsule is anatomically repaired with the Injector II Capsule Restoration System and No. 2 permanent suture. The Table presents our technical pearls.


