User login
ExCITE: Minimally invasive tissue extraction made simple with simulation
In November 2014, following concerns regarding the use of electromechanical, or power, morcellation, we published a surgical technique called the extracorporeal C-incision tissue extraction, or ExCITE, technique, as an alternative to contained tissue extraction during minimally invasive gynecologic procedures such as myomectomy and hysterectomy.1 This technique was developed to create a simple, reproducible, and minimally invasive approach to tissue extraction without the need for power morcellation. ExCITE is trainee-friendly and teachable.
In this article, we will review the steps for successful execution of the ExCITE technique. In addition, we will describe how to create your own cost-effective simulation model for teaching, learning, and practicing this technique with a few simple materials found in any craft or grocery store. Simulation is essential. It helps to troubleshoot issues that may arise in an actual case and allows for learning and practicing of surgical techniques to improve the learning curve and efficiency in the operating room (OR).
The model described here is viewable in the video, “The ExCITE technique, Part 2: Simulation made simple.” It is archived in Arnold Advincula’s Surgical Techniques Video Channel, which also is accessible through the “multimedia” section of this Web site.
ExCITE operative technique
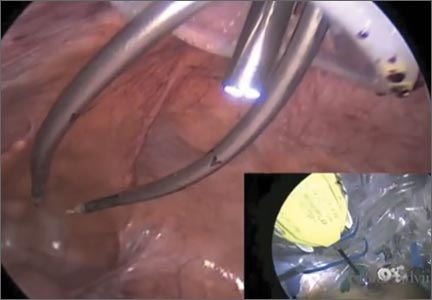
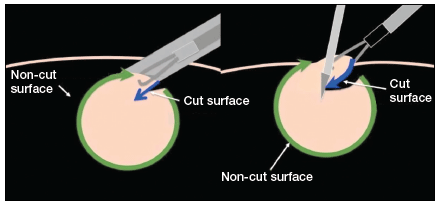
“Traditional” intracorporeal tissue extraction techniques use power morcellation without specimen containment. The specimen is grasped with a tenaculum and pulled through the device. The specimen is essentially peeled like an apple and results in long strips of tissue with both a “cut” and “noncut” or intact surface due to the way the blade incises the tissue (FIGURE 1). When performing extracorporeal tissue extraction, we are replicating essentially the same mechanism of tissue removal. With ExCITE, however, the specimen is contained, there is no power morcellator, and tissue extraction is performed manually (FIGURE 2).

The ExCITE technique can be broken down into 5 major steps:
1. specimen retrieval and containment
2. self-retaining retractor placement
3. creation of the C-incision
4. tissue extraction
5. fascial closure.
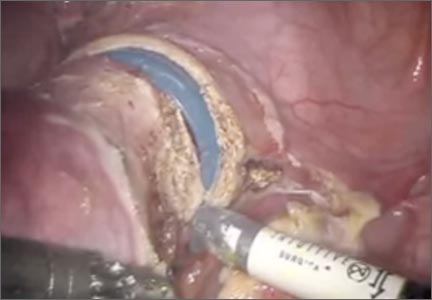
1. Specimen retrieval and containment
First, place the specimen in an endoscopic specimen retrieval bag. Extend the incision at the umbilicus, to approximately 2.5 to 3.5 cm (roughly 2 good fingerbreadths), and exteriorize the bag at the level of the umbilicus.
2. Self-retaining retractor placement
Next, place a small disposable self-retaining retractor, (we prefer the extra-small Alexis-O) inside the bag, which helps keep the bag in position at the umbilicus (FIGURE 3).

Tip. When inserting the retractor, push it in all the way until the entire bottom ring is inside of the bag. This allows for the retractor ring to deploy. Allow some space between the specimen and the opening of the bag when placing the retractor. Do not pull the bag too tightly against the anterior abdominal wall as this may prevent the retractor ring from deploying fully and make the specimen extraction step more difficult.
3. Creation of C-incision
Grasp the specimen with a penetrating clamp (such as a tenaculum, Lahey, or towel clamp) and pull the specimen flush against the incision and retractor. Use a #11 or #10 blade scalpel to create a reverse “C-incision,” with the clamp in your nondominant hand and the scalpel starting the C-incision from your nondominant side moving toward your dominant side. (The curve of the “C” faces your dominant side.)
Tip. It is important to make your C-incision wide enough to get an adequate sized specimen strip through the umbilicus but not too wide (ie, too flush with the retractor), as this will decrease your workspace and increase the risk of cutting the retractor or the bag. It is helpful to hold the scalpel like a pencil and use a sawing-like motion rather than trying to advance the scalpel through the tissue in one motion.
4. Tissue extraction
Re-grasp the tissue flap, or “nub,” created by the C-incision with the penetrating clamp. While maintaining tension on the specimen, continue cutting with a sawing-like motion, using a reverse C coring technique, keeping one surface completely intact. (Generally this is the surface facing your nondominant side.) When cutting, the tissue becomes a strip, similar in appearance to when using a power morcellator. In fact, the technique is very similar to peeling an apple all the way around while trying to keep the skin of the fruit intact.
Tip. Try to angle the scalpel slightly when cutting the tissue, especially at the curve of the C. In other words, keep the tip of the scalpel toward the center of the strip and the handle away from the center, angled closer to the abdominal wall. When achieving an adequate strip of tissue, often the specimen will start rolling (similar to power morcellation). If this occurs, “go with the roll” by modifying the C-coring incision to a half C and incising along the top part of the C repeatedly until the specimen stops rolling. At that point, complete the C. Be sure to re-grasp near the specimen base as you continue the procedure and as the strip gets longer to prevent premature breakage of the strip and for ease of maintaining tension.
5. Fascial closure
After the specimen is completely extracted, remove the self-retaining retractor and specimen bag. Close the fascia at the umbilical incision. We prefer to close the fascia with an 0-polysorb (absorbable) suture in a running fashion, but you may consider an interrupted closure or use delayed absorbable sutures such as polyglyconate/polydioxanone (maxon/PDS).
Tip. To facilitate removal of the self-retaining retractor, pull on the specimen retrieval bag at one apex in order to collapse the retractor ring inside the bag. This allows removal of the bag and retractor simultaneously.
Keys to success
- Perfect the cutting technique; it is imperative to achieve tissue removal in long strip-like pieces for efficiency. Achieving the “saw cut” is like connecting the dots on a piece of paper with a pencil, where you try not to lift up the pencil (or the scalpel in this case). Rock the tissue back and forth with your nondominant hand and pull the specimen flush to the incision. This helps expose maximal surface area so you can continue to cut tissue pieces that are as large as possible. When rocking, move your dominant (cutting) and nondominant (holding the specimen with the tenaculum) hands in opposite directions.
- Ensure that the appropriate amount of tissue is cut when performing the C-incision. If the tissue strip is too thick, it becomes hard to see and incise the tissue, especially as you come around the back curve of the C. Limited visualization will increase your risk of cutting the retractor or the bag. If the cut is too thick, angle the scalpel in to make the tissue strip thinner (ie, make a “V-like” incision into the noncut surface). If the tissue strip becomes small, do the opposite; instead of cutting at a diagonal toward the noncut surface, aim out from your last incision (“V-out”). You should re-grasp below the narrowed area of the strip in this case before continuing to cut to prevent premature breakage of the strip.
- Maintain traction on the specimen. Keep it flush against the abdominal wall and the opening of the self-retaining rectractor. Use your finger to help “roll” the specimen when continuing the C-incision, if necessary. Maintaining traction will help avoid the need to use your finger.
- If you cannot remove the tissue fully intact, reorient or resect, and move forward. When the tissue is not easily extractable, try to roll the specimen by pushing near or behind the junction of the cut surface and the specimen. This helps reorient the specimen and exposes more smooth, noncut surfaces so coring can continue. The strip of tissue may need to be completely incised at times. If this occurs, drop the specimen back into the bag, find a smoother surface, re-grasp, and begin the C-incision again.
To view ExCITE performed in real-time during removal of an 8-cm, 130-g fibroid after a robot-assisted laparoscopic myomectomy, access the video “The Extracorporeal C-Incision Tissue Extraction (ExCITE) technique” at obgmanagement.com, found in Arnold Advincula’s Surgical Techniques Video Channel.
Building the ExCITE simulation model
Creation of the ExCITE simulation model can be broken down into 4 simple steps: creating the self-retaining retractor, building the torso, preparing the specimen, and simulating the ExCITE technique.
Supplies
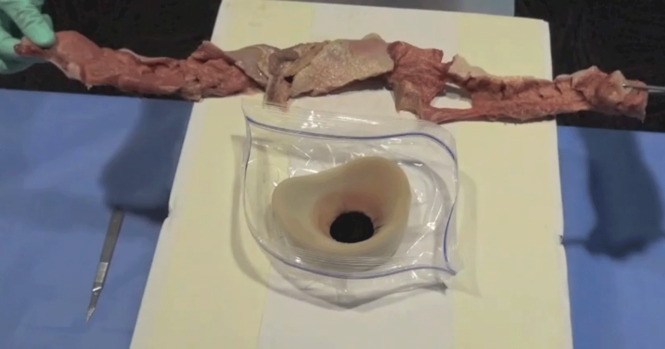
To complete all 4 steps, you will need several materials, all of which are easily accessible and easy to prepare for simulation (FIGURE 4).

- 1 beef tongue (2−3 lb)
- 1 pantyhose
- 2 silicone rings (4−5 cm in diameter, such as those used as wrist bracelets for cancer awareness)
- 1-gallon resealable (Ziploc) plastic bags
- 8x12 cardboard/corrugated box (or plastic storage box)
- duct or masking tape
- instruments:
– #11-blade (or your preference) scalpel
– penetrating clamps (tenaculum, Lahey, or towel clamps)
Note that beef tongue, given its muscular texture, closely mimics uterine tissue and therefore is used to represent the fibroid or uterus during simulation. Sometimes, a piece of beef tongue can be marbleized, or fatty, in which case it can simulate a degenerated fibroid. Beef tongue usually comes in one large piece, which could be suitable for up to 4 surgical exercises. The cost of a single tongue is approximately $20 to $30, so it averages about $5 to $7 per exercise/surgical trainee.
1. Create the self-retaining retractor
Supplies: pantyhose, 2 silicone rings
A self-retaining retractor is tubular and made up of a thin plastic material that has a pliable ring on either end. The pantyhose is used to simulate the tubular plastic material, and the silicone bracelets serve as the ring ends of the retractor. The retractor should be large enough so that it does not slip through the incision.
First, cut off the toe end of the pantyhose. Measure and cut a pantyhose strip to approximately 38 cm (15 in). Place one end of the pantyhose through the center of one of the silicone bracelets and wrap it around the edges of the bracelet. Make it as even as possible all the way around the ring. Roll the pantyhose over the bracelet twice more to secure it. Repeat these steps for the other end of the pantyhose to create the simulated self-retaining retractor (FIGURE 5).

2. Build the torso
Supplies: cardboard (ie, office paper box) or plastic box, scissors, duct tape
Place the cardboard box upside down and cut a hole (approximately 2−3 cm wide) at the center of the box top (technically the bottom of the box) to simulate the umbilical incision. Cut another opening on either side of the box (large enough to fit a hand so that the specimen can be inserted inside the box). When performing the ExCITE technique, a constant upward traction is required. In order to keep the box from lifting off the table, tape the box to the table with masking or duct tape. Alternatively, place weights in the bottom of the inside of the box.
3. Prepare the specimen
Supplies: beef tongue, resealable plastic bag
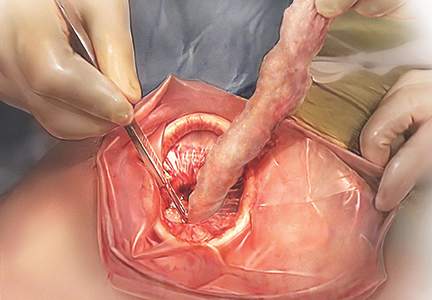
To simulate the contained fibroid or uterus, slice the beef tongue into 3 to 4 pieces (approximately 1-lb pieces) and place one piece of beef tongue inside the resealable plastic bag. Using the side opening in the box, place the bag with the specimen inside the box, and pull the bag through the “umbilical incision” hole, just as you would in a real case. When exteriorizing the bag, ensure some slack so the simulated self-retaining retractor can be placed inside the bag with the ring rolled over it (FIGURE 6).

 |
4. ExCITE technique simulation: Grasp, cut, extract
Supplies: #11-blade scalpel, penetrating clamps (tenaculum, Lahey, or towel clamps).
After exteriorizing the bag, place the self-retaining retractor inside the bag and roll the silicone ring until the retractor is flush with the anterior abdominal wall. Grab the specimen (beef tongue) inside the bag. Perform the ExCITE technique using the beef tongue and the simulated model to fully remove the specimen (FIGURE 7).
Ready, set, simulate
There are many advantages to being able to teach and practice the ExCITE technique outside of the OR. Simulation helps the surgeon to better understand the nuances of tissue extraction in a risk-free environment, and it can improve efficiency in the OR. Building the simulation model as we have described is simple, quick, and inexpensive. We hope that this technique will add to your surgical armamentarium so that you can continue to provide your patients minimally invasive gynecologic surgical options. We recommend that you view both of our videos related to the ExCITE technique and its simulation model at obgmanagement.com, and soon you will be ready to teach or practice the ExCITE technique.
Share your thoughts on this article! Send your Letter to the Editor to rbarbieri@frontlinemedcom.com. Please include your name and the city and state in which you practice.
Reference
1. Truong MD, Advincula AP. The Extracorporeal C-Incision Tissue Extraction (ExCITE) technique. OBG Manag. 2014;26(11):56.

Dr. Advincula is the Levine Family Professor of Women’s Health and Vice-Chair, Department of Obstetrics & Gynecology, and Chief of Gynecology, Sloane Hospital for Women at Columbia University Medical Center in New York, New York.

Dr. Truong is Assistant Professor and Director, Minimally Invasive Gynecology, Virginia Commonwealth University, Richmond, Virginia.
Dr. Advincula reports being a consultant to Blue Endo, CooperSurgical, Intuitive Surgical, SurgiQuest, Titan Medical and receiving royalties from CooperSurgical. Dr. Truong reports no financial relationships relevant to this article.
Dr. Advincula is the Levine Family Professor of Women’s Health and Vice-Chair, Department of Obstetrics & Gynecology, and Chief of Gynecology, Sloane Hospital for Women at Columbia University Medical Center in New York, New York.
Dr. Truong is Assistant Professor and Director, Minimally Invasive Gynecology, Virginia Commonwealth University, Richmond, Virginia.
Dr. Advincula reports being a consultant to Blue Endo, CooperSurgical, Intuitive Surgical, SurgiQuest, Titan Medical and receiving royalties from CooperSurgical. Dr. Truong reports no financial relationships relevant to this article.
In November 2014, following concerns regarding the use of electromechanical, or power, morcellation, we published a surgical technique called the extracorporeal C-incision tissue extraction, or ExCITE, technique, as an alternative to contained tissue extraction during minimally invasive gynecologic procedures such as myomectomy and hysterectomy.1 This technique was developed to create a simple, reproducible, and minimally invasive approach to tissue extraction without the need for power morcellation. ExCITE is trainee-friendly and teachable.
In this article, we will review the steps for successful execution of the ExCITE technique. In addition, we will describe how to create your own cost-effective simulation model for teaching, learning, and practicing this technique with a few simple materials found in any craft or grocery store. Simulation is essential. It helps to troubleshoot issues that may arise in an actual case and allows for learning and practicing of surgical techniques to improve the learning curve and efficiency in the operating room (OR).
The model described here is viewable in the video, “The ExCITE technique, Part 2: Simulation made simple.” It is archived in Arnold Advincula’s Surgical Techniques Video Channel, which also is accessible through the “multimedia” section of this Web site.
ExCITE operative technique
“Traditional” intracorporeal tissue extraction techniques use power morcellation without specimen containment. The specimen is grasped with a tenaculum and pulled through the device. The specimen is essentially peeled like an apple and results in long strips of tissue with both a “cut” and “noncut” or intact surface due to the way the blade incises the tissue (FIGURE 1). When performing extracorporeal tissue extraction, we are replicating essentially the same mechanism of tissue removal. With ExCITE, however, the specimen is contained, there is no power morcellator, and tissue extraction is performed manually (FIGURE 2).
The ExCITE technique can be broken down into 5 major steps:
1. specimen retrieval and containment
2. self-retaining retractor placement
3. creation of the C-incision
4. tissue extraction
5. fascial closure.
1. Specimen retrieval and containment
First, place the specimen in an endoscopic specimen retrieval bag. Extend the incision at the umbilicus, to approximately 2.5 to 3.5 cm (roughly 2 good fingerbreadths), and exteriorize the bag at the level of the umbilicus.
2. Self-retaining retractor placement
Next, place a small disposable self-retaining retractor, (we prefer the extra-small Alexis-O) inside the bag, which helps keep the bag in position at the umbilicus (FIGURE 3).
Tip. When inserting the retractor, push it in all the way until the entire bottom ring is inside of the bag. This allows for the retractor ring to deploy. Allow some space between the specimen and the opening of the bag when placing the retractor. Do not pull the bag too tightly against the anterior abdominal wall as this may prevent the retractor ring from deploying fully and make the specimen extraction step more difficult.
3. Creation of C-incision
Grasp the specimen with a penetrating clamp (such as a tenaculum, Lahey, or towel clamp) and pull the specimen flush against the incision and retractor. Use a #11 or #10 blade scalpel to create a reverse “C-incision,” with the clamp in your nondominant hand and the scalpel starting the C-incision from your nondominant side moving toward your dominant side. (The curve of the “C” faces your dominant side.)
Tip. It is important to make your C-incision wide enough to get an adequate sized specimen strip through the umbilicus but not too wide (ie, too flush with the retractor), as this will decrease your workspace and increase the risk of cutting the retractor or the bag. It is helpful to hold the scalpel like a pencil and use a sawing-like motion rather than trying to advance the scalpel through the tissue in one motion.
4. Tissue extraction
Re-grasp the tissue flap, or “nub,” created by the C-incision with the penetrating clamp. While maintaining tension on the specimen, continue cutting with a sawing-like motion, using a reverse C coring technique, keeping one surface completely intact. (Generally this is the surface facing your nondominant side.) When cutting, the tissue becomes a strip, similar in appearance to when using a power morcellator. In fact, the technique is very similar to peeling an apple all the way around while trying to keep the skin of the fruit intact.
Tip. Try to angle the scalpel slightly when cutting the tissue, especially at the curve of the C. In other words, keep the tip of the scalpel toward the center of the strip and the handle away from the center, angled closer to the abdominal wall. When achieving an adequate strip of tissue, often the specimen will start rolling (similar to power morcellation). If this occurs, “go with the roll” by modifying the C-coring incision to a half C and incising along the top part of the C repeatedly until the specimen stops rolling. At that point, complete the C. Be sure to re-grasp near the specimen base as you continue the procedure and as the strip gets longer to prevent premature breakage of the strip and for ease of maintaining tension.
5. Fascial closure
After the specimen is completely extracted, remove the self-retaining retractor and specimen bag. Close the fascia at the umbilical incision. We prefer to close the fascia with an 0-polysorb (absorbable) suture in a running fashion, but you may consider an interrupted closure or use delayed absorbable sutures such as polyglyconate/polydioxanone (maxon/PDS).
Tip. To facilitate removal of the self-retaining retractor, pull on the specimen retrieval bag at one apex in order to collapse the retractor ring inside the bag. This allows removal of the bag and retractor simultaneously.
Keys to success
- Perfect the cutting technique; it is imperative to achieve tissue removal in long strip-like pieces for efficiency. Achieving the “saw cut” is like connecting the dots on a piece of paper with a pencil, where you try not to lift up the pencil (or the scalpel in this case). Rock the tissue back and forth with your nondominant hand and pull the specimen flush to the incision. This helps expose maximal surface area so you can continue to cut tissue pieces that are as large as possible. When rocking, move your dominant (cutting) and nondominant (holding the specimen with the tenaculum) hands in opposite directions.
- Ensure that the appropriate amount of tissue is cut when performing the C-incision. If the tissue strip is too thick, it becomes hard to see and incise the tissue, especially as you come around the back curve of the C. Limited visualization will increase your risk of cutting the retractor or the bag. If the cut is too thick, angle the scalpel in to make the tissue strip thinner (ie, make a “V-like” incision into the noncut surface). If the tissue strip becomes small, do the opposite; instead of cutting at a diagonal toward the noncut surface, aim out from your last incision (“V-out”). You should re-grasp below the narrowed area of the strip in this case before continuing to cut to prevent premature breakage of the strip.
- Maintain traction on the specimen. Keep it flush against the abdominal wall and the opening of the self-retaining rectractor. Use your finger to help “roll” the specimen when continuing the C-incision, if necessary. Maintaining traction will help avoid the need to use your finger.
- If you cannot remove the tissue fully intact, reorient or resect, and move forward. When the tissue is not easily extractable, try to roll the specimen by pushing near or behind the junction of the cut surface and the specimen. This helps reorient the specimen and exposes more smooth, noncut surfaces so coring can continue. The strip of tissue may need to be completely incised at times. If this occurs, drop the specimen back into the bag, find a smoother surface, re-grasp, and begin the C-incision again.
To view ExCITE performed in real-time during removal of an 8-cm, 130-g fibroid after a robot-assisted laparoscopic myomectomy, access the video “The Extracorporeal C-Incision Tissue Extraction (ExCITE) technique” at obgmanagement.com, found in Arnold Advincula’s Surgical Techniques Video Channel.
Building the ExCITE simulation model
Creation of the ExCITE simulation model can be broken down into 4 simple steps: creating the self-retaining retractor, building the torso, preparing the specimen, and simulating the ExCITE technique.
Supplies
To complete all 4 steps, you will need several materials, all of which are easily accessible and easy to prepare for simulation (FIGURE 4).
- 1 beef tongue (2−3 lb)
- 1 pantyhose
- 2 silicone rings (4−5 cm in diameter, such as those used as wrist bracelets for cancer awareness)
- 1-gallon resealable (Ziploc) plastic bags
- 8x12 cardboard/corrugated box (or plastic storage box)
- duct or masking tape
- instruments:
– #11-blade (or your preference) scalpel
– penetrating clamps (tenaculum, Lahey, or towel clamps)
Note that beef tongue, given its muscular texture, closely mimics uterine tissue and therefore is used to represent the fibroid or uterus during simulation. Sometimes, a piece of beef tongue can be marbleized, or fatty, in which case it can simulate a degenerated fibroid. Beef tongue usually comes in one large piece, which could be suitable for up to 4 surgical exercises. The cost of a single tongue is approximately $20 to $30, so it averages about $5 to $7 per exercise/surgical trainee.
1. Create the self-retaining retractor
Supplies: pantyhose, 2 silicone rings
A self-retaining retractor is tubular and made up of a thin plastic material that has a pliable ring on either end. The pantyhose is used to simulate the tubular plastic material, and the silicone bracelets serve as the ring ends of the retractor. The retractor should be large enough so that it does not slip through the incision.
First, cut off the toe end of the pantyhose. Measure and cut a pantyhose strip to approximately 38 cm (15 in). Place one end of the pantyhose through the center of one of the silicone bracelets and wrap it around the edges of the bracelet. Make it as even as possible all the way around the ring. Roll the pantyhose over the bracelet twice more to secure it. Repeat these steps for the other end of the pantyhose to create the simulated self-retaining retractor (FIGURE 5).
2. Build the torso
Supplies: cardboard (ie, office paper box) or plastic box, scissors, duct tape
Place the cardboard box upside down and cut a hole (approximately 2−3 cm wide) at the center of the box top (technically the bottom of the box) to simulate the umbilical incision. Cut another opening on either side of the box (large enough to fit a hand so that the specimen can be inserted inside the box). When performing the ExCITE technique, a constant upward traction is required. In order to keep the box from lifting off the table, tape the box to the table with masking or duct tape. Alternatively, place weights in the bottom of the inside of the box.
3. Prepare the specimen
Supplies: beef tongue, resealable plastic bag
To simulate the contained fibroid or uterus, slice the beef tongue into 3 to 4 pieces (approximately 1-lb pieces) and place one piece of beef tongue inside the resealable plastic bag. Using the side opening in the box, place the bag with the specimen inside the box, and pull the bag through the “umbilical incision” hole, just as you would in a real case. When exteriorizing the bag, ensure some slack so the simulated self-retaining retractor can be placed inside the bag with the ring rolled over it (FIGURE 6).
|
4. ExCITE technique simulation: Grasp, cut, extract
Supplies: #11-blade scalpel, penetrating clamps (tenaculum, Lahey, or towel clamps).
After exteriorizing the bag, place the self-retaining retractor inside the bag and roll the silicone ring until the retractor is flush with the anterior abdominal wall. Grab the specimen (beef tongue) inside the bag. Perform the ExCITE technique using the beef tongue and the simulated model to fully remove the specimen (FIGURE 7).
Ready, set, simulate
There are many advantages to being able to teach and practice the ExCITE technique outside of the OR. Simulation helps the surgeon to better understand the nuances of tissue extraction in a risk-free environment, and it can improve efficiency in the OR. Building the simulation model as we have described is simple, quick, and inexpensive. We hope that this technique will add to your surgical armamentarium so that you can continue to provide your patients minimally invasive gynecologic surgical options. We recommend that you view both of our videos related to the ExCITE technique and its simulation model at obgmanagement.com, and soon you will be ready to teach or practice the ExCITE technique.
Share your thoughts on this article! Send your Letter to the Editor to rbarbieri@frontlinemedcom.com. Please include your name and the city and state in which you practice.
Reference
1. Truong MD, Advincula AP. The Extracorporeal C-Incision Tissue Extraction (ExCITE) technique. OBG Manag. 2014;26(11):56.
Reference
1. Truong MD, Advincula AP. The Extracorporeal C-Incision Tissue Extraction (ExCITE) technique. OBG Manag. 2014;26(11):56.
In this Article
- 5 steps to execute ExCITE
- Keys to technique success
- Building the simulation model
Laparoscopic management of interstitial ectopic pregnancy
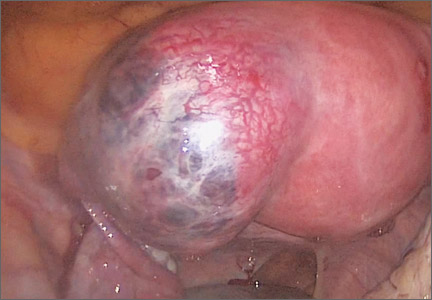
Interstitial ectopic pregnancies, commonly reported as “cornual” ectopic pregnancies, are rare, accounting for only 2% to 3% of all tubal ectopic pregnancies. They can be managed medically with methotrexate or surgically via laparotomy or laparoscopy. Many variations of laparoscopic techniques have been described in the literature but no standardized surgical management has been established.
In this video, we begin by reviewing interstitial ectopic pregnancy and surgical approaches to treatment, with a focus on key surgical techniques and steps for successful laparoscopic management.
We then present the case of a 40-year-old woman (G3P1011) at 7 weeks 2 days gestation with a 5-cm left interstitial ectopic pregnancy who underwent a laparoscopic cornual resection.
We hope this video can serve as a quick reference in your practice for the surgical management of interstitial ectopic pregnancies.
Share your thoughts on this video! Send your Letter to the Editor to rbarbieri@frontlinemedcom.com. Please include your name and the city and state in which you practice.
Surgical removal of malpositioned IUDs
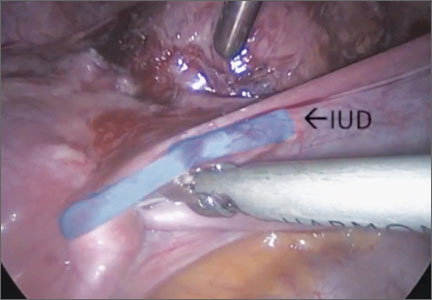
Today’s intrauterine devices (IUDs) represent an excellent form of long-acting reversible contraception. Depending on the type of IUD, many also are used to help alleviate such gynecologic symptoms as abnormal uterine bleeding. Approximately 10% of IUD insertions are complicated by malpositioning, which can include embedding, translocation, or perforation. Malpositioned IUDs are often amenable to office removal but, occasionally, hysteroscopy or laparoscopy is necessary.
In this video, we begin by reviewing techniques for complicated office IUD removal. Then we present 4 cases of malpositioned IUDs that required surgical intervention; hysteroscopic, laparoscopic, or combined techniques were used in each case. This video highlights how preoperative imaging often is not sufficient to determine the necessary surgical approach. Therefore, patients should be counseled on the potential need for hysteroscopy or laparoscopy to surgically remove a malpositioned IUD.
Although risk factors for malpositioned IUDs are not well studied in the literature, understanding proper placement and identification of complications at the time of IUD placement are essential to malpositioning prevention.
My colleagues and I hope you enjoy this video.
—Dr. Arnold Advincula
Share your thoughts on this video! Send your Letter to the Editor to rbarbieri@frontlinemedcom.com. Please include your name and the city and state in which you practice.
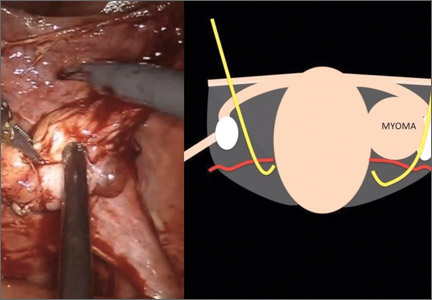
Surgical management of broad ligament fibroids
Although broad ligament fibroids are rare, their surgical management includes nuances of anatomical awareness, traction and counter-traction techniques, and proper hemostasis.
This month’s surgical video presents the case of a 40-year-old woman who presented to the emergency department with sudden-onset abdominal pain. She had a history of menorrhagia and dysmenorrhea and had undergone uterine artery embolization.
The objectives of this technique video are to provide:
- an overview of the background, clinical presentation, and imaging related to broad ligament fibroids
- pertinent anatomical landmarks
- a clinical case of robot-assisted laparoscopic myomectomy, demonstrating surgical technique
- key points for successful and safe surgical management.
I hope you find this video to be a useful tool for your practice and that you share it, and the other technique videos on my Video Channel, with your colleagues.
Mastering the uterine manipulator: Basics and beyond
An essential but often overlooked component of a successful minimally invasive gynecologic procedure is uterine manipulation. Regardless of whether conservative or extirpative surgery is being performed, the ability to optimally position the uterus within the pelvis is critical to safe and efficient surgical dissection. The addition of a colpotomizer cup to any uterine manipulator further enhances the ability to perform a conventional or robot-assisted laparoscopic hysterectomy.
The following video, produced by my third-year resident, Katherine Palmerola, MD, and my second-year fellow, Mireille Truong, MD, aims to provide a quick reference for gynecologists to use to help teach their surgical assistants the fundamentals of assembly and use of a uterine manipulator. This video also can be used as a resource for educating residents and medical students on the essentials of uterine manipulation.
The objectives of this video are to:
- outline the required instruments and steps for assembling a uterine manipulator and colpotomizer cup
- demonstrate the technical nuances of proper uterine manipulation intraoperatively
- highlight important clinical applications of uterine manipulation during pelvic surgery.
I hope this video proves to be a valuable resource for your practice.
– Dr. Arnold Advincula

Watch for these video topics coming soon:
• Tips and tricks to understanding retroperitoneal anatomy
• Simple versus radical hysterectomy: Anatomical nuances.
Share your thoughts on this video! Send your Letter to the Editor to rbarbieri@frontlinemedcom.com. Please include your name and the city and state in which you practice.
An essential but often overlooked component of a successful minimally invasive gynecologic procedure is uterine manipulation. Regardless of whether conservative or extirpative surgery is being performed, the ability to optimally position the uterus within the pelvis is critical to safe and efficient surgical dissection. The addition of a colpotomizer cup to any uterine manipulator further enhances the ability to perform a conventional or robot-assisted laparoscopic hysterectomy.
The following video, produced by my third-year resident, Katherine Palmerola, MD, and my second-year fellow, Mireille Truong, MD, aims to provide a quick reference for gynecologists to use to help teach their surgical assistants the fundamentals of assembly and use of a uterine manipulator. This video also can be used as a resource for educating residents and medical students on the essentials of uterine manipulation.
The objectives of this video are to:
- outline the required instruments and steps for assembling a uterine manipulator and colpotomizer cup
- demonstrate the technical nuances of proper uterine manipulation intraoperatively
- highlight important clinical applications of uterine manipulation during pelvic surgery.
I hope this video proves to be a valuable resource for your practice.
– Dr. Arnold Advincula
Watch for these video topics coming soon:
• Tips and tricks to understanding retroperitoneal anatomy
• Simple versus radical hysterectomy: Anatomical nuances.
Share your thoughts on this video! Send your Letter to the Editor to rbarbieri@frontlinemedcom.com. Please include your name and the city and state in which you practice.
The Extracorporeal C-Incision Tissue Extraction (ExCITE) technique
As a result of recent concerns regarding the use of power morcellation, clinicians have been faced with the need to develop alternative techniques for contained tissue extraction during minimally invasive gynecologic procedures such as myomectomy and hysterectomy.
The following video represents a refined and reproducible approach that incorporates a containment bag (Anchor Medical) and a self-retaining retractor (Applied Medical) in order to meet the following objectives:
- tissue extraction without the need for power morcellation
- specimen containment to avoid intraperitoneal spillage
- ability to continue to offer minimally invasive surgical options to patients through a safe and standardized approach to tissue extraction.
The example case is real-time, contained, intact removal of an 8-cm, 130-g fibroid.

I hope you enjoy the featured opening session on best tissue extraction standards at the AAGL Global Congress on Minimally Invasive Gynecology in Vancouver and stop by to visit me at the OBG Management booth.
— Dr. Arnold Advincula, AAGL 2014 Scientific Program Chair
Share your thoughts on this video! Send your Letter to the Editor to rbarbieri@frontlinemedcom.com. Please include your name and the city and state in which you practice.
As a result of recent concerns regarding the use of power morcellation, clinicians have been faced with the need to develop alternative techniques for contained tissue extraction during minimally invasive gynecologic procedures such as myomectomy and hysterectomy.
The following video represents a refined and reproducible approach that incorporates a containment bag (Anchor Medical) and a self-retaining retractor (Applied Medical) in order to meet the following objectives:
- tissue extraction without the need for power morcellation
- specimen containment to avoid intraperitoneal spillage
- ability to continue to offer minimally invasive surgical options to patients through a safe and standardized approach to tissue extraction.
The example case is real-time, contained, intact removal of an 8-cm, 130-g fibroid.
I hope you enjoy the featured opening session on best tissue extraction standards at the AAGL Global Congress on Minimally Invasive Gynecology in Vancouver and stop by to visit me at the OBG Management booth.
— Dr. Arnold Advincula, AAGL 2014 Scientific Program Chair
Share your thoughts on this video! Send your Letter to the Editor to rbarbieri@frontlinemedcom.com. Please include your name and the city and state in which you practice.
Total laparoscopic versus laparoscopic supracervical hysterectomy
It gives me great pleasure to introduce this month’s surgical video. The following feature presentation was produced by my third-year fellow, Mireille Truong, MD, and my third-year resident, Sarah Horvath, MD. The focus of this surgical video is to compare and contrast total laparoscopic hysterectomy (TLH) with laparoscopic supracervical hysterectomy (LSH). The indication for the TLH case was refractory dysmenorrhea and for the LSH case was as part of a concomitant sacrocervicopexy. The particular methods for specimen removal demonstrated include through the colpotomy for TLH and cold knife manual morcellation within a bag using an Alexis retractor for LSH.
The objectives of this surgical video are to:
- Highlight the clinical advantages and disadvantages between cervical removal or retention at the time of a minimally invasive laparoscopic hysterectomy
- Demonstrate the surgical nuances between TLH and LSH
- Provide a potential resource for patient counseling as well as medical student and resident education.
I encourage you to share this video as an educational resource with your colleagues, residents, students, and patients alike.

I hope to see you at the AAGL Global Congress on Minimally Invasive Gynecology in Vancouver, November 17–21, 2014. Visit www.aagl.org/globalcongress for more information.
— Dr. Arnold Advincula, AAGL 2014 Scientific Program Chair
Share your thoughts on this video! Send your Letter to the Editor to rbarbieri@frontlinemedcom.com. Please include your name and the city and state in which you practice.
It gives me great pleasure to introduce this month’s surgical video. The following feature presentation was produced by my third-year fellow, Mireille Truong, MD, and my third-year resident, Sarah Horvath, MD. The focus of this surgical video is to compare and contrast total laparoscopic hysterectomy (TLH) with laparoscopic supracervical hysterectomy (LSH). The indication for the TLH case was refractory dysmenorrhea and for the LSH case was as part of a concomitant sacrocervicopexy. The particular methods for specimen removal demonstrated include through the colpotomy for TLH and cold knife manual morcellation within a bag using an Alexis retractor for LSH.
The objectives of this surgical video are to:
- Highlight the clinical advantages and disadvantages between cervical removal or retention at the time of a minimally invasive laparoscopic hysterectomy
- Demonstrate the surgical nuances between TLH and LSH
- Provide a potential resource for patient counseling as well as medical student and resident education.
I encourage you to share this video as an educational resource with your colleagues, residents, students, and patients alike.
I hope to see you at the AAGL Global Congress on Minimally Invasive Gynecology in Vancouver, November 17–21, 2014. Visit www.aagl.org/globalcongress for more information.
— Dr. Arnold Advincula, AAGL 2014 Scientific Program Chair
Share your thoughts on this video! Send your Letter to the Editor to rbarbieri@frontlinemedcom.com. Please include your name and the city and state in which you practice.
Understanding the spectrum of multiport and single-site robotics for hysterectomy
We present this video with the objective of demonstrating a hysterectomy performed using the robotic single-site approach in juxtaposition with a robotic multiport hysterectomy. In the video, and briefly here, we review the benefits, disadvantages, and challenges of robotic single-site hysterectomy.
The advantages of single-site robotic hysterectomy include:
- possible improved aesthetics for the patient
- allowance for surgeon independence while minimizing the need for a bedside assistant
- automatic reassignment of the robotic arm controls
- circumvention of certain limitations seen in laparoscopic single-site procedures.
The disadvantages of single-site robotic hysterectomy include:
- instrumentation is nonwristed and less robust than that of multiport instrumentation
- decreased degrees of freedom
- longer suturing time
- restricted assistant port use
- decreased applicability to a wide range of procedures as the surgical approach is limited to less complex and smaller pathology.
Related articles:
The robot is broadly accessible less than 10 years after its introduction to gynecologic surgery. Janelle Yates (News for your Practice; December 2013)
The robot is gaining ground in gynecologic surgery. Should you be using it? Arnold P. Advincula MD; Cheryl B. Iglesia MD; Rosanne M. Kho MD; Jamal Mourad, DO; Marie Fidela R. Paraiso, MD; Jason D. Wright, MD (Roundtable; April 2013)
Identify your learning curve for robotic hysterectomy. Joshua L Woelk, MD, MS, and John B. Gebhart, MD, MS (Guest Editorial; April 2013)
In general, each step of the single-port procedure has been found to be equivalent in time to a multiport approach to robotic-assisted hysterectomy—except for the step of vaginal cuff closure. Since the initial experience, aside from overcoming the learning curve of a new surgical approach, various techniques have been modified in order to surmount this challenge, such as closing the vaginal cuff vertically, using a cutting needle versus a tapered needle, addition of a “plus one” wristed multiport robotic arm, or replacing the single-site robotic needle driver with a multiport 5-mm needle driver.
Nevertheless, widespread adoption of single-site robotic gynecologic surgery still requires further technological improvements, and further research and experience is needed to determine its role, benefits, and applications in gynecologic surgery.
--Dr. Arnold Advincula, AAGL 2014 Scientific Program Chair
WE WANT TO HEAR FROM YOU!Share your thoughts on this article. Send your Letter to the Editor to: rbarbieri@frontlinemedcom.com