In the first part of this series, “Preservation of the Anterior Cruciate Ligament: A Treatment Algorithm Based on Tear Location and Tissue Quality” we discussed the history of anterior cruciate ligament (ACL) preservation, and the historical outcomes of both open primary repair and augmented repair. We also presented our surgical treatment algorithm for ACL preservation, which is based on the tear location and tissue quality of the ligament remnant. In this article, we propose a modification of the Sherman classification1 to identify the different tear types, and we will discuss the different surgical techniques that can be used for each one. Furthermore, we aim to provide an overview of the variations of these techniques that are seen in the literature. It is important to emphasize that these tear types and corresponding surgical techniques are to be seen as guidelines, rather than strict criteria, and that significant overlap between these tear types and surgical indications exist.
Assessment of Tear Type and Tissue Quality
The first assessment of the tear location and tissue quality is made using magnetic resonance imaging (MRI). Although MRI can give you an idea of where the tear is located, the final assessment for eligibility of each specific preservation technique is made during arthroscopy. Therefore, the routine preoperative discussion and informed consent process with the patient should encompass the gamut of surgical possibilities ranging from repair to reconstruction.
The Table shows our tear type classification, along with the corresponding preservation surgical techniques.
The location of the tear is described as the length of the distal remnant compared to the total ligament length (in percentage). The tissue quality indicates the minimum tissue quality that is generally necessary to perform a certain surgical technique. If the tissue quality is less than what is necessary for a specific ACL preservation technique, it may still be possible to perform another technique. For example, if a type II tear is found to have poor tissue quality in the upper half of the ligament, but good tissue quality in the lower half of the ligament, the remnant with poor quality is debrided and then the surgical procedure that corresponds to the length of good tissue quality can be performed (in this case remnant tensioning or remnant preservation with soft tissue graft reconstruction).Surgical Preparation
In the operating room, the patient is placed in supine position on a standard operative table, such that the knee can be moved freely through its range of motion (ROM). The operative leg is then prepped and draped in standard fashion for knee arthroscopy. Standard knee arthroscopy equipment and implants are used, although some instruments from the standard shoulder set are also utilized. Anteromedial and anterolateral portals are created, and a general inspection of the knee is performed. By pulling the remnant ligament proximally using a broad tissue gasper, the available length of the remnant can be assessed. It is important to reduce possible anterior tibial subluxation in the sagittal plane in order to prevent “false” shortening of the distal ligament remnant. Once the length of the remnant tissue is assessed and the tissue quality is determined, the surgical preservation technique can be chosen (Table).
Type I Tears: Primary Repair
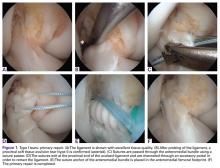
In order to be a candidate for arthroscopic primary repair, sufficient tissue length and tissue quality are necessary (Figures 1A and 1B, Table).
Sufficient length is seen if the distal remnant can be approximated to the femoral wall. Sufficient tissue quality is noted if sutures can be passed through the ligament and achieve good purchase. Once the ligament is deemed suitable for repair, a malleable Passport cannula (Arthrex) is placed in the anteromedial portal to facilitate suture passage and management of the repair.Sutures are then passed through the anteromedial bundle using the Scorpion Suture Passer (Arthrex) with a No. 2 FiberWire suture (Arthrex) (Figure 1C). Suturing is commenced at the intact distal end of the anteromedial bundle and is advanced in an alternating, interlocking Bunnell-type pattern towards the avulsed proximal end with approximately 4 mm to 5 mm between each pass. In general, 3 to 4 passes can be made before the final pass exits via the avulsed end of the ligament towards the femur (Figure 1D). The same process is then repeated for the posterolateral bundle of the ACL remnant with a No. 2 TigerWire suture (Arthrex) to optimize suture management. With each subsequent pass of the sutures, it is important to assess tissue resistance to prevent perforation of a previous stitch. Mild resistance is normal, but the suture-passing device should be repositioned when notably increased resistance is encountered. In addition, placing all of the bites in the same plane should be avoided since this can allow the sutures to “cheese cut” along the collagen fibers of the ligament remnant rather than holding firm.
After passing the sutures through both bundles, the sutures are guided outside the knee using an accessory stab incision situated just above the medial portal. Using this portal, the ligament can be retracted away from the femoral footprint for optimal visibility. The femoral footprint is then roughed using a shaver or burr, and bleeding is induced to stimulate a local healing response,2 while the sutures and the ACL are protected via the portal. With the knee in flexion, an accessory inferomedial portal is then created under direct visualization using a spinal needle for localization. Care should be taken to enable the appropriate trajectory for anchor placement to be achieved.
Many different techniques can be used to provide fixation of the ACL repair to the femoral footprint; the 2 most straightforward techniques are presented here. The first technique provides fixation with knotless suture anchors,3,4 whereas in the second technique the sutures are transosseously passed, and tied over a bone bridge, as was performed in the 1970s and 1980s.


