Take-Home Points
- Repair anterior bone defect on the glenoid related to recurrent anterior instability with preshaped, predrilled allograft.
- Avoid graft harvest complications related to coracoid (Latarjet) or iliac crest autograft.
- Simple guide system to allow for appropriate graft and screw placement.
- Soft tissues can be repaired to the allograft in predrilled suture holes either inside or outside of the graft
- Position the graft without step at the anterior glenoid.
Anteroinferior glenoid bone loss plays a significant role in recurrent glenohumeral instability. Arthroscopic capsulolabral reconstruction has been associated with a recurrence rate of 4% in the absence of significant glenoid bone loss but 67% in patients with either bone loss of more than 25% of the inferior glenoid diameter or an engaging Hill-Sachs lesion.1,2 Anteroinferior glenoid rim deficiency has been reported in up to 90% of cases of recurrent instability.3 Glenoid reconstruction is therefore recommended in patients with bone loss of more than 25% and in certain revision cases.4 Surgical strategies in these cases include coracoid transfer, iliac crest autograft, and allograft (osteochondral and iliac crest). These procedures all successfully restore stability of the glenohumeral joint. However, they carry the drawbacks of technical complexity with increased operative time or risk of neurovascular damage, or they create a nonanatomical reconstruction, which may contribute to subsequent instability arthropathy. In this article, we introduce a technique in which a preshaped allograft (Glenojet; Arthrosurface, Inc.) is used to match the contour of the glenoid defect. The graft is simple to insert and can reduce operative time.
Graft Preparation
The shaped human tissue cortical bone allograft is usually prepared from proximal or distal tibia or femur. There is no cartilage on the graft. It can be ordered in 2 sizes, 10 mm × 29 mm and 13 mm × 34 mm, for different amounts of bone loss. The more commonly used smaller graft reconstructs defects of 20% to 30% of the glenoid.
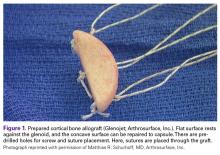
The graft has a flat surface that abuts the glenoid and a concave surface that repairs to the capsule. The graft has predrilled holes for cortical screw placement as well as smaller holes for threading suture for capsule repair. It is shaped to match the contour of the glenoid (Figure 1).The sutures through this allograft can be prepared on the back table while the rest of the equipment is set up. Start by tying a No. 2 FiberWire (or equivalent) over a small thin object, such as a Freer elevator. Once the knot is secure, remove the Freer and trim the knot tails short. Thread another suture through the loop that has been created and pull to make the 2 tails even. Then thread these tails through one of the small holes of the graft, going from the flat side to the concave side. Pull the suture tails all the way through, including through the loop of the prior suture. The knot of the loop prevents the entire construct from pulling through. The suture tails are then able to slide as if attached to an anchor. Repeat these steps for the other 2 small holes to get a total of 3 sutures exiting the concave side of the graft (Figure 1). Alternatively, pass the suture the opposite way, if tying the capsule inside the graft is preferred.
Surgical Technique
A standard deltopectoral approach is used to expose the anterior glenoid. The subscapularis can either be split in line with its fibers or tenotomized with 1 cm to 2 cm attached to the tuberosity for later repair. In either instance, it is important to separate the muscle from the underlying capsule layer, as the capsule is what is directly repaired to the graft.
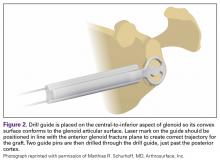
The capsule is carefully peeled off the anterior glenoid. A Fukuda or similar retractor may be used on the humerus, and a glenoid retractor is placed on the anterior glenoid, under the capsule and subscapularis, for optimal exposure. Once the anterior glenoid surface is exposed, the drill guide is placed flush against the surface of the glenoid.
It is important to confirm the guide is seated flush on the glenoid, as this ensures correct positioning, angulation, and alignment of the graft. The laser mark on the guide is positioned in line with the anterior glenoid fracture plane. The guide is securely held while 2 guide pins are drilled in place, until just past the posterior cortex of the glenoid (Figure 2).The guide is removed. The cannulated reamer is introduced and advanced until the guide pin appears in the viewing window of the reamer and hits the stop—approximating the correct amount of bone to remove. This step is repeated for the second guide pin. Reaming flattens the anterior glenoid and allows for maximal stable apposition of the graft to the glenoid. The allograft is then inserted onto the pins in the correct orientation to match the surface of the native glenoid.
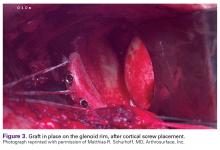
The length of the superior guide pin is measured with the depth gauge device. It is then removed, and the appropriate-length 3.5-mm cortical bone screw is inserted (alternatively, the guide pin is removed, and a standard depth gauge is used to measure screw length). Once the superior guide pin is secure, the process is repeated for the inferior guide pin (Figure 3).
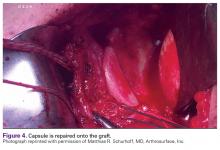
The screws should have excellent bicortical fixation. Although we have not had any intraoperative graft fractures, overtensioning of the screws could cause the graft to fail at the screw site at follow-up. Therefore, we recommend not overtightening the screws.Once the graft is secure, the capsule is attached to the graft with the use of a free needle on the suture of the graft (Figure 4).
The capsule is advanced as necessary for appropriate anterior soft-tissue tensioning. Once the capsular repair is complete, the subscapularis is repaired as necessary.


